Double switch

Joined
27 Apr 2009
Messages
27
Reaction score
1
Location
Bristol
Country
United Kingdom
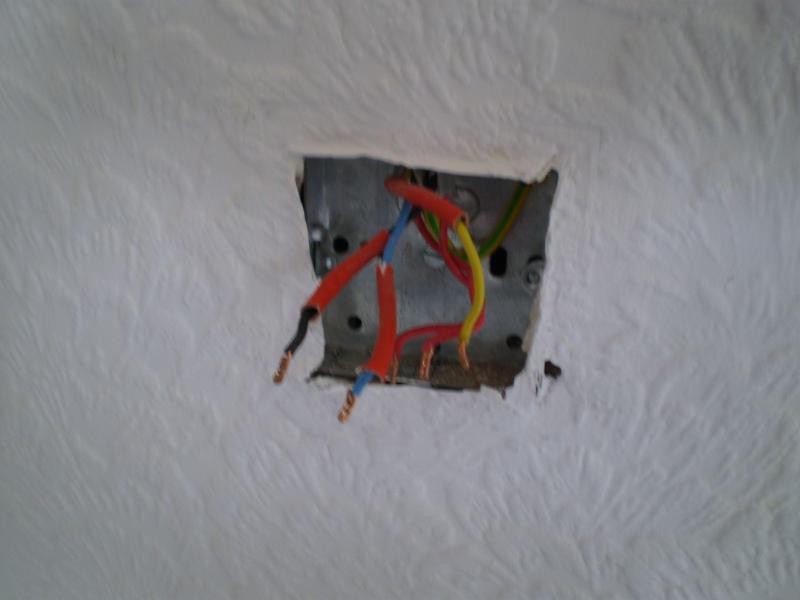
I remembered to do a sketch of where/how the switch I was replacing was wired. Then removed the switch.

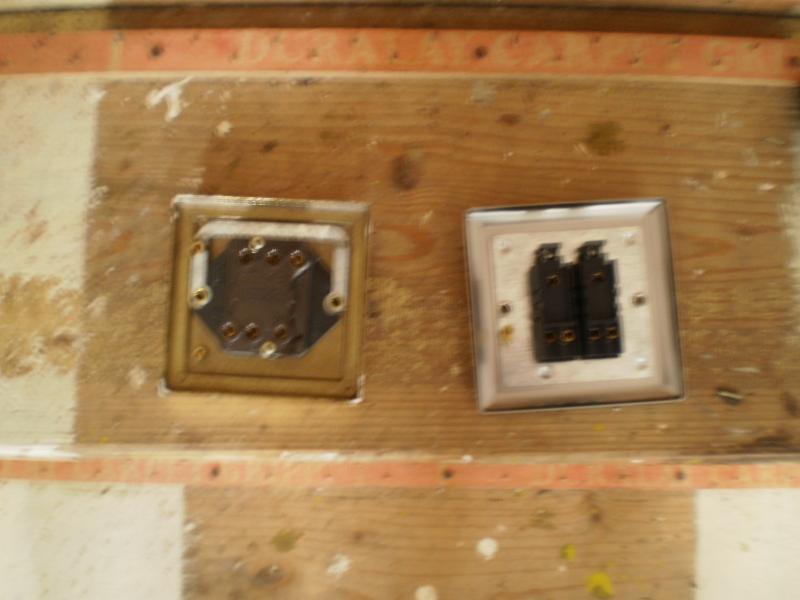
When I picked up the new switch, it was different!

See below

The blue with red sleve and black with red sleve went in at top of switch the two reds and yellow went at bottom yellow in right side.

The new switch below has four terminals at top and two below.


Sorry about the poor quality of the pictures.

Can anyone tell me how to wire the new switch please?
 
Sponsored Links
The terminals relating to the seperate switches are usually in a triangular formation behind each switch rocker. It looks one switch had one upright triangle and one inverted triangle. The division is often marked with a diagomal line moulded on the back of the switch.

It looks like the other switch has it's connections in two upright triangles, so you need to flip half your wiring diagram upside down.

Note the labelling of the terminals. That describes the function of each terminal. It's usually something like Com, L1 and L2 for each switch.
 
OK, so the blue wire with the red sleve and the black wire with red sleve in the two single terminals.

What goes where in the four lower terminals?
 
Sponsored Links
What are the markings on the terminals of the old and new switches?

Old switch:

Com L1 L2


L1 L2 Com


New Switch:

Com Com


1 Way 2 Way 1 Way 2Way


Old switch

Com - Red wire L1 Red wire L2 Yellow


L1 nothing L2 Black Com Blue
Red sleve Red sleve


Does this help?

Thanks for the feedback thus fare
 
As I said, the terminals are arranged in triangles. Com on the top row is associated with L1 and L2 on the bottom row. L1 and L2 on the top with Com on the bottom.

Split your diagram in half, turn the right hand half upside down and it will match your new switch.
Com = Com
L1 = 1Way
L2 = 2 Way

If one switch works upside down, swap it's wires between 1 way and 2 way.
 
And buy a multimeter before you attempt any more electrical work.

Why would I want to purchase a multimeter when I already own one, sorry, did I miss where you told me to use one?

Thanks TicklyT for your input which was very helpful.

BSA, if you are going to be so I am the greatest and offer no usable help, why don't you migrate over to another forum where you will find others just as obnoxious as yourself.
 
What happened to BAS's reply to Mr Ms last post?

It wasn't at all helpful but don't see why it has been deleted.

Was thinking of a reply even!
 
As TicklyT said, on the switch on the left in your picture, the left gang (switch) has COM at the top, and L1, L2 at the bottom. The right side of the switch has COM at the bottom and L1, L2 at the top. The switch on the right the COM's for each gang at the top.

You just need to wire the new switch to the terminals with the same or similar name. The L1 terminal is equivalent to 1WAY, L2 is equivalent to 2WAY.
 
Why would I want to purchase a multimeter when I already own one, sorry, did I miss where you told me to use one?
My apologies - I assumed that the lack of one was the reason you didn't use it to work out which switch terminals went with which, not because you couldn't be bothered.
 
Or, maybe he's just a DIYer who doesn't know how you would do that?
 
So you're suggesting that he doesn't know how to use his multimeter to check continuity, and he doesn't know what a switch does?
 

DIYnot Local

Staff member

If you need to find a tradesperson to get your job done, please try our local search below, or if you are doing it yourself you can find suppliers local to you.

Select the supplier or trade you require, enter your location to begin your search.


Are you a trade or supplier? You can create your listing free at DIYnot Local

 
Sponsored Links
Back
Top