Downstairs loo/cloakroom make over

Joined
17 Nov 2005
Messages
231
Reaction score
4
Location
Cardiff
Country
United Kingdom
I live in a new build (2001) which has a downstairs loo/ washbasin.
Nice size but it's time for a make over. I want a hidden cistern so with back to wall toilet. I wish there was a vanity unit that would fit between walls but the distance is 880mm and I have only seen 600mm units.

The idea is to then tile the floor and mount a floating half vanity wash basin unit.
I have seen somebody's attempt to custom build there own unit which I have added here.

I was hoping for more photos/ideas and if somebody has custom made there own unit to hide the cistern.

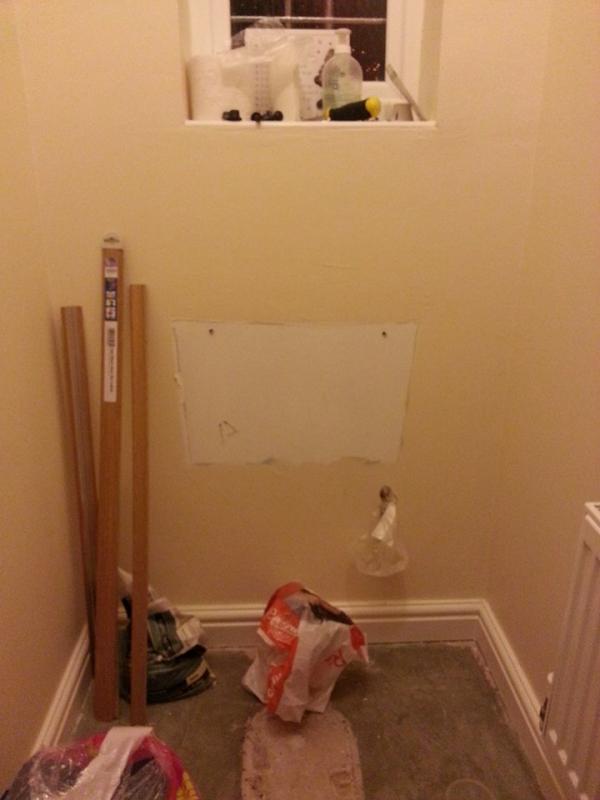
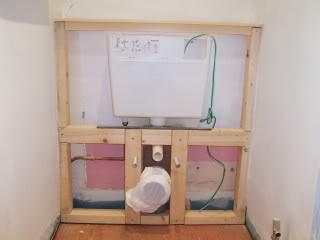
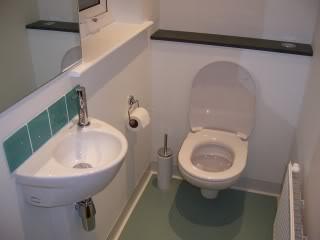
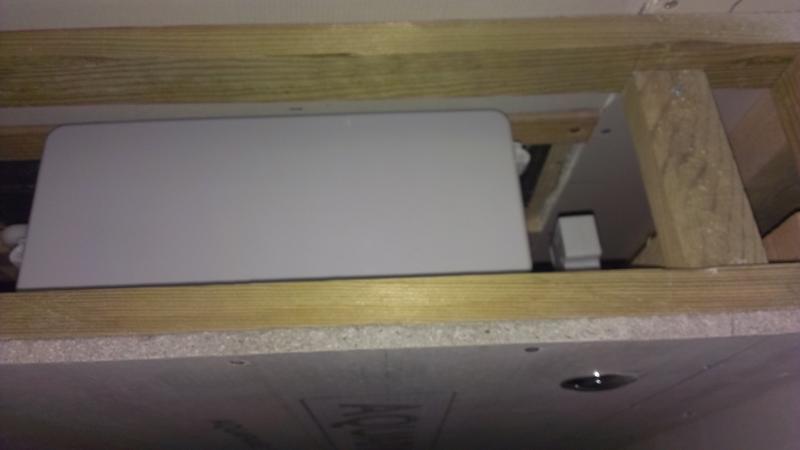
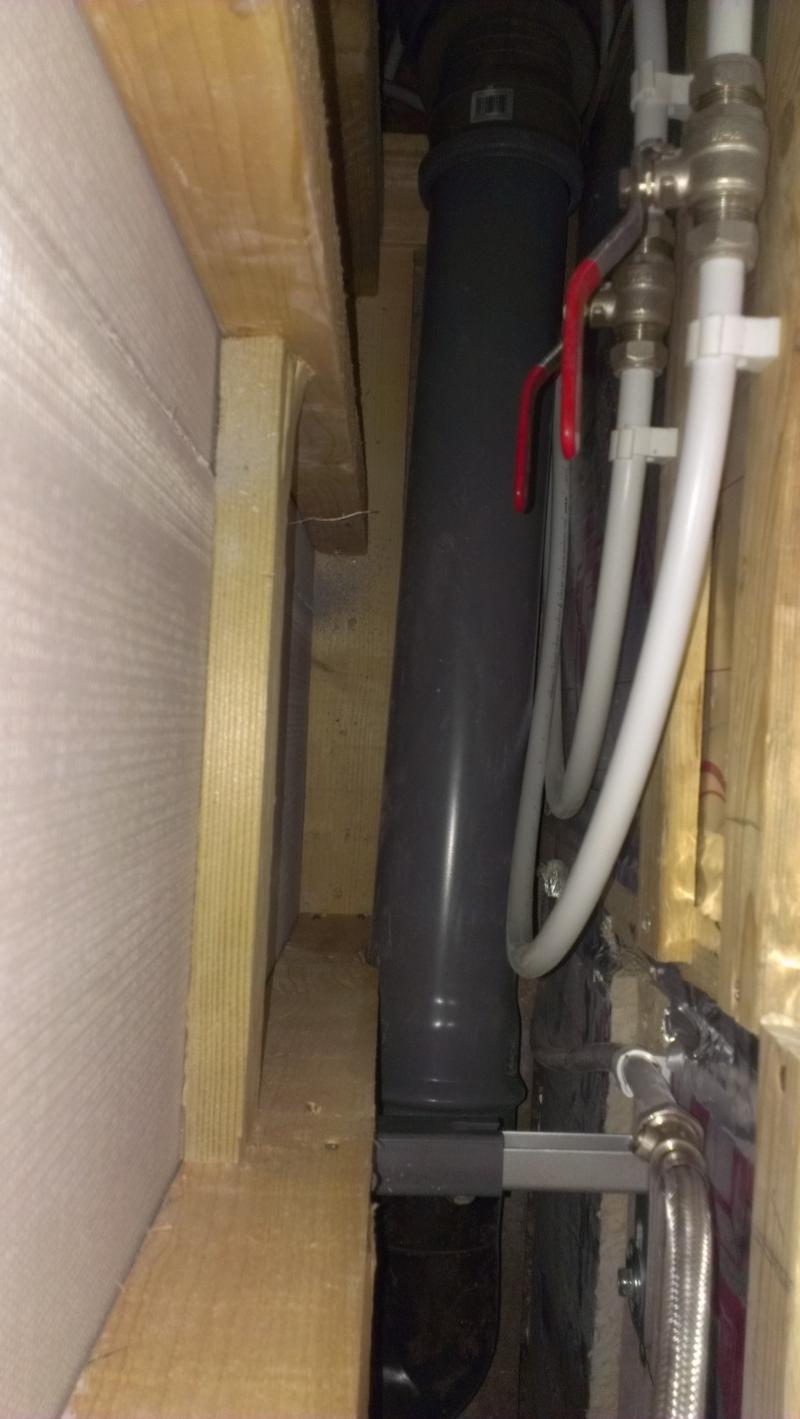
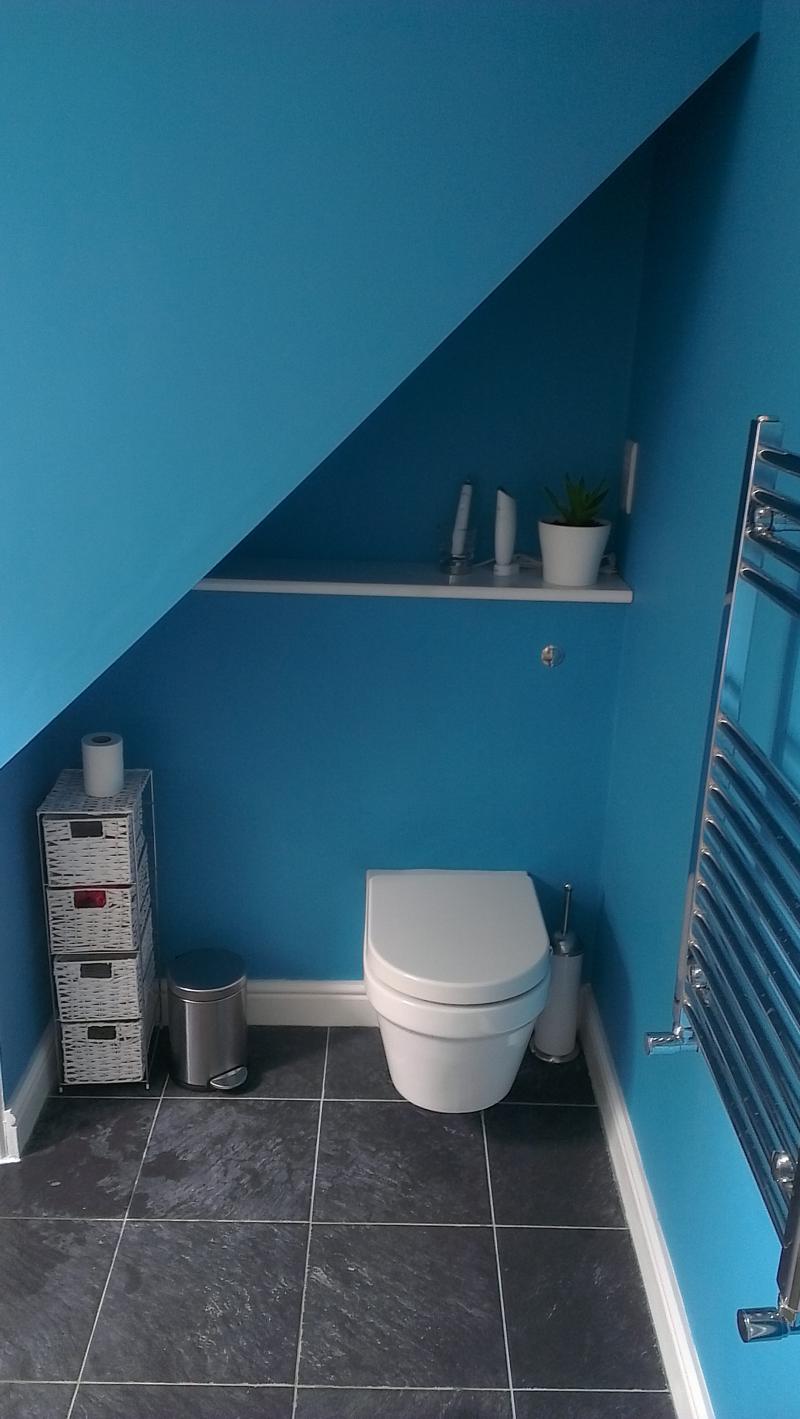
2 images I have uploaded are what I found on a forum. One is showing a custom made frame to hide cistern (which is what I am aiming for). The other image is the finished project I found. The third is my current set. So I'll have to removed toilet and cistern. And build a frame like in the uploaded image. I am looking for tips and images maybe by others who have done this. Thanks


[/img]
 
Sponsored Links
vanity units can be made wider by using 'fillers' from the same range and a custom length top. we've used them at work. do not be put off by not finding one the exact size.

otherwise, building your own frame is very easy and probably much cheaper than buying a ready made vanity. just frame it, install the frame for the toilet, board out with plasterboard, skim, paint. leave the top removable for access to cistern, and make sure you have access to any isolation valves.
 
Some good advice Berty. Thanks.
I am wondering which toilet to go for ie floating back to wall or the back to wall where it touches the floor. In the image I have uploaded it looks like a floating toilet secured to the frame. I am sure a frame would support it. The back wall behind my toilet is plasterboard probably thermal bricks then outside bricks.
What do you think?

I am ok with fitting a top which will pop off but if I put one piece plasterboard over frame then I am not going to get at isolation valve. That's on the right hand side of cistern. Maybe I could reach down from the top if my arm is long enough? Either front panel will be secure and painted so has to go in from the top. Yes I think there will be enough space and access from the top to get to the isolation valve :)
 
In the picture you've posted they have secured the toilet to the wooden frame they've made (at least that's what it looks like). This is fine, or you can buy a toilet mounting frame (which is what I did). This is bolted to the wall behind, and the floor making for a very secure toilet.

here's some pictures of mine which was done exactly as I suggested.


as you can see my isolation valves are reachable from the top.


the toilet in the picture is this one http://www.bathstore.com/products/euro-mono-wall-hung-pan-1046.html
notice the frame in the pictures (this may not some supplied with the toilet, might have to be purchased seperately)
 
Sponsored Links
Thanks Berty.
Looks a good job. Smarter toilet when not touching floor.
I take it the red levers (in one image) are the isolation valves? Rather then the ones you with a screw that you turn? What position would I be looking from at that image?

Is that plasterboard you are using to secure to front of frame?

I am going to have to think carefully to how I will secure the toilet to the frame. Tomorrow I will remove the toilet and cistern. Take them to the skip.
I will have to buy some timber. Any idea what size? 4 x4 or 2 x 4?
Then I will have to remove some of the skirting. I should think you would bolt some timber along the floor as well as screw the frame to the sides of the wall which is plasterboard.
 
The wooden frame doesn't have to be very substantial at all if you're using one of the recommended steel mounting frames as all of the weight goes through that rather than your timber frame.

I used 2x4 and smaller to make frame then clad the whole thing with plasterboard.

The view in that picture is looking down with the top removed. The left hand side of the image is the front (you can see the back of the plasterboard). The right hand side of the image is the rear wall. You can see the large black soil pipe just turning 90 degrees into the toilet at the bottom of the picture. The red valves are isolation for my shower (it's a wet room). the isolation for the toilet is one of the standard screwdriver types and you can just see it in the lower third of that image on the silver braided pipe. In that same area you can see the left hand side of the toilet mounting frame (grey metal) and its mounting to the rear wall.

here's a video which shows the general idea of wall hung toilets. i would recommend buying the toilet and brackets before building your frame it'll make much more sense when you can see it and offer it into position.

http://www.youtube.com/watch?v=g9UuGKTIk98

Replace the metal framing they use with wood and you're sorted ;)
 
Cheers Berty. Amazing video.

I noticed in that video they sealed all the plasterboard.

One crucial important thing.
I have no problem bolting the frame into the floor. But what about the thermal brick behind the plasterboard? I do believe it to be that grey crumbling brick. The bolts would have to go through the plasterboard then that thermal brick? Special raw plugs needed? Is yours house brick? Cheers
 
you don't need to seal the plasterboard.
yes, my wall is normal brick. you will have to secure to the brick not the plasterboard. you will be fine so long as you use the correct wall plugs for your type of brick.

if unsure which plug to use, try asking for advice in the Building subforum.

oh and don't forget to keep us updated on your progress!
 
I meant it looked like they enclosed the job without access to cistern and isolation valve. Yes I will make sure I get the right raw plugs. Will keep you updated. Cheers
 

Ok removed the toilet and cistern. Took them to the skip.
Now figuring out which frame and how I will build this stud frame around it as support as I believe the wall behind the plasterboard is thermalite which can crumble. Any thoughts?

I have been looking on youtube. Wall to wall measures 88cm and floor to window sill 107cm.
 
Don't fix anything heavy to thermalite, regardless of the standard of fixing.

I would build a frame and secure it to the studs in the walls at the side (I think you said these are stud walls) (provided these are beefy enough). Even if these are thermalite walls fixing into them would be better than to the back wall as the fixing cannot be pulled out.
 
H i Steve

Yes I think if a good solid frame was built with good timber securing the rear timber to the back wall spreading the load then a frame to hold the toilet can be screwed into the timber itself. I have seen a video on youtube whereby it screws into base and sides of timber. Rather than the rear wall. I just need pointing in right direction for this type of frame for this size room.

This is one I have seen but the studding goes up to the ceiling. But this frame screws into side studding.

http://www.youtube.com/watch?v=16WXu5E4ahM
 
Ok been in touch with a nice man at Geberit cistern frames ref to wall hung toilet.

He rang me up and told me he's installed 3 in his house and has same type of construction house as me. Plasterboard with thermalite blocks at the rear.
He's emailed me with a few links to what I require. He said use a supporting rail (see link) to fasten across the wall with extra bolts will thread through the plasterboard and into the themalite blocks. He told me he used extra long bolts which may go as far into the house bricks. Of course two bolts for the floor. So this is a relief. Tell me what you think guys? :)


http://catalog.geberit.com/public/product.aspx?cat=GB_GB-en_1&paging=True&p=75074

http://catalog.geberit.com/public/product.aspx?cat=GB_GB-en_1&paging=True&p=73832
 

This is what I have done so far. Secured the frame to wall by long studs set in chemical resin. Also secured to the floor. Screwed brackets around frame.
I have 12mm plasterboard ready to cut and box around. But I am still unsure what toilet to buy.

It has been suggested this one but the securing nuts (to frame) are invisible which is what I prefer but how difficult is this to secure to the frame? Anybody know?

http://www.easy-bathrooms.co.uk/dur...-toilet.html?gclid=CLGStNGMq74CFdShtAodtl4Ang
 
Fixing the toilet wont be difficult even with invisible fixings. They all come with instructions.

Is it me or is your frame work slightly out of line? This might cause a problem when you come to add the plasterboard.

The plasterboard needs to be nice and tight to the frame or it'll bend/bow/creak when weight is put on the toilet.
 

DIYnot Local

Staff member

If you need to find a tradesperson to get your job done, please try our local search below, or if you are doing it yourself you can find suppliers local to you.

Select the supplier or trade you require, enter your location to begin your search.


Are you a trade or supplier? You can create your listing free at DIYnot Local

 
Sponsored Links
Back
Top