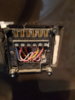
Assume that you mean Nest Heatlink. So my comments are based on that. Also, that your existing plumbing set up allows independent control of the heating and hot water (ie you can have the central heating on without the hot water having to be on at the same time) The Tempus 6 terminals have the functions as shown in the diagram below:
So from this you can identify what the wires in each of the terminals does. Is then a matter of wiring them into the Heatlink terminals that have exactly the same function. This is determined from the diagram below:
N and L are straightforward, the terminals are labelled the same at the Tempus and Heatlink
Tempus 'CH On' (terminal 4) is called 'Heating call for heat' (terminal 3) by Nest
Tempus 'HW On' (terminal 3) is called 'Hot water call for heat' (terminal 6) by Nest
Next you need to add wires links, so that the two Heatlink 'Common' terminals (2 & 5) are also connected to the 'L' terminal.
The Nest room thermostat can be powered by wiring it to T1 & T2 or by using a separate plug in power supply.
Finally any existing room thermostat needs to be taken out of operation. [You can ignore this bit if you don't have a room thermostat]
There are several ways this can be done, here are 3 options. It can't simply be disconnected as this would leave the heating wiring 'open circuit' and the heating will not operate.
1. Trace the thermostat cable back to its origin. Note where the wires are connected and disconnect the cable. Then insert a wire link so that the terminals where the two ‘live’ switching wires came from are joined together.
2. Remove the existing thermostat and replace it with a junction box, connect the two ‘live’ switching wires together and isolate the neutral (if there is one)
3. Leave the existing room thermostat in place, and join the ‘live’ switching wires together so that they are permanently connected.