- Joined
- 23 Dec 2019
- Messages
- 4
- Reaction score
- 0
- Country

Hi all,
Bear with me with my detailed post, but I thought more information is better than too little!
I've done a lot of researching on the net and a bit on this forum and i'm looking for some advice and also give you my opinions/findings too!
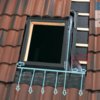
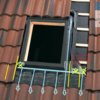
My parents have a fairly recent rear extention built (about 4 years ago), south facing, with a low pitch, tiled (redland 49 interlocking) roof, and a velux window.
I now feel the pitch was too low for tiles, but building control approved it and up until now there have been no issues.
Recently however with the windy heavy rain there was a leak in the kitchen extention with water dripping through one of the spotlights below the velux (around 1 drip every 20 sec).
We've had windy, stormy rain in the past so I couldn't see why it's leaking now (there isn't any cracked or missing tiles.
Over the weekend while it wasn't raining I decided investigate further, popping my head through the velux and also going on to the roof.
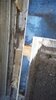
Looking along the side flashing channel, there seems to be a bit of a gap above the channel ridge and the side profile of the tiles (so if there was strong cross wind, the rain could get through these gaps (if that makes sense).
I pulled the bottom 2 rows of tiles that run up along the side of the velux flashing (on both sides) and noticed on one side the membrane was quite damp beneath the bottom corner of the velux (the other side seemed ok). This seemed to match with the drip coming through the same side of the spotlight
The foam trim that runs along the 2nd channel of the velux flushing had totally disintergrated into a mess (on both sides), and it seems like under heavy rain (especially when windy), the rain got through the gaps on above the first rain channel ridge & tiles and into the 2nd channel.
As there wasn't any foam left, the water stream breached the 2nd gutter channel onto the membrane.
The flashing kit looks like the EDZ:
And as you can see around the 2:35 mark, the the corners of the flashing have to be folded over like a triangle - probably to channel the water onto the tiles - HOWEVER, the bottom corners of my flashing were not folded, so I suspect that the water just ran off the sides onto the membrane.
I believe the EDZ flashing kit has now been superceded by the EDW:
And as you can see the bottom flashing design is modified with a triangular ends and a lip - I would guess so the water doesn't run off the sides!
I have now folded the corners like instructed in the video, so I'll see what the results will be!
I would need to replace the foam strip that runs along the 2nd gully of the flashing (under the tile) - Any idea where I can get the foam only from?
Finally, i've also noticed at the top of the velux window, the row of tiles are very close to the velux window and cover most of the top drainage gully (probably 10mm gap)- after reading a bit online and watching the velux installation videos, a minimum gap of 60mm should have been left!!!
I think I should be able to push back the row of tiles that run along the top of the velux back to expose the required gap (i'll have to use an angle grinder to cut out a corner piece where I can't push the tile back).
My other quest is, what happends when there isn't the recommend gap above the top of the velux and the tiles?
I can't seem to work out what the negative effect would be and if it has contributed to the leak
Thanks and apologies again for the long-winded post, but hopefully I also may have helped others with what I uncovered!
Bear with me with my detailed post, but I thought more information is better than too little!
I've done a lot of researching on the net and a bit on this forum and i'm looking for some advice and also give you my opinions/findings too!
My parents have a fairly recent rear extention built (about 4 years ago), south facing, with a low pitch, tiled (redland 49 interlocking) roof, and a velux window.
I now feel the pitch was too low for tiles, but building control approved it and up until now there have been no issues.
Recently however with the windy heavy rain there was a leak in the kitchen extention with water dripping through one of the spotlights below the velux (around 1 drip every 20 sec).
We've had windy, stormy rain in the past so I couldn't see why it's leaking now (there isn't any cracked or missing tiles.
Over the weekend while it wasn't raining I decided investigate further, popping my head through the velux and also going on to the roof.
Looking along the side flashing channel, there seems to be a bit of a gap above the channel ridge and the side profile of the tiles (so if there was strong cross wind, the rain could get through these gaps (if that makes sense).
I pulled the bottom 2 rows of tiles that run up along the side of the velux flashing (on both sides) and noticed on one side the membrane was quite damp beneath the bottom corner of the velux (the other side seemed ok). This seemed to match with the drip coming through the same side of the spotlight
The foam trim that runs along the 2nd channel of the velux flushing had totally disintergrated into a mess (on both sides), and it seems like under heavy rain (especially when windy), the rain got through the gaps on above the first rain channel ridge & tiles and into the 2nd channel.
As there wasn't any foam left, the water stream breached the 2nd gutter channel onto the membrane.
The flashing kit looks like the EDZ:
And as you can see around the 2:35 mark, the the corners of the flashing have to be folded over like a triangle - probably to channel the water onto the tiles - HOWEVER, the bottom corners of my flashing were not folded, so I suspect that the water just ran off the sides onto the membrane.
I believe the EDZ flashing kit has now been superceded by the EDW:
And as you can see the bottom flashing design is modified with a triangular ends and a lip - I would guess so the water doesn't run off the sides!
I have now folded the corners like instructed in the video, so I'll see what the results will be!
I would need to replace the foam strip that runs along the 2nd gully of the flashing (under the tile) - Any idea where I can get the foam only from?
Finally, i've also noticed at the top of the velux window, the row of tiles are very close to the velux window and cover most of the top drainage gully (probably 10mm gap)- after reading a bit online and watching the velux installation videos, a minimum gap of 60mm should have been left!!!
I think I should be able to push back the row of tiles that run along the top of the velux back to expose the required gap (i'll have to use an angle grinder to cut out a corner piece where I can't push the tile back).
My other quest is, what happends when there isn't the recommend gap above the top of the velux and the tiles?
I can't seem to work out what the negative effect would be and if it has contributed to the leak
Thanks and apologies again for the long-winded post, but hopefully I also may have helped others with what I uncovered!
Last edited: