Randall 3020P replacement (wired different)

Joined
7 May 2011
Messages
254
Reaction score
8
Location
Durham
Country
United Kingdom
I've seen another thread on here, but wired differently to mine.
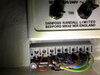
I have 4 cables running into the Randall 3020P control box. The wiring into the terminals as follows :

1 = empty
2 = x1 red
3 = x2 neutral (1 black, 1 brown)
4= 1 black
5= empty
6= x2 brown
7 = x3 blue
Earth = x3 green&yellow

Ive read that not all control boxes are suitable for gravity fed heating. Sny suggestions on a replacement?
 

Attachments

  • IMG_20210626_201352.jpg
    IMG_20210626_201352.jpg
    219.1 KB · Views: 385
Sponsored Links
Ah right, thanks for the info. Is there a compatible replacement i could get where i can look up the corresponding terminals to wire it up? Just something basic without fiddly timer functions
 
tell us what system you actually have , you will have a Y plan or S plan open vented system, no such thing as a gravity CH system, you might have a gravity HW system completely different thing, pics are best
 
Sponsored Links
Dug out some papers. Baxi Bermuda 552 with an indirect loft tank fitted.
The reason for wanting to change the control box is because the timer clock is noisey and i never use it. Can i disconnect the power to the clock mechanism and keep the switches?
 
Last edited:
just locate and cut the live to the motor in the programmer, it will be worn cogs in the mechanism that are making the noise, remember and safely isoltae the wire after cutting it, then you can just turn things on and off manually, the clock wont go round but the noise will stop
 
Best to cut the motor wire in a location where it could be reconnected again in the future.

I had a new one of those a couple of years ago and sold it on Ebay.

I was surprised at just how popular it was and how it sold for a good price of close to £30 ! Seems some people do like something more simple.

The manufacturers seem to employ computer engineers to design something only computer engineers can understand!
 
For fellow novices :
Unscrewed the rings on Base of the switches and pulled cover off.
Unscrewed the 2 screws at the top and slid unit up backing plate to unplug it from bottom unit, took back off unit and removed the 2 thin wires to the clock
 
  • Thanks
Reactions: CBW

DIYnot Local

Staff member

If you need to find a tradesperson to get your job done, please try our local search below, or if you are doing it yourself you can find suppliers local to you.

Select the supplier or trade you require, enter your location to begin your search.


Are you a trade or supplier? You can create your listing free at DIYnot Local

 
Sponsored Links
Back
Top