Bathroom revamp and redocoration

Joined
18 Oct 2020
Messages
68
Reaction score
1
Country
United Kingdom
Hello guys, I have a few queries. I'm hoping you might be able to help me with the ones you have experience of please. Ok...
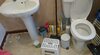
1) how can I cap off the sink and toilet to redecorate behind? One key problem is that the sink is pinned to the wall and so I want to patch the wall without fixing it back, but still be able to use it until we can get a plumber... Note getting any trade is a nightmare right now. Is it possible to still use the sink and toilet when taken away from the walls?
2) how can you get broken nails out of a solid plaster wall the paint over?
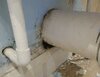
3) when the previous owner installed an electric shower they destroyed the plasterwall below the bath to run the pipe. This meant the tiles weren't secure and so the seal leaked over the bath. How can I repair the wall below strong enough for us to secure the tiles again?
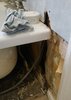
4) what can I do/material to use to repair the plaster around the sink drain pipe and the refuse pipe from the toilet?
5) when is it best to put the new lino down? . Before the new toilet and sink goes in?
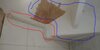
6) we have curved walls in the bathroom and looks like grout has been used to bodge... Any recommendations on fixing this better?
7) How can I best secure a new towel rail to a hollow plaster wall? And does the bathroom rad have to have the correct BTU because it's a big bathroom as it was an old bedroom?
8) what is the best way to repair plaster where the holes are too big to repair using polyfiller?
Some pictures to follow
 

Attachments

  • DSC_2413.JPG
    DSC_2413.JPG
    157.5 KB · Views: 55
Sponsored Links
Ok, you have at least 1 broken screw hole in your basin, and if you want to use the sanitary-ware whilst removed, you’d have to extend pipework etc. To remove you can isolate the water to each pipe if there’s isolation valves, if not, then I recommend fitting them, full bore too.

expose more of the wall for broken nail, enough to get a grip of it.

I believe cement based boards would be the solution to point 3, but I’ve never used them.

For the towel rail, either timber battens in the wall, or some stronger plasterboard fixings, like grip-it.

As you say, more photos would be better.
 
Thankyou CBW.
So I'm not so confident on extending pipework... Especially drain pipe.
I have just had a look at the full bore valves. So these can go below the flexible metal pipe you think on to the white flexible 15mm inlets?
I will get more photos over thanks again
 
First image is an overall view
2) refuse pipe from toilet with destroyed plaster
3) red line indicates piled up grout... And blue shows how wall is structured in the corner with corner structure where moisture collects and then mold build ls
4) destroyed plaster board behind bath panel where shower cold water inlet was piped in
Thankyou
 

Attachments

  • _20211208_134939.JPG
    _20211208_134939.JPG
    160.3 KB · Views: 56
  • _20211209_132305.JPG
    _20211209_132305.JPG
    228.1 KB · Views: 58
  • _20211209_132217.JPG
    _20211209_132217.JPG
    97.1 KB · Views: 54
  • _20211209_132020.JPG
    _20211209_132020.JPG
    213.7 KB · Views: 63
Sponsored Links
I have had to polyfilla around 30mm holes over 3 different coats.... Where the old rad wasn't secured properly and pulled away form the wall... Will the GRIP ITS still work...? Didn't want to destroy the repaired and painted wall I just did.
Thanks
 
Personally, i'd just rip all that out, and fit new, proper stuff, properly.
I'd also fit an extract fan.

It looks a disaster.
 
CBW.. can you shed any light on things.. Need positive progress unlike that from blueloo
 
CBW.. can you shed any light on things.. Need positive progress unlike that from blueloo
It is positive. Although perhaps a bit harsh.

Your bath needs removing, the rot removing and then properly sealing on the wall sides with modern sealing solutions. Same for the toilet, where it looks like you have damaged walls and damp (hence my comment about an extract fan).

My experience is that half a job has to be done twice and the walls in the pictures look in poor shape. You want to be really getting them right before you put any ware in the room and thats much easier if you take it all out and do it afresh.

Didn't mean to come across brash soz :)
 
I have had to polyfilla around 30mm holes over 3 different coats.... Where the old rad wasn't secured properly and pulled away form the wall... Will the GRIP ITS still work...? Didn't want to destroy the repaired and painted wall I just did.
Thanks
You could always try different securing holes, or create new ones, just ensure it’s supported properly, failing that I’d go for timber battens behind.
 
With regards the bath - personally, I’d get it removed, fix everything needed to ensure no more leaks, otherwise you’ll be doing it every year or so.

The “destroyed” plaster behind the toilet looks minimal, so polyfilla, or maybe one-coat plaster.

If you’re only removing certain parts to decorate, then no need for isolation valves, unless it’s going to take a long time. If you want to fit them, make sure you use inserts in that plastic pipe.

20 years ago, my bath was installed the same way as the OPs as that was the only way (i believe) at the time.
I had a very good sealing strip on it which moved with the bath and worked great (bloody expensive though). However, technology has moved on and when i went to replace the seal as it had begun to fail, i discovered that thede strips are not commonly used anymore and putting the bath against the tiles is no longer std practice. I couldn't retile my bathroom for the sake of a seal so managed to find a substitute (sealux).

The modern way is to use a seal upstand and tile past it, onto the bath (see the sealux web site). This looks a far better bath seal solution. It's one i would recommend to the Op if he's looking to redo the bath.

I'll eventually do this myself but other jobs are more pressing!
 

DIYnot Local

Staff member

If you need to find a tradesperson to get your job done, please try our local search below, or if you are doing it yourself you can find suppliers local to you.

Select the supplier or trade you require, enter your location to begin your search.


Are you a trade or supplier? You can create your listing free at DIYnot Local

 
Sponsored Links
Back
Top