
You are using an out of date browser. It may not display this or other websites correctly.
You should upgrade or use an alternative browser.
You should upgrade or use an alternative browser.
DIY Bath panel
- Thread starter CrazyFool
- Start date
Just slots together .Apologies, I realise this is an old thread but really interested in replacing my cracked P shaped bath panel.
The soffit looks ideal. Do they slot together? If not, how do you connect them together seamlessly?
Thanks.
Dragons, I come here today looking for £80k in exchange for 20% of my business ...Just sorted one for my nephew, used soffit pvc, its twin walled so ripped the rear every panel to reduce it to single thickness which bends easily.
Lay ply or board over top edge to mark shape of curve , cut this out and fix to floor inline to hold the base of panel and finish with pvc trim to form a skirting. water proof and easily cleaned.
White silicon to seal all gaps.Best of all just £10 for plastic.
View attachment 186486
Might be a silly question, but what did you use to rip the back layer off? Some of the soffit I'm looking at says it's a honeycomb construction.Just sorted one for my nephew, used soffit pvc, its twin walled so ripped the rear every panel to reduce it to single thickness which bends easily.
Lay ply or board over top edge to mark shape of curve , cut this out and fix to floor inline to hold the base of panel and finish with pvc trim to form a skirting. water proof and easily cleaned.
White silicon to seal all gaps.Best of all just £10 for plastic.
View attachment 186486
Did not rip the back off , just rip cuts vertically to leave single skin to front which allows it to flex. Use mini circular saw set to 5mm depth of cut.
I think I need to see a bit of soffit to understand what you mean. Thanks for the reply .Did not rip the back off , just rip cuts vertically to leave single skin to front which allows it to flex. Use mini circular saw set to 5mm depth of cut.
- Joined
- 22 Jul 2016
- Messages
- 6,405
- Reaction score
- 1,236
- Country

Look up bendy MDF/ply that has slots to see what you would do to soffits.
if you go in person to a upvc supplier you could look through what they stock.
not suggesting ply/MDF as water damage is likely
if you go in person to a upvc supplier you could look through what they stock.
not suggesting ply/MDF as water damage is likely
I think I need to see a bit of soffit to understand what you mean. Thanks for the reply .
I was also wondering what Foxhole meant on the original post. It is a really neat and economical solution.
Vertical slices through the rear layer to allow the front layer to bend
Only needed for the rounded sections
I think I need to see a bit of soffit to understand what you mean. Thanks for the reply .
So are the internal fins only attached to the back? Carefully cut along the two long edges to separate ? Would a Dremel multi tool do the job?
Attachments
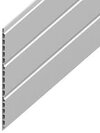
Ah, so don't " remove " the rear layer?I was also wondering what Foxhole meant on the original post. It is a really neat and economical solution.
Vertical slices through the rear layer to allow the front layer to bend
Only needed for the rounded sections
and vertical relative to the way the soffit will sit when fitted on the side of the bath?Ah, so don't " remove " the rear layer?
Ah, so don't " remove " the rear layer?
Correct.
Yes.and vertical relative to the way the soffit will sit when fitted on the side of the bath?
You need 'slots' cut in the back layer to allow the front to bend.
Google kerf cuts to give an idea of what you are doing.
Foxhole used a mini circular saw.
Dremel or Stanley might do it but you would need to be careful not to damage the front layer.
Cheap enough to experiment until you get it right.
D
Deleted member 174758
A circular saw with the depth limited to a few millimetres and a guide fence (basically a stick) would do. The main things are to keep the kerfs absolutely parallel and evenly spaced - like the kerfs on the bendy stuff I published a photo of aboveFoxhole used a mini circular saw.
Dremel or Stanley might do it but you would need to be careful not to damage the front layer.
Last edited by a moderator:
Correct, there are 15 cells to that profile so where you need that section to bend you make 15 slits to the rear.So are the internal fins only attached to the back? Carefully cut along the two long edges to separate ? Would a Dremel multi tool do the job?
Got it now! Thank you everyone.
DIYnot Local
Staff member
If you need to find a tradesperson to get your job done, please try our local search below, or if you are doing it yourself you can find suppliers local to you.
Select the supplier or trade you require, enter your location to begin your search.
Please select a service and enter a location to continue...
Are you a trade or supplier? You can create your listing free at DIYnot Local