Chimney removal - extending floor joists

Joined
29 Mar 2023
Messages
33
Reaction score
0
Country
United Kingdom
Hi all,

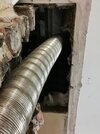
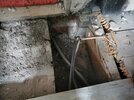
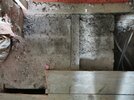
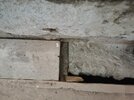
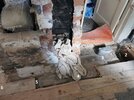
We are removing our chimney breast and are down to the floor of the 1st floor bedroom. The floor joists for the bedroom rest on the chimney breast below which is 1 block bigger for the joists to rest on. The joists run from the back exterior wall to the top of the chimney breast (about 250mm from the dividing wall).

The gap we need to fill is approximately 250mm in length and across 3 or 4 joists at 400mm centers. The joists are an actual measurement of 7inches x 3inches.
The dividing wall is a single skin, engineering brick wall, 100mm thick.

The structural engineer said the breast wasn't structural and could be removed brick by brick, top to bottom and the floor fixed with either a ledger board or wall pockets.

If we go for a ledger board, would we fit a 7x3 on the wall? My understanding is:
a. ledger board 100mm longer than gap attached to the wall with resin and M12 x 160mm bolts
b. joist hangers attached to the ledger with square twist nails
c. new piece of 7x3 joist overlapping old joist by at least twice the total gap length (500mm in this case, that doesn't sound a lot?!), attached with m12 bolts, nuts and timber connecters at 50mm, 250mm and 450mm, zig zagged top and bottom
d. attach new joist end to joist hanger with square twist nails

Or wall pockets, we follow step C with the addition of damp proofing the ends (is this necessary in an internal wall?), cut a pocket into the brick for the joist to sit in. Is that all?

Is there a preference? Are the processes correct?

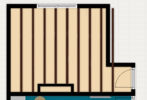
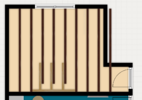
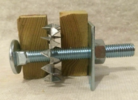
I have attached some rough floor plans of the joists and the type of connection for the sistering joists.

I read on this forum about adding a trimmer board across the ends of the joists and then just filling in the gap but wouldn't that just transfer the load of 3-4 joists onto two single ones either side?
 

Attachments

  • Joists 1.png
    Joists 1.png
    148.3 KB · Views: 257
  • Joists 3.png
    Joists 3.png
    180.6 KB · Views: 252
  • nuts.png
    nuts.png
    404.7 KB · Views: 263
I would do a minimum 600mm overlap (not an engineer but I also think 500mm seems a bit short). The trimmer should be fine because there's no bending stress at the ends (look at a typical trimmed chimney arrangement - the only reason the trimming joists are doubled up is because the trimmer is more into the span than yours would be). It would probably be easier than fixing a ledger. I wouldn't pocket a 100mm party wall.
 
I would do a minimum 600mm overlap (not an engineer but I also think 500mm seems a bit short). The trimmer should be fine because there's no bending stress at the ends (look at a typical trimmed chimney arrangement - the only reason the trimming joists are doubled up is because the trimmer is more into the span than yours would be). It would probably be easier than fixing a ledger. I wouldn't pocket a 100mm party wall.
Thanks for your reply.
Could you expand on the bending stress? The chimney below will be removed (I don't think I mentioned that) so the joists will be floating in mid air.
The dividing wall isn't a party wall - just the wall between two of our bedrooms.
 
Joists bend towards the middle not at the ends. If you look at the photo, a traditional trimmer is usually fixed well into the joist span (it's above the green and black tub, about 800mm out) so the joists either side are carrying the load from the ones that don't reach the wall in an area where bending is an issue (hence they are doubled up).

IMG_20240605_101726959.jpg


Your "trimmer" would be against the wall where there is virtually no bending force (there is something called shear force in play here but it won't be an issue).

It's a bit of a concept to grasp but this diagram should help:

Screenshot_20240605-102252.png


I'm probably just overcomplicating the issue for you here, basically a trimmer close the wall hung from the two adjacent joists, a ledger fixed to the wall, joists pocketed into the wall or even masonry joist hangers set in the wall will all be fine - just whatevers easiest with your skill set.
 
Joists bend towards the middle not at the ends. If you look at the photo, a traditional trimmer is usually fixed well into the joist span (it's above the green and black tub, about 800mm out) so the joists either side are carrying the load from the ones that don't reach the wall in an area where bending is an issue (hence they are doubled up).

View attachment 345175

Your "trimmer" would be against the wall where there is virtually no bending force (there is something called shear force in play here but it won't be an issue).

It's a bit of a concept to grasp but this diagram should help:

View attachment 345176

I'm probably just overcomplicating the issue for you here, basically a trimmer close the wall hung from the two adjacent joists, a ledger fixed to the wall, joists pocketed into the wall or even masonry joist hangers set in the wall will all be fine - just whatevers easiest with your skill set.
Ah ha! No, I completely understand! Thank you! I'll have a think and do a bit more research.
 
OP,
I've quickly read some of the above.
Ceiling joists are typically trimmed around chimney breasts whether in the loft or FF.
The trimming is purposely (fire risk) kept off the c/b by 40mm (modern Regs).
ie. the c/b is not supposed to support the trimming.
Why not post pics of what your situation is?

There's no need to ledger the wall - simply fix short joists across the gap from trimming joist to trimming joist. ie. parallel with the wall.
 
Hi! The downstairs breast is an extra brick thick and the joists are just resting on that. I've actually been using the wrong images and the joists are actually 450mm centers only two rest on the breast below. The gap between end of joist and wall is actually 340mm, not 250mm. A third is running butted along the side of the breast so could be affected by the removal (I can't see that far yet).

Below is a more accurate image and the plan we had with a ledger (I may be using the term "sister joist" wrong? I've also read "splice" but my memory left me when I had kids)

Joists 450mm.png
 
This is an ex-council house. We found a section of the breast that had no brick, just brick sized mortar. We has had a couple of rows where each brick was in a different orientation - vertical, horizontal, on its side. It's been a journey and I never want to do it again. :LOL:

IMG_20240604_161512.jpg
 
OP,
Hi, I presume that what you show in the last two pics is the FF?
I now see how its been built - & that your ledger plan will work.
What about the above, loft c/b trimming - presumably you've removed all from the roof stack down to the loft ceiling? Pics please?

Is the GF c/b being removed?
If its abandoned then you need to remove the SS flue liner sooner than later.
I have to duck in & out to the PC so it will be a bit later before I can get back.
No worries - thanks for coming back so quick!
This is the first floor, yes.
The stack is gone from the loft/roof. The stack was trimmed all round. I'll try and get a photo later (I don't fancy falling from the ladder while there's no one else home!) Would we need extra joists to cover the hole it made in the loft in order to satisfy building control?

The ground floor breast will be removed too. As soon as the plan for the joists is in place and we can be sure the bedroom won't fall down on us!
Will the flue liner just pull up or is it attached somewhere down the bottom? We'd rather have had it out by now but assumed it was somehow attached where we couldn't reach. We'll do that tonight if we can!
 
OP,
To keep it simple: Everything on the roof is the stack - everything below the roof is the c/b.
The patch in the roof where the stack was is irrelevant to the work below.
I was looking for a pic of the loft opening joists in the bedroom ceiling?
The flue liner, unless its attached to an appliance or register plate, should be free to be pulled up to the FF.
Could you remove the carpeting etc. & show a clear pic of the floor boards in front of the c/b?
 
Apologies for the delay - kids!

I'll upload photos of the joists (I've labelled them with numbers to stop any confusion). We're now suspecting there ARE 4 joists affected as the ones to the right are fine but the downstairs breast extends wider than upstairs and crosses another 2 joists :unsure:. If there are 4 joists affected (not 2), would the 7x3 ledger and sister joists idea still be appropriate?

I gave the flue liner a good tug and it's not going anywhere so we'll get to that when we can.

I'm going to take the ceiling below down soon (1. It'll be easier to sort joists and 2. It's artex that we we're going to overboard anyway so may as well take down while we can instead of adding extra weight. Asbestos check done and all clear before anyone asks!)
 

Attachments

  • IMG_20240606_183725.jpg
    IMG_20240606_183725.jpg
    288.2 KB · Views: 148
  • Joist Position 2.jpg
    Joist Position 2.jpg
    346.7 KB · Views: 131
  • Joist Position 3.jpg
    Joist Position 3.jpg
    364.1 KB · Views: 120
  • Joist Position 4.jpg
    Joist Position 4.jpg
    385.8 KB · Views: 127
  • Joist Position 5.jpg
    Joist Position 5.jpg
    238.5 KB · Views: 123
  • Joist Positions Labelled.jpg
    Joist Positions Labelled.jpg
    369.6 KB · Views: 145

If you need to find a tradesperson to get your job done, please try our local search below, or if you are doing it yourself you can find suppliers local to you.

Select the supplier or trade you require, enter your location to begin your search.


Are you a trade or supplier? You can create your listing free at DIYnot Local

 
Back
Top