Hello,
I have a 1930s semi. I'm on the point of renovating the casements, all solid pine, and possibly never repainted since the house was built.
I will be replacing the existing (single-glaze) panes by vacuum glazing panes, and I'm also going to install weatherstrip (AQ21) round the edges of all the sashes. I'm not asking for advice on that here, only on a painting question. All the paints I'm going to be using are OIL-BASED: primer, undercoat and topcoat (gloss white).
The wood is sound except for a couple of rotten sills, which I'm going to replace.
The state of the paint varies greatly throughout the house. I'm looking for advice on how you would tackle things if it were your house. In short: would you strip back EVERYTHING to the bare wood and then start priming? Or would you paint ON TOP on some parts of these, where the paint still looks thick and protective? If so, would you first apply undercoat, or just dive in with the topcoat?
Generally speaking the interior paint is in better condition than the exterior.
Please find attached five photos. Please bear in mind that I'm aware that these windows all need a good CLEAN!
These are my comments on each attached photo
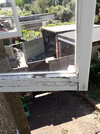
One: you can probably see that the paint on the interior of the fixed frame looks pretty good. However you can also see that at the bottom right of the interior of the sash, the paint is peeling away, revealing the bare wood.
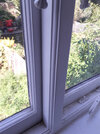
Two: again, the interior of the fixed frames (and here of the sash at the left) looks pretty good to me: would it be overkill to strip all this paint back to bare wood?
Three: as I say, these windows certainly need cleaning! You can probably see that the paint on the exterior sill is getting pretty thin.
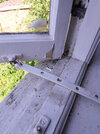
Four: pretty bad condition of the paint on the exterior bottom batten: but the wood is still perfectly sound. This will obviously have to have all the paint removed, and repriming... but what do you think of the upright batten? Again, would it be overkill to strip all the paint off this?
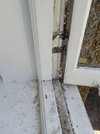
Five: exterior sill. Again, this sill is definitely not rotten, but it has obviously suffered over the decades. After all the paint is stripped the wood will need some TLC (filler) before priming.
Thanks for any advice!
I have a 1930s semi. I'm on the point of renovating the casements, all solid pine, and possibly never repainted since the house was built.
I will be replacing the existing (single-glaze) panes by vacuum glazing panes, and I'm also going to install weatherstrip (AQ21) round the edges of all the sashes. I'm not asking for advice on that here, only on a painting question. All the paints I'm going to be using are OIL-BASED: primer, undercoat and topcoat (gloss white).
The wood is sound except for a couple of rotten sills, which I'm going to replace.
The state of the paint varies greatly throughout the house. I'm looking for advice on how you would tackle things if it were your house. In short: would you strip back EVERYTHING to the bare wood and then start priming? Or would you paint ON TOP on some parts of these, where the paint still looks thick and protective? If so, would you first apply undercoat, or just dive in with the topcoat?
Generally speaking the interior paint is in better condition than the exterior.
Please find attached five photos. Please bear in mind that I'm aware that these windows all need a good CLEAN!
These are my comments on each attached photo
One: you can probably see that the paint on the interior of the fixed frame looks pretty good. However you can also see that at the bottom right of the interior of the sash, the paint is peeling away, revealing the bare wood.
Two: again, the interior of the fixed frames (and here of the sash at the left) looks pretty good to me: would it be overkill to strip all this paint back to bare wood?
Three: as I say, these windows certainly need cleaning! You can probably see that the paint on the exterior sill is getting pretty thin.
Four: pretty bad condition of the paint on the exterior bottom batten: but the wood is still perfectly sound. This will obviously have to have all the paint removed, and repriming... but what do you think of the upright batten? Again, would it be overkill to strip all the paint off this?
Five: exterior sill. Again, this sill is definitely not rotten, but it has obviously suffered over the decades. After all the paint is stripped the wood will need some TLC (filler) before priming.
Thanks for any advice!