Installing Oak Worktop

Joined
4 Nov 2013
Messages
433
Reaction score
12
Country
United Kingdom
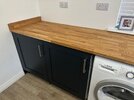
I’m fitting an oak worktop in a utility room I’ve made. I’ve not fitted an oak worktop before (used cheap laminate in the garage).

I’ve had it pre-cut so it will just drop straight in. I’m going to leave 3-4 mm clearance at the left side and along the back edge for growth.
I’ve got some slots bracket to fix the worktop to the cabinets. I’ll probably screw through the cabinet frame with some oversized clearance holes and washers as advised to add extra fixtures.

I was thinking of applying some sealant, maybe in the corners underneath the worktop and along the back edge. Mainly due to my suspicion that I haven’t got everything perfectly level and it will help it sit on the units/frame.

Is there anything wrong with this approach?

IMG_1150.jpeg
 
First things first.

You need to oil the underside and top atleast 3 times before you fit it.

Drill 10mm holes through the top bars in your cabinets, use pan head screws with penny washers to screw up through the 10mm holes directly into underside of worktop, dont over tighten the screws.

Oak worktops expand in the width not so much in the length 5mm to the left and 10mm at the back are the minimum expansion distances.
 
I rang worktop express and they told me just 2 to the top and 3 to the edges as it’s being pre oiled.

I’ll do as you said re the screws.

I also purchased some self adhesive foil in 300mm width to stick to the underside to try and prevent the heat from the tumble dryer affecting the wood.
 
First things first.

You need to oil the underside and top atleast 3 times before you fit it.

Drill 10mm holes through the top bars in your cabinets, use pan head screws with penny washers to screw up through the 10mm holes directly into underside of worktop, dont over tighten the screws.

Oak worktops expand in the width not so much in the length 5mm to the left and 10mm at the back are the minimum expansion distances.

What length screw would you typically use?
With 15mm cabinet thickness, 2mm washer I was thinking 30mm but would ~13mm into a 27mm worktop be sufficient?

Is the dab of silicone to stop any bouncing in corners etc overkill?
 
Thanks Johnny. I’ve got the screws and pens washers ready.
I’m probably not going to fix the worktop onto the units until start of next week to let it settle in the room. I’ll get it oiled over the weekend though.

Was still planning to use some Soudal Silirub 2 and run a bead along the back edge and the front corners if it’s not sitting flat.
You can use silicone and the silirub is very good.
But before you do, have a dry run with the worktop and see if you can perfectly level the cabinets.
It's a compromise between front level and top level; you'll work it out when you do the dry run.
 
You can use silicone and the silirub is very good.
But before you do, have a dry run with the worktop and see if you can perfectly level the cabinets.
It's a compromise between front level and top level; you'll work it out when you do the dry run.
Thanks.
Yeah I’m pretty happy with the left unit and it’s secured to the wall too, I’m more worried about the right unit as the floor runs out. I’ve tried my best to ignore the floor and window cill and keep it level.
 
Thanks.
I can always back off a couple of the fixings and adjust the legs a bit if needed. Fingers crossed..
 
some self adhesive foil in 300mm width to stick to the underside to try and prevent the heat from the tumble dryer affecting the wood
Won't do a thing for the heat, but it's more for the moisture, which is something you should be concerned about, eg steam from a dishwasher etc

I’ve tried my best to ignore the floor and window cill
If your windowsill and floor are massively out of level then you might need to let go the desire to have the worktop bang on and slope it some. "If it looks right, it is right" and having a windowsill that's obviously 2 inches above the top on one side and 3 on the other will look ramshackle. Adjusting the top to be a little off to take out a quarter inch, and adjusting the windowsill to take out another half inch for example would significantly diminish the visual effect of being far out

All in, try it for a fit and see how it looks, and don't be a slave to the level; you won't have a spirit bubble on it forever, but you will have to look at a windowsill forever
 
Last edited:
Thanks Robin. Wise words.
Yes the heat from the tumble dryer isn’t too bad tbf, but it is obviously a little more humid even though it’s a heat pump dryer. It’s probably overkill but I’ll stick the foil on today as the worktop is coming pre-oiled.

Re. The level, it has troubled me since I started. It is mainly the window cill and specifically the right side of it. It runs out about 8mm over a metre and my initial plan was to cut off the front of the cill and run the upstanding across the front. But it if looks ‘okay’ I was going to strategically place a planter or something on the worktop to hide that bit. My other concern was that if I tried to take that slope into account across the entire width I’d have bigger problems at the other end in terms of squareness and visuals.

But let’s see how it looks and I’ll post the results
 

If you need to find a tradesperson to get your job done, please try our local search below, or if you are doing it yourself you can find suppliers local to you.

Select the supplier or trade you require, enter your location to begin your search.


Are you a trade or supplier? You can create your listing free at DIYnot Local

 
Back
Top