Hanging lining paper around difficult areas

Joined
11 Jun 2016
Messages
370
Reaction score
17
Country
United Kingdom
Haven't done any wallpapering for donkeys years apart from a feature wall.

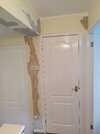
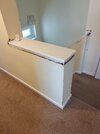
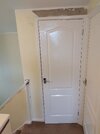
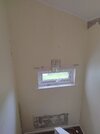
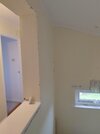
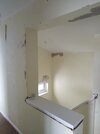
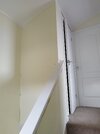
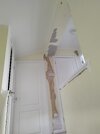
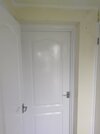
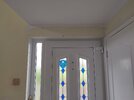
Its wallrock paper i am using. Straight walls obviously no issue, but it's just looking at all of the different external & internal corners i have to negotiate that has confused me & how to do it too. Especially where to join the paper on external corners without it being noticed.

Is there a YouTube video or similar that someone could point me to, any advice greatly appreciated. Many thanks
 

Attachments

  • IMG_20260617_091246.jpg
    IMG_20260617_091246.jpg
    179.6 KB · Views: 12
  • IMG_20260617_091308.jpg
    IMG_20260617_091308.jpg
    380.1 KB · Views: 10
  • IMG_20260617_091317.jpg
    IMG_20260617_091317.jpg
    202.5 KB · Views: 9
  • IMG_20260617_091329.jpg
    IMG_20260617_091329.jpg
    185.5 KB · Views: 9
  • IMG_20260617_091347.jpg
    IMG_20260617_091347.jpg
    150.3 KB · Views: 10
  • IMG_20260617_091400.jpg
    IMG_20260617_091400.jpg
    188.4 KB · Views: 12
  • IMG_20260617_091416.jpg
    IMG_20260617_091416.jpg
    196.8 KB · Views: 11
  • IMG_20260617_091426.jpg
    IMG_20260617_091426.jpg
    187.1 KB · Views: 10
  • IMG_20260617_091459.jpg
    IMG_20260617_091459.jpg
    146.4 KB · Views: 9
  • IMG_20260617_091516.jpg
    IMG_20260617_091516.jpg
    228.6 KB · Views: 10
Well as long as the lining paper is well soaked, shouldn’t be a problem - it’s not as if you have any patterns to match. I always take my time with butting up the joins so that they don’t pull apart when it dries. Even then, if painting afterwards, you can fill any joining gaps with filler before painting. With papering, I’ve found that most mistakes you make are only obvious to others if you point them out!
 
As above, splice the paper.

Lining paper is a dream to work with (once you get used to it).

Image #2, if the wall is out square, no problem, just splice the paper.

In the above scenario, let's assume that you are working from left to right- as you get to the return, you may find that you cannot stretch the paper enough to butt both pieces up. Hang the paper, then hang another piece over the return and let it hang over the last bit that you applied. Note: both bits of paper still need to be wet.

You will then be able to cut through both bits of paper and get a clean join. Do not do it free hand, the paper will (very probably) rip.

I use wide filling knives to cut against, my longest is about 12" but I use smaller ones as required. The straight edge holds both bits of paper in place as you run the knife down.

By way of an example, here is a wide knife. I have never used the web site, I just wanted you see what I was talking about. The handle allows you apply sufficient pressure against the paper as you cut through, so that it doesn't rip.

I really recommend using a 9mm snap off blade knife. As you cut through the two layers of paper, you will hit the plaster, that will quickly blunt the cutting edge. You can snap little bits off as you are working.

My go to is Olfa with the black blades. The Olfa blades are impressively thin, but generic blades will suffice.

Once you make you the cut line, remove the top part (excess), then peel back the top layer and remove the excess paper under it. You may, or may not need to brush in more wallpaper paste given that some of the paste will have soaked in to both the plaster and/or other layer of paper.

Important- wipe away all excess paste. The emulsion will reactive any old paste.

If you can see a slight ridge, use 180(?) grit sandpaper to lightly sand the lining paper (when dry).

If done properly you should not need to use any filler. In the event that you need filler, I would recommend either Red Devil OneTime or Toupret RedLite. Both are lightweight fillers with a very low water content. Both are unlikely to reactivate the glue under the lining paper. If you use a filler that you mix with water, the water content might activate the paste and lift the paper as the filler is setting. .

It is worth noting that both fillers are incredibly soft- softer than the lining paper. Ultimately, you are only, hopefully filling a 0.2mm gap

It might be prudent to put a coat of emulsion on any joins you want to fill though- it reduces the level of suction. And, if using 180+ grit, you can sand through the emulsion- kinda using it as a thin filler- that only applies to matt emulsion though- silk is a different proposition.

I hope the above makes sense, if not, just reply.

Best of luck
 
Well as long as the lining paper is well soaked, shouldn’t be a problem - it’s not as if you have any patterns to match. I always take my time with butting up the joins so that they don’t pull apart when it dries. Even then, if painting afterwards, you can fill any joining gaps with filler before painting. With papering, I’ve found that most mistakes you make are only obvious to others if you point them out!
Cheers Mottie
 
As above, splice the paper.

Lining paper is a dream to work with (once you get used to it).

Image #2, if the wall is out square, no problem, just splice the paper.

In the above scenario, let's assume that you are working from left to right- as you get to the return, you may find that you cannot stretch the paper enough to butt both pieces up. Hang the paper, then hang another piece over the return and let it hang over the last bit that you applied. Note: both bits of paper still need to be wet.

You will then be able to cut through both bits of paper and get a clean join. Do not do it free hand, the paper will (very probably) rip.

I use wide filling knives to cut against, my longest is about 12" but I use smaller ones as required. The straight edge holds both bits of paper in place as you run the knife down.

By way of an example, here is a wide knife. I have never used the web site, I just wanted you see what I was talking about. The handle allows you apply sufficient pressure against the paper as you cut through, so that it doesn't rip.

I really recommend using a 9mm snap off blade knife. As you cut through the two layers of paper, you will hit the plaster, that will quickly blunt the cutting edge. You can snap little bits off as you are working.

My go to is Olfa with the black blades. The Olfa blades are impressively thin, but generic blades will suffice.

Once you make you the cut line, remove the top part (excess), then peel back the top layer and remove the excess paper under it. You may, or may not need to brush in more wallpaper paste given that some of the paste will have soaked in to both the plaster and/or other layer of paper.

Important- wipe away all excess paste. The emulsion will reactive any old paste.

If you can see a slight ridge, use 180(?) grit sandpaper to lightly sand the lining paper (when dry).

If done properly you should not need to use any filler. In the event that you need filler, I would recommend either Red Devil OneTime or Toupret RedLite. Both are lightweight fillers with a very low water content. Both are unlikely to reactivate the glue under the lining paper. If you use a filler that you mix with water, the water content might activate the paste and lift the paper as the filler is setting. .

It is worth noting that both fillers are incredibly soft- softer than the lining paper. Ultimately, you are only, hopefully filling a 0.2mm gap

It might be prudent to put a coat of emulsion on any joins you want to fill though- it reduces the level of suction. And, if using 180+ grit, you can sand through the emulsion- kinda using it as a thin filler- that only applies to matt emulsion though- silk is a different proposition.

I hope the above makes sense, if not, just reply.

Best of luck
Cheers opps. I'm sure it won't be long before i am back lol
 

If you need to find a tradesperson to get your job done, please try our local search below, or if you are doing it yourself you can find suppliers local to you.

Select the supplier or trade you require, enter your location to begin your search.


Are you a trade or supplier? You can create your listing free at DIYnot Local

 
Back
Top