
Adding radiator support to partition wall

Joined
13 Feb 2025
Messages
186
Reaction score
5
Country
United Kingdom
A small airing cupboard has 3 standard partition walls and each partition wall has several verticals. I found out that the airing cupboard radiator's brackets were coming loose because of inadequate rawl plugs. So I removed sections of plaster, added four 7"x3" CLS timber horizontal wood (blockers)between the 3 (1 left, 1 centre 1 to right) verticals (verticals are 4" x 3" timber) then put the plasterboard back then put a bigger radiator in the airing cupboard. I uses hex screws to remount the brackets to the blockers behind the plaster. Due to lack of access to the left and right verticals I could only attach the blockers using two 6x80 wood screws drilled diagonally per edge and I did reinforce with flat bar brackets on each edge. The new radiator is about 25kg plus 15kg water weight so about 40kg. So 40/4 about 10kg per bracket so about 5kg per pair of 6x80 wood screws so about 2.5kg per 6x80 screw. Hopefully I have sized the mechanical fixing right? Here are some pics for context: Pic 1 showing the blockers added
 

Attachments
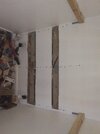
  • IMG_20260808_152148_810.jpg
    IMG_20260808_152148_810.jpg
    400.4 KB · Views: 6
Last edited:
Id just use a polymer grab and 6mm MDF stuck to wall. Emulsion.
Fit radiator to that.

You can use corefix maybe
 
Last edited:
Id just use a polymer grab and 6mm MDF stuck to wall. Emulsion.
Fit radiator to that.

You can use corfix maybe
The airing cupboard is tiny so I didn't want to add timber in front of the plasterboard. Said timber would have to be 3" x2" minimum to allow the hex screw to go through. So is my solution using the blockers in the post above safe and good enough?
 
Ok. I get it now.

Remove all the plasterboard so that only one piece is fitted.
Marked red.
You will only have one joint to worry about.

Put timber in just under so top edge is screwed through both the old board and new board.
Screw joints will stop movement.

You don't need those surface plates. They will cause issue when new plasterboard is fitted over.
One screw either side and sunk in.
If wood is snug add wood glue before you add a screw. Will be solid.
Remove all this plasterboard
IMG_20260808_152148_810~3.jpg


Fit wood just under old board and the green is new screws
IMG_20260808_152148_810~4.jpg


That's how I'd do it.
Keep it simple with minimum filling.
You made that much harder than it needed to be.
Just want one new piece of plasterboard in there.
 

If you need to find a tradesperson to get your job done, please try our local search below, or if you are doing it yourself you can find suppliers local to you.

Select the supplier or trade you require, enter your location to begin your search.


Are you a trade or supplier? You can create your listing free at DIYnot Local

 
Back
Top