Building a Domestic Extension in Stages

Jeepers, that pillar is doing some work!

Did you under-pin it?

No, it's not doing materially more than before: there were only two windows between, with a very small brick pillar, and actually, it's bigger than it looks. The plans were reviewed by a structural engineer (who specified the vaulted ceiling support) and building control were also quite happy.

Interestingly, one end of the existing steel support on the side (rather than the new ones at the back) bears onto mortar: no padstone, and not even a brick, I might do something about that, but it's been like that for thirty years already.
 
Sponsored Links
Jeepers, that pillar is doing some work!

Did you under-pin it?

No, it's not doing materially more than before: there were only two windows between, with a very small brick pillar...

You won't get the same spread of load to the foundations, as I doubt the windows were full height, and it will also be a lot more slender...and you've now got all of the roof load from the extension on it.

Although the pier itself looks plenty big enough, as Noseall says, it's the foundation that is likely to struggle...but if your SE says it's OK...
 
Can I just add a well done mate.

I'm sure some of us may have questions over some of your processes or methods etc. But ultimately this is a site for DIYers and you've done a good job of DIY Project Managing your own extension and it looks fine. You've probably saved a bunch of money, and if your SE and your BCO are happy - what more to say? Oh actually, if 'er indoors is happy, then we're all happy!
 
Sponsored Links
I'm pretty pleased, so far, and Her Indoors is very happy - the house was her childhood home and we've given it a new lease of life.

There's still lots to do: inside looks like a bomb site (although I have almost completed the complete refurbishment and redecoration of the interior not directly affected by the build). We were hoping to be able to move in before Christmas, but the end of January is still realistic.
 
It's my job to to guide DIY'ers through building projects. I'm not here to slap backs.:cool:

It would be typical of building control to say, "can we have a look at the foundations beneath that pillar now please", just as the o.p. is preparing his floor.

We did a very similar job in the summer whereby there were three beams all landing on a similar sized pillar. Although the found's to the house were (reasonably) modern, we still had to underpin.

If I see summat that I think could be a trip-up for the o.p. I will say so rather than let them suffer later on, instead of massaging their ego. :mrgreen:
 
Very interesting post, I like seeing how jobs develop and the variety of opinions etc.

Out of interest; how much has this cost you for the shell and your estimated total inclduding fitting out. How did this compare with quotes given to you by builders to managed the whole projected themselves etc.? How much therefore have you saved yourself and what was the biggest cost saving in your opinion.

Also, what was the width of your extention from the original side elevation of the house to the new side elevation of the extension?

I myself am planning an extension and am still weighing up all the build options.
 
Out of interest; how much has this cost you for the shell and your estimated total inclduding fitting out...

I'm still spending at quite a rate (insulation, plastering, 2nd fix electrics etc.), but I'll post some summary figures when we are a bit nearer to being done. Having been let down by a cowboy drive layer last weekend (needing to get a water service pipe across an old concrete drive), we're running a week behind.

That's another job I might end up doing myself, but there are only so many hours in the day!
 
Started laying floor screed today: done about a third. I need it to go off so that I can construct stud-partition walls and get in the last three radiators. Boiler coming on Thursday!

 
Badly underestimated quantity of sharp sand! The main extension is 2/3rds done, but not yet touched the conservatory. Have used 3 bulk bags, and reckon I'll need at least 2 more. I need some concrete for the foundation of a new driveway/garden retaining wall, so I guess I'm buying 3 + 1 of ballast.

It's such hard work!
 
So having taken a break over Christmas & New Year, work resumes on the extension, and we're nearly finished ...

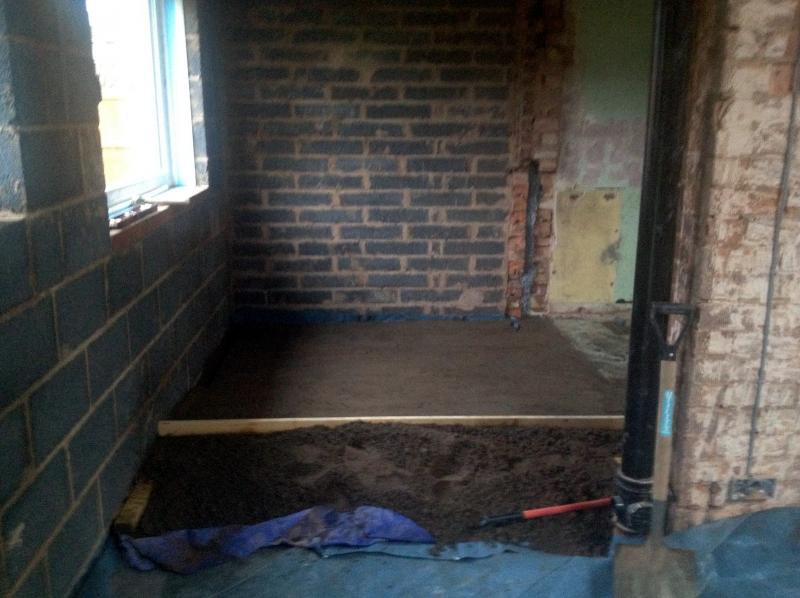
The floor screed is all down and drying out. We used just over six tonnes of sand + cement at 4:1, all mixed on site in a hired cement mixer, and that was damned hard work! I'm reasonably pleased with the result: quite flat and fairly smooth. I think that I'll put a very thin layer of cement-based self-levelling compound over the top, but I've saved a useful chunk of money.

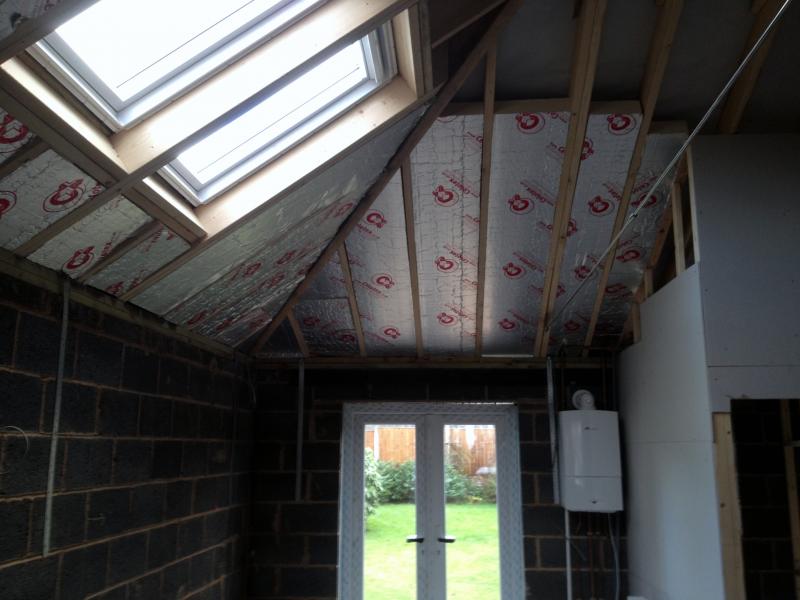
Next job is to get insulation into the roof (I've waited to have a level, clear, floor to make access as easy as possible). I'm putting 100mm Celotex between the rafters, and then 40mm more, bonded with plasterboard, over the top. Any tips for fixing? The manufacturers suggestion is to cut the board slightly oversize, and then to rely on a friction-fit - just wedge it in? I assume that as soon as I am ready to fix the PB over the top, it can no longer fall out, anyway ...

Should I tuck the insulation down behind the top of the wallplate, into the box behind the external fascia, or just fit the material flush with the inside edge of the rafters, resting on the wallplate?

There are a couple of places where I'm going to put Celotex/Plasterboard on the walls: there seems to be a paper-based surface on the insulation (rather than the foil for the stuff I used under the floor) - can you use plasterboard adhesive with that (dab & dot) or will it just fall off again?
 

Most of the insulation is now in. I'm hiring a platform to get to the top of the roof later this week (it's 4m), and will put in the last two sheets, and then overboard with insulated plasterboard.

I'm trying to decide how best to plasterboard around the velux windows, the frames of which have rebates, which I assume are to take the edge of plasterboard. I'm unsure of the best method of fixing the four pieces around each window, and joining them to the main boards across the ceiling ...
 
I'm trying to decide how best to plasterboard around the velux windows, the frames of which have rebates, which I assume are to take the edge of plasterboard.
Your top and bottom Velux trimmers should have been angled or splayed so that the greatest amount of light is admitted.
The board slots in the Velux top and bottom reflect this.

I'm unsure of the best method of fixing the four pieces around each window, and joining them to the main boards across the ceiling ...
Are you not fitting an underdraw of insulation to those rafters?

In any case, you will fix the plasterboard to the face of the rafters first, leave the plasterboards overlapping or even completely covering the Velux, then saw out the plasterboard in line with the board slots on the Velux after. It is easy once you have done one.
You then fix the reveal boards and measure them so that they come flush with the facing plasterboards.
 

DIYnot Local

Staff member

If you need to find a tradesperson to get your job done, please try our local search below, or if you are doing it yourself you can find suppliers local to you.

Select the supplier or trade you require, enter your location to begin your search.


Are you a trade or supplier? You can create your listing free at DIYnot Local

 
Sponsored Links
Back
Top