1926 kitchen and bathroom refurb

Joined
8 Jan 2014
Messages
13
Reaction score
0
Location
Anglesey
Country
United Kingdom
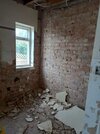
Looking for advice on how to finish kitchen and bathroom walls on an old non-cavity wall.

I have done A LOT of research into this and to be honest it has now become overwhelming.

There never seems to be an agreed method and I really dont want to make the mistake of picking the wrong method and having my new kitchen and bathroom riddled with damp and condensation. I also dont like the thought of studding out and losing 6" of the room with insulation / boards etc although if this is the best mdthod i'd use it.

The outside of the wall has been pebble dashed, there's no evidence of damp on the Internal side of the brick although they are cold.

Any advise appreciated
 

Attachments

  • 20231101_114225.jpg
    20231101_114225.jpg
    322.4 KB · Views: 29
  • IMG-20231016-WA0011.jpg
    IMG-20231016-WA0011.jpg
    267.6 KB · Views: 29
Sponsored Links
Use proprietary board foam adhesive and stick 70mm PIR to the outside walls. Get some 150mm screws and fix 25mm x 50mm battens at 400mm centres, onto the PIR. Foil tape the joints. On the walls where kitchen units are fitted, cut some 18mm ply to fit between the uprights. Fix it, then fit Duplex plaster boards on top. We usually fix a 4" x 1" timber 'rail', top and bottom, then slot the uprights between these and skew screw into the rails.

Make sure you complete your first fix (leccy, plumbing) first.
 
Last edited:
And the electrics and plumbing can nicely go in the service void formed by the 25x50 battens in that buildup. Electrical back boxes can be 37 mm deep and clamp the plasterboard edges rather than needing to fix through the insulation and into the wall

Remember where you've run your services; Don't drive screws through your pipes and wires when installing your plasterboard, and read up on electrical safe zones and how to create them and run wires in them (job for your sparky if it's notifiable work of a new circuit)

While you have the place in a state now, hire a stihl saw and cut the window opening inner leafs two inches wider at the sides and bottom to allow for insulation to be installed. If you want to indulge the top and are replacing the windows, you can install windows with a slightly higher top profile edge so the glass area is slightly less. Consider installing heat recovering ventilation fans as these are both moisture generating rooms that need to be ventilated under building regs
 
Last edited:

DIYnot Local

Staff member

If you need to find a tradesperson to get your job done, please try our local search below, or if you are doing it yourself you can find suppliers local to you.

Select the supplier or trade you require, enter your location to begin your search.


Are you a trade or supplier? You can create your listing free at DIYnot Local

 
Sponsored Links
Back
Top