
- Joined
- 29 Feb 2024
- Messages
- 16
- Reaction score
- 0
- Country

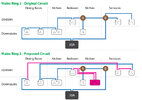
Hello,
I’m a DIYer planning to add some sockets and resolve some double spur issues I have found on my parent’s mains rings. There are two 30A rings, one serving the front of the house and the other, the rear. As there are crawl spaces on either side of the house, I have been able to trace the circuits easily, although the diagrams I have made do not accurately represent the distance between the sockets. Luckily there is conduit feeding every socket and I can carry out my work from the crawl spaces without damaging walls or lifting any floors.
Please let me know if my plans to modify the circuit are correct. The parts shown in pink are my proposed additions.
Thanks.

")