

Just pulled down a load of tiles and plasterboard in the upstairs bathroom of my Victorian property. My goal is to tile it from floor to ceiling, replace the toilet, the sink and install a shower cubicle. I have in mind that I'm going to square out any non-level studs by planing off and sticking some wood onto the studs, then board up the bathroom with moisture-resistant plasterboard by staggering it on the studs (with screws) and the brickwork (dab) for strength/rigidity. I'll tape and joint the plasterboard, tank and prime it with acrylic primer, then tile over it. However...
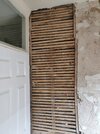
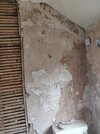
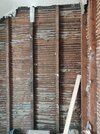
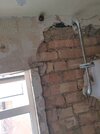
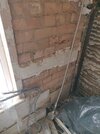
Pictures 1, 2 and 3
One of the walls is partially studding (I've yet to remove the lathes) and partially brick - what's the best way about ensuring that the plasterboard is even considering there'll probably be a difference in depth between the two?
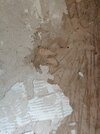
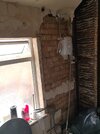
Pictures 4 and 5
I can't quite get some of the plaster off the brick walls. The other lot in picture 5 came off with the tiles - it was dead loose. But this stuff is stubborn. Should I bother removing it or can I get away with putting batons on the wall to bring the PB out in areas free of plaster?
General questions
1. Can I use regular joint compound for the plasterboard given that it's green? I'm thinking moisture might diffuse through the joins if regular.
1. Do the green PBs need to be tanked and primed?
1. What's the best stuff for filling the gaps in-between the ceiling and the tips of the PBs where I've pulled out some of the plasterboard in the ceiling? Silicone then regular filler? Does it need to be waterproof?
1. Is there any point in staggering? I've not seen anyone else bother.
Pictures 1, 2 and 3
One of the walls is partially studding (I've yet to remove the lathes) and partially brick - what's the best way about ensuring that the plasterboard is even considering there'll probably be a difference in depth between the two?
Pictures 4 and 5
I can't quite get some of the plaster off the brick walls. The other lot in picture 5 came off with the tiles - it was dead loose. But this stuff is stubborn. Should I bother removing it or can I get away with putting batons on the wall to bring the PB out in areas free of plaster?
General questions
1. Can I use regular joint compound for the plasterboard given that it's green? I'm thinking moisture might diffuse through the joins if regular.
1. Do the green PBs need to be tanked and primed?
1. What's the best stuff for filling the gaps in-between the ceiling and the tips of the PBs where I've pulled out some of the plasterboard in the ceiling? Silicone then regular filler? Does it need to be waterproof?
1. Is there any point in staggering? I've not seen anyone else bother.
Attachments
-
 IMG_20230625_142127.jpg323.4 KB · Views: 120
 -
 IMG_20230625_142132.jpg324 KB · Views: 132
 -
 IMG_20230625_142253.jpg383.9 KB · Views: 113
 -
 IMG_20230625_142140.jpg242.1 KB · Views: 113
 -
 IMG_20230625_142144.jpg278 KB · Views: 124
 -
 IMG_20230625_142153.jpg450.5 KB · Views: 113
 -
 IMG_20230625_142203.jpg437.1 KB · Views: 115
 -
 IMG_20230625_142207.jpg361.7 KB · Views: 128
 -
 IMG_20230625_142237.jpg245.6 KB · Views: 119
 -
 IMG_20230625_142245.jpg282.7 KB · Views: 114