

First, I should warn that unless you have experience of autism you may find my post a little baffling, however I wanted to share this because it's quite possibly been my most successful DIY project ever in terms of effort expended/cost vs reward. This will seem like a bit of a botch, but I've been thinking about the design for some time.
A few months ago my son decided he didn't want to go to the bathroom unaccompanied. This is obviously a pain during the day, with the family drawing lots over who has to go with him, but at least it's manageable. It's something else at night, and is seriously interfering with our attempts to get him out of nappies. It generally falls to my wife to get up a few times in the course of a night to go with him. Sometimes it feels like having a newborn again even though he's 6.
So I reasoned that if he could get up and walk to our room, then all we need to do is to have a toilet en-route and he can just go there. Note: we moved him into the ensuite room, that didn't work as he's still too scared to even go next door to his bedroom, so it really has to be on his way to our room.
I could leave a potty out for him. Unfortunately they don't hold much p*ss. And I don't like the idea that he may kick it over as he's stumbling around half-awake, so that wasn't going to work. What I needed was something sturdy, that really needed some effort to kick over. Something a bit like a toilet, but obviously I didn't want to buy a real toilet and bolt it to the floor, so I came up with the following.
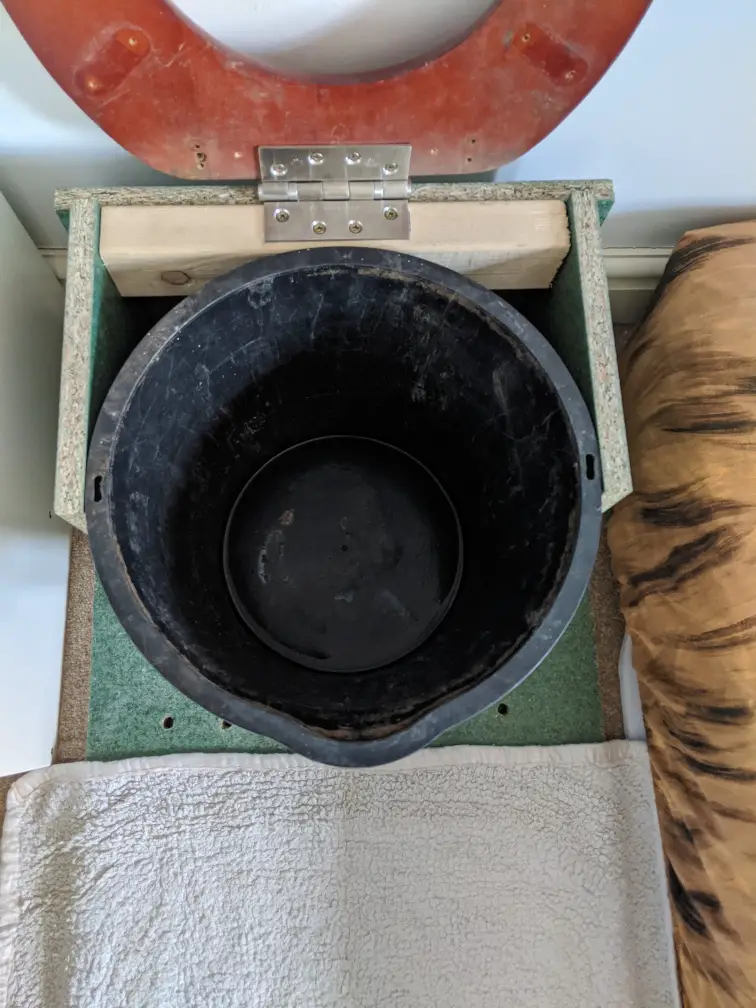
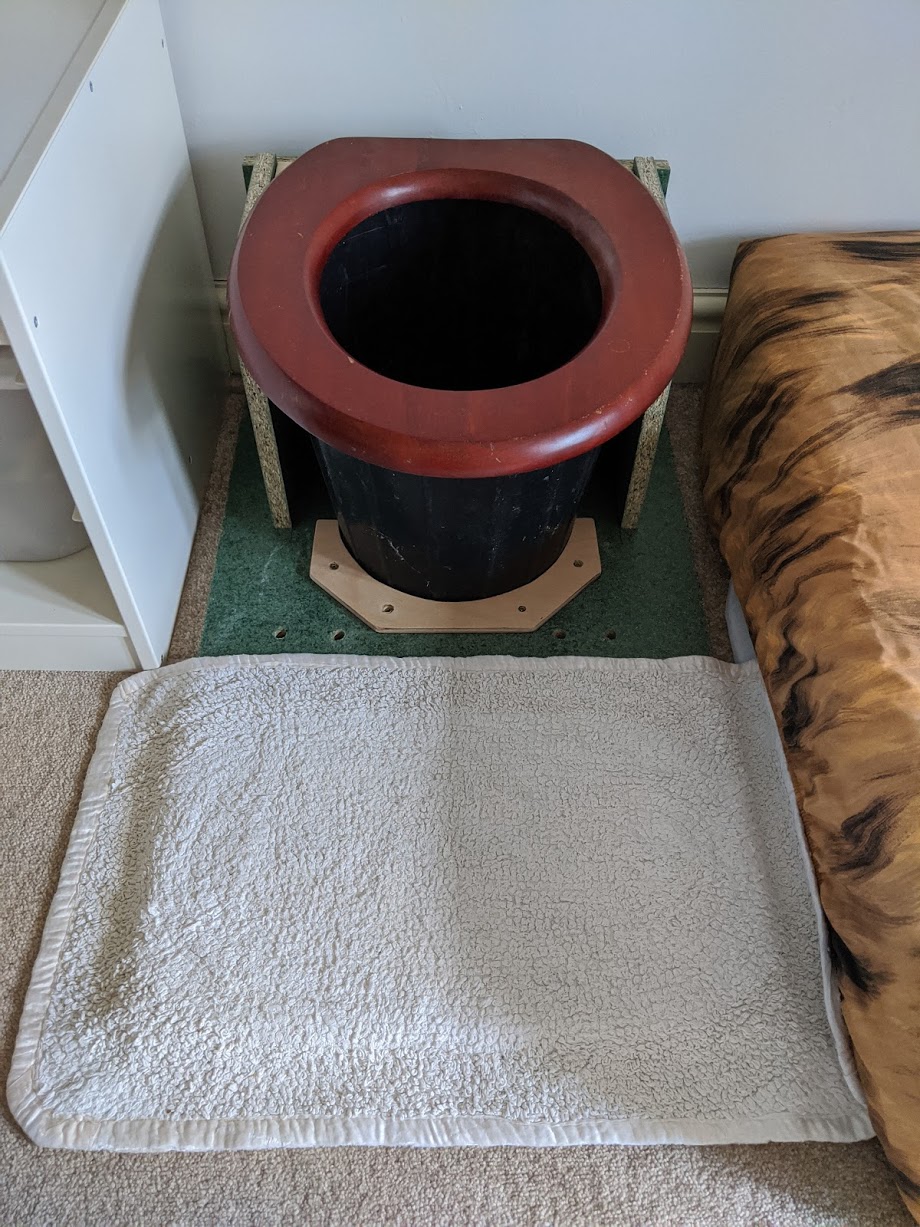
I had some off-cuts of 18mm caber-floor which I used for the base, back and sides, although any chipboard could be used, perhaps an old kitchen unit. This arrangement is pretty heavy. He'd struggle to lift it let alone tip it over. I screwed this together with 50mm screws to form a box exactly the same width as a standard Wickes bucket with the carrying handle removed (actually slightly smaller so it was a snug fit. The height of the box was exactly the height of the bucket. I used an off-cut of Wickes stud at the back (£2.99 for 2.4m) just to have something substantial to attach a fire door hinge to (probably could have used a smaller hinge, that was just what I had lying about). I can't remember where I got the wooden toilet seat but I've seen 2nd hand ones on Ebay. To avoid the bucket moving forward I made a bracket from 8mm ply, cut out with a jig saw, sanded and screwed into place. That bucket is not going to move unless you lift the toilet seat, but at the same time emptying is quick and easy once you do.
So what was the verdict? My son is really pleased with his new toilet, he couldn't be more appreciative. My wife had her first solid night sleep in a long time last night so she's happy too, and it took me all of 30 seconds to empty it in the morning.
Here are the pictures:
A few months ago my son decided he didn't want to go to the bathroom unaccompanied. This is obviously a pain during the day, with the family drawing lots over who has to go with him, but at least it's manageable. It's something else at night, and is seriously interfering with our attempts to get him out of nappies. It generally falls to my wife to get up a few times in the course of a night to go with him. Sometimes it feels like having a newborn again even though he's 6.
So I reasoned that if he could get up and walk to our room, then all we need to do is to have a toilet en-route and he can just go there. Note: we moved him into the ensuite room, that didn't work as he's still too scared to even go next door to his bedroom, so it really has to be on his way to our room.
I could leave a potty out for him. Unfortunately they don't hold much p*ss. And I don't like the idea that he may kick it over as he's stumbling around half-awake, so that wasn't going to work. What I needed was something sturdy, that really needed some effort to kick over. Something a bit like a toilet, but obviously I didn't want to buy a real toilet and bolt it to the floor, so I came up with the following.
I had some off-cuts of 18mm caber-floor which I used for the base, back and sides, although any chipboard could be used, perhaps an old kitchen unit. This arrangement is pretty heavy. He'd struggle to lift it let alone tip it over. I screwed this together with 50mm screws to form a box exactly the same width as a standard Wickes bucket with the carrying handle removed (actually slightly smaller so it was a snug fit. The height of the box was exactly the height of the bucket. I used an off-cut of Wickes stud at the back (£2.99 for 2.4m) just to have something substantial to attach a fire door hinge to (probably could have used a smaller hinge, that was just what I had lying about). I can't remember where I got the wooden toilet seat but I've seen 2nd hand ones on Ebay. To avoid the bucket moving forward I made a bracket from 8mm ply, cut out with a jig saw, sanded and screwed into place. That bucket is not going to move unless you lift the toilet seat, but at the same time emptying is quick and easy once you do.
So what was the verdict? My son is really pleased with his new toilet, he couldn't be more appreciative. My wife had her first solid night sleep in a long time last night so she's happy too, and it took me all of 30 seconds to empty it in the morning.
Here are the pictures:
