Hi All,
I’m a diy plasterer, a relative novice as well – I’ve done about 12 walls of varying sizes now and 1 ceiling (never again!). The later walls have turned out ok. I would completely agree that it’s all about practice practice, practice!!
I’m at a stage now where I’m trying to reduce the amount of remedial filling and sanding that I have to do once the plaster has dried I would really welcome some help with a problem I’m coming across.
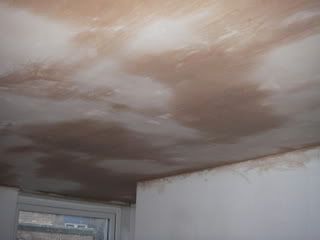
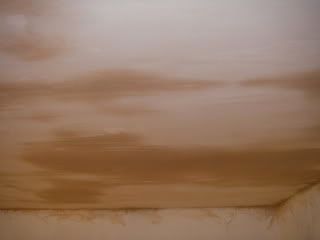
On the last few walls I’ve done (2 onto existing plaster, 1 onto plasterboard, always using multi) I’m finding a lot of bubbles in the plaster when I’m applying it to the walls. Well, initially on the first coat there's just loads holes in the plaster that I’ve applied (where seemingly air is in the mix and the bubbles have popped).
Once the second coat goes on I can often see small bubbles forming below the surface of the plaster, which generally need to be popped with the corner of the trowel because they won’t smooth. Unfortunately there’s been too many bubbles to get them all, therefore causing me much more sanding/filling at a later date.
Some my question is, how do I stop these bubbles??
I always follow the prep-rules when preparing to plaster and use the appropriate PVA/water mixes. However, as my bubbles appear to be on old plaster and plasterboard backgrounds I assume it’s not the prep/background causing the issue.
I have recently invested in a paddle mixer which does save me no end of time. At the risk of being a bad workman who’s blaming his tools - does the mixer speed (usually I have it on max) have any effect on the amount of air being brought into the plaster mix? Should I ensure the paddle always stays submerged at the base of the plastering bucket?
When learning to plaster (yes, by DVD) I was shown to just apply the first coat, leave to go off, then apply the second coat and do the dry/wet/wet/dry smoothing stages. However, as my trowel skills aren’t great I generally give the first coat a dry trowel after application to smooth it a bit (and to remove the holes caused by the bubbles) before leaving it to go off ready for the second coat. Could this be my problem – should I just leave the first coat well alone?
Apologies for the length of the post, and thanks for sticking with me this far! I though it was best to explain in full what I’m doing/doing wrong in order to receive more appropriate advice.
Cheers
I’m a diy plasterer, a relative novice as well – I’ve done about 12 walls of varying sizes now and 1 ceiling (never again!). The later walls have turned out ok. I would completely agree that it’s all about practice practice, practice!!
I’m at a stage now where I’m trying to reduce the amount of remedial filling and sanding that I have to do once the plaster has dried I would really welcome some help with a problem I’m coming across.
On the last few walls I’ve done (2 onto existing plaster, 1 onto plasterboard, always using multi) I’m finding a lot of bubbles in the plaster when I’m applying it to the walls. Well, initially on the first coat there's just loads holes in the plaster that I’ve applied (where seemingly air is in the mix and the bubbles have popped).
Once the second coat goes on I can often see small bubbles forming below the surface of the plaster, which generally need to be popped with the corner of the trowel because they won’t smooth. Unfortunately there’s been too many bubbles to get them all, therefore causing me much more sanding/filling at a later date.
Some my question is, how do I stop these bubbles??
I always follow the prep-rules when preparing to plaster and use the appropriate PVA/water mixes. However, as my bubbles appear to be on old plaster and plasterboard backgrounds I assume it’s not the prep/background causing the issue.
I have recently invested in a paddle mixer which does save me no end of time. At the risk of being a bad workman who’s blaming his tools - does the mixer speed (usually I have it on max) have any effect on the amount of air being brought into the plaster mix? Should I ensure the paddle always stays submerged at the base of the plastering bucket?
When learning to plaster (yes, by DVD) I was shown to just apply the first coat, leave to go off, then apply the second coat and do the dry/wet/wet/dry smoothing stages. However, as my trowel skills aren’t great I generally give the first coat a dry trowel after application to smooth it a bit (and to remove the holes caused by the bubbles) before leaving it to go off ready for the second coat. Could this be my problem – should I just leave the first coat well alone?
Apologies for the length of the post, and thanks for sticking with me this far! I though it was best to explain in full what I’m doing/doing wrong in order to receive more appropriate advice.
Cheers