They may not be visible, but you cannot effect any sort of repair from the front of the stairs.
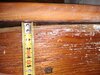
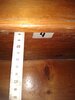
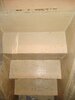
Closed riser stairs, like yours, are held together with a large number of wedges and glue blocks, as the following illustrate:
View attachment 268970
View attachment 268971
If the wedges loosen they can be knocked out, coated in glue and knocked back in, one by one, going from bottom to top. This will tighten the treads. If the tread has moved back a little from the stringer (the recess for the nosing will be visible) a hammer and block of wood, usd from behind, wil reposition in. To repair cracks in the treads thin (4 to 6mm thick) plywood repair pieces which are the same size as the treads can be glued and screwed to the undersides of the treads where required.
You can remove the triangular glue blocks from the underside of the treads, clean up the undersides of the treads (glue doesn't adhere well to old glue), inject some glue into the grooves on the underside of the treads, and knock the treads back in, again one step at a time. Splits and cracks in the risers can be dealt with the same way as it is with the treads by "plating" the backs of the risers with thin (4 to 6mm thick) plywood repair pieces which are the same size as the risers. These need to be glued and screwed in place, but because the risers are often thin the screws may well come through and need to be removed once the glue has set (and the holes filled from the front). In bad cases it is possible to remove and replace complete risers. The risers are held in in the same way that the treads are, with a glued-in wedge at each end. After riser repairs have been completed the glue blocks can be replaced (and new ones added if any have gone missing). They get coated with glue on two faces and rub-joined (you press and rub the blocks side to sie a few millimetres and the glue eventually holds them without the need to pin or screw - works better with PVA glue, though). For speed consider using a D4 glue such as the Everbuild product sold by Toolstation. Plywood is the preferred material for repair work - MDF, chipboard and OSB all have problems in use
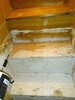
Because all the repair work needs to be done from beneath you should now understand why the underdrawings need to come off
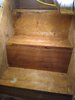
Without going down to the office and digging out my C&G texts, this is about the clearest image I could find on the web to illustrate the construction method:
View attachment 268972
BTW, if looking for info about stairs on the web, try to ignore American web sites - they often use techniques which are simply not permitted in the UK and can really send the unwary down a misinformation rabbit hole