
You are using an out of date browser. It may not display this or other websites correctly.
You should upgrade or use an alternative browser.
You should upgrade or use an alternative browser.
Changing switch plate
- Thread starter NewhouseOldhouse
- Start date
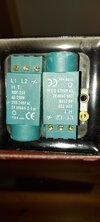
Wiggly line with arrow = Com.
The others don't matter which way round in this case.
The 2 terminals opposite the Com go to the same switch.
Oh, and earth the metal faceplate!!
If you have LED lamps, make sure they are dimmer compatible.
The others don't matter which way round in this case.
The 2 terminals opposite the Com go to the same switch.
Oh, and earth the metal faceplate!!
If you have LED lamps, make sure they are dimmer compatible.
The dimmers do not look suitable for led lights.
But here is the order for the wires.
Mark the cables and photo them before you remove them from old switch so you can put them back in if new switch does not work.
And make sure new metal face plate will have an earth cable connection to it. If it does not, STOP, and keep the plastic plate.
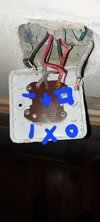
You can see the words COM on the plastic plate next to your o and your -.
- = COM (wiggly line on switch 1)
+ = L1 (on switch 2)
□= L2 (on switch 2)
I = L1 (on switch 1)
X =L2 (on switch 1)
○ = COM (wiggly line on switch 2)
But here is the order for the wires.
Mark the cables and photo them before you remove them from old switch so you can put them back in if new switch does not work.
And make sure new metal face plate will have an earth cable connection to it. If it does not, STOP, and keep the plastic plate.
You can see the words COM on the plastic plate next to your o and your -.
- = COM (wiggly line on switch 1)
+ = L1 (on switch 2)
□= L2 (on switch 2)
I = L1 (on switch 1)
X =L2 (on switch 1)
○ = COM (wiggly line on switch 2)
Last edited:
- Joined
- 8 May 2017
- Messages
- 10,652
- Reaction score
- 2,871
- Country

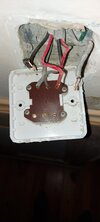
What terminals were the 3 loose wires connected to before you removed them ?
Grey = O
Red = X
Black =I
Red = X
Black =I
For the earth, there is a earth cable connected inside the metal box.
- Joined
- 8 May 2017
- Messages
- 10,652
- Reaction score
- 2,871
- Country
Is there only one copper wire in that green sheath " earth" ??For the earth, there is a earth cable connected inside the metal box.
Never checked that might be 2 wires with earth sheathIs there only one copper wire in that green sheath " earth" ??
Yup, and these wires need to be moved to your new metal switch plate. That is the important place for the earth to be connected to.For the earth, there is a earth cable connected inside the metal box.
Ideally, there should also be a jumper to the backbox, but that isn't strictly necessary!
")
Tried thie above lights didn't work at all.The dimmers do not look suitable for led lights.
But here is the order for the wires.
Mark the cables and photo them before you remove them from old switch so you can put them back in if new switch does not work.
And make sure new metal face plate will have an earth cable connection to it. If it does not, STOP, and keep the plastic plate.
You can see the words COM on the plastic plate next to your o and your -.
- = COM (wiggly line on switch 1)
+ = L1 (on switch 2)
□= L2 (on switch 2)
I = L1 (on switch 1)
X =L2 (on switch 1)
○ = COM (wiggly line on switch 2)
Checked the other 2 single gang switches and the red wire is in L1 in one switch and L2 in the other switch. The black wire is the same.
Grey wire is com.
Tried this too lights didn't work.
Any ideas or dimmers will not work?
DIYnot Local
Staff member
If you need to find a tradesperson to get your job done, please try our local search below, or if you are doing it yourself you can find suppliers local to you.
Select the supplier or trade you require, enter your location to begin your search.
Please select a service and enter a location to continue...
Are you a trade or supplier? You can create your listing free at DIYnot Local