drain height problem

Joined
5 Mar 2006
Messages
462
Reaction score
0
Location
West Midlands
Country
United Kingdom
Hello,
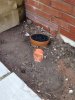
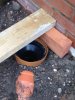
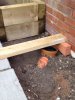
I am in the process of paving around a drain installed by a previous owner that seems to be the wrong kind and wrong height. It was surrounded by shingle, gravel and a few slabs dotted about the area. I am trying to patio/path the entire area and after digging around the drain found it to be too low and sloping. It has no plastic hopper or concrete cast type.

Pictures below:

Don't know enough to attempt digging up and re-doing the entire thing, so need advice about a basic fix or work around. I figured I could either just leave a space around it and then create a concrete sloping sides to act as a hopper and divert any water down into the drain. Is there a plastic fitting I could it fit inside it or a flexible seal I could use to cut the top off the existing drain and attach a new hopper fitting? Any advice would be very welcome and much appreciated.


Attachments

  • IMG_0656.JPG
    IMG_0656.JPG
    148.6 KB · Views: 195
  • IMG_0657.JPG
    IMG_0657.JPG
    267 KB · Views: 188
  • IMG_0658.JPG
    IMG_0658.JPG
    148 KB · Views: 174
  • IMG_0659.JPG
    IMG_0659.JPG
    139.2 KB · Views: 210
Sponsored Links
Three choices really;
Leave it as it is and pave up to within say 100mm all round then haunch sloping concrete around it.

Dig the lot up and re-hash the drain using bends/fittings to raise the whole gully.

Fit a gully extender into the top and bring it up to the new paving height.

Third choice seems the most sensible but it may mean having long arms when clearing the gully out, although not that long looking at it.
 
Last edited:
As above.
seneca, what you might do before anything else is to dig out clear of all soil the "gulley" and drainage until it goes under the flags. Then post a photo or two on here.

The hefty timber "forms" are possibly bridging the DPC and creating a water trap. Where is your DPC?

Is the gulley purely to drain the yard/patio or does/will it take any RWP or waste pipes?
 
The hefty timber are part of a raised planting bed and they touch the DPC exactly. The DPC is 4 engineering bricks high as the house is on a slope. Also the soil around the pipe has a lot of muck mixed in it and is pretty solid a few cm below the soil.

Fit a gully extender into the top and bring it up to the new paving height

This seems like what I had planned but can you help with a link to the one I need. I want a large hopper with a big a grill as possible so it covers the widest area. Trouble is, most of the ones have a 110 coupling at the base and the top of my bottle gulley grill is 180mm (but further down there is a black plastic "socket" lining the brown plastic and that looks narrower. How would I attach a gull extender to the top and then have a large grill I can take off? Something like this:
upload_2016-6-21_8-20-4.png
 
Sponsored Links
As the height difference to the level of the slabs is only 5cm could I not just drop some sort of grill fitting into the existing bottle gulley and that would get it close to level with the slabs. Can't find a grill attachment alone that could slot in, but something that looks like the one on top of this fitting

http://www.screwfix.com/p/back-inlet-bottle-gully/12051
 
great. So if I get one of those does it push into the black tube inside the brown plastic bottle? ie. first take the grill off, then slide this into it and cut it to the height needed? I would like a wide square grill hopper that I could then attach to this new riser piece. Could I buy one on its own and slide it on to the new piece. Whilst this should get to the new height, I suppose there is no way to get the slanted bottle straight as this riser looks rigid and not flexible, so cannot be bent.
 
Just realised the whole thing is on the pi$$. To be honest, sand saving much more messing about, I'd dig the entire thing out again, and reinstall it properly at the height you require. Plastic pipe is simple to work with, cut with a suitable saw to required length, chamfer cut edges off to 45degrees, apply suitable lubricant to the edge of the spigot, and the rubber seal in the socket, and simply push the pipe into the socket to make the joint.

Look at http://www.pavingexpert.com/pavindex.htm for more details on drainage installation or come back and ask if still unsure.
 

DIYnot Local

Staff member

If you need to find a tradesperson to get your job done, please try our local search below, or if you are doing it yourself you can find suppliers local to you.

Select the supplier or trade you require, enter your location to begin your search.


Are you a trade or supplier? You can create your listing free at DIYnot Local

 
Sponsored Links
Back
Top