Dry ridge abutment to verge

Joined
17 Apr 2015
Messages
3,030
Reaction score
539
Location
Warwickshire
Country
United Kingdom
Hi
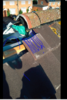
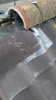
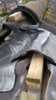
On my extension my new ridge sits about 200mm below the existing one, the last ridge tile will abut the verge of the existing house (ie normal set up for an extension )
I was planning on using the klober roll fix kit that I've already bought a while ago, but trying to work out if I've got any chance of actually getting it watertight at this junction.... I guess it all depends how I finish the adhesive roll tape maybe tuck it up under the existing verge?
I am thinking this is probably easier with a mortared ridge? But would like to use the kit as I've already got it. Also pretty sure this is done on new builds a lot, so guess it's possible. Any words of wisdom really appreciated.
 
Sponsored Links
lead saddle before the ridges go on spanning the step in the roof. Sides of saddles turned back on their selves to prevent water running into the roof.
 
Thanks datarebal, so the lead goes on before the last new ridge tile, and sits under the new ridge tile and also tucks under the existing verge batten ends? Or does it sit over the existing tiles at the verge of the existing roof
 
under the higher level roof covering, dress down over the lower roof tiles neatly. then fit the ridge
 
Sponsored Links
Thanks I think I know what you mean, I've tried to sketch it below, would the lead be dressed over the ridge battens and over the top of the first tile below the ridge on the new roof? Thanks for this really appreciated

I'd probably have to fix a screw through the lead for the last ridge fixing? Or shall I try and avoid that
 
Sketch here
 

Attachments

  • IMG_20170927_082248.jpg
    IMG_20170927_082248.jpg
    95.3 KB · Views: 324
  • IMG_20170927_082248.jpg
    IMG_20170927_082248.jpg
    95.3 KB · Views: 294
Ok you have basically got it. I did think the ridges were inline with each other.
Even so the same applies as you have drawn it Saddle from under top course on main roof dressed around he end rafter and down onto your top tile (cut I believe) Then your lower ridge will go over it.
It doesn't need to be under the ridge more than 150mm
Now it will require a bit of bossing slowly slowly.. or get one made up .
Note there is a vaunerable point at the X the lead would go on before you fit your barge or if its a brick gable An addition flashing will be required..
 

Attachments

  • rs1.jpg
    rs1.jpg
    154.1 KB · Views: 254
Thanks, that's extremely helpful I appreciate it.
I am a bit of a way off yet so may post pics as I'm doing it with more daft questions.

Only other thing was I need to batten the ridge up with a few battens and those square brackets as part of the klober dry ridge kit. I guess I am better stopping short of where the lead will be as I don't think dressing the lead over this will be easy or much point? Or I could fit the lead first and trap it under the ridge battens?
I guess I need to felt everything first in any case, lapping it over the ridge and getting everything covered.
Sorry loads of questions but I'm starting to get my head round it thanks.
 
the lead ideally needs to go over the ridge batten , you could cut the batten slightly short. dont trap it under the ridge batten.
 
Hi
I have got a bit further with this now, pic attached showing my first cut tile on my new roof, the new ridge tile will sit above that
what I am not sure about is exactly where the lead is going in terms of the existing roof. I have tried to show it in blue on the picture, but I am not sure what to do with the lead when it meets the first full tile on the top course of the existing roof. Any pointers really appreciated
 

Attachments

  • Capture.PNG
    Capture.PNG
    593.4 KB · Views: 288
Been doing this all day today and I think I've cracked it, I will also point some mortar into the end of the lower ridge where it finishes, although water getting in there should just run down the lead and out.
I have turned the ends of the lead up under the roof to stop any water going sideways.
Any comments on this welcome, thanks again for the advice datarebal
 

Attachments

  • IMG_20171006_150418.jpg
    IMG_20171006_150418.jpg
    365 KB · Views: 467
  • IMG_20171006_150047.jpg
    IMG_20171006_150047.jpg
    284 KB · Views: 944

DIYnot Local

Staff member

If you need to find a tradesperson to get your job done, please try our local search below, or if you are doing it yourself you can find suppliers local to you.

Select the supplier or trade you require, enter your location to begin your search.


Are you a trade or supplier? You can create your listing free at DIYnot Local

 
Sponsored Links
Back
Top