Finishing Timber 1st, Or Balustrade, Spindles 1st?

Joined
29 Dec 2015
Messages
2,972
Reaction score
62
Country
United Kingdom
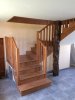
Quick question. I'm soon going to be fixing the finishing timber to stairs risers and treads. The stairs have been used for a while now with just constructional ply for treads and risers and no balustrade, spindles, etc.

Do I fix the finishing timber first to stairs, risers, and skirting, (which will be sanded, stained, etc) then the newel posts, balustrade and spindles?
Or do I fix the newel posts, balustrade and spindles first and cut the treads/risers around the newel posts and spindles?

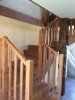
The stairs are a two landing, three flight set, middle flight only is open one side. Lower and topmost flights are open both sides. No fancy bottom step. Top landing does return on one side so a level balustrade is required there, but it does not affect treads and risers.

I have a vague recollection that the newel posts are fitted first with a gap underneath to slide in the tread timber.

I'm guessing: newel posts, then tread and riser finishing timber, then balustrade, then spindles and skirting?

(Top and bottom risers are correct height to allow for the treads to match the rest. Upper and lower floors are finished floor levels already.)
 
Sponsored Links
yep newels in first then slide in the treads and risers and wedges, screw risers to back of treads, don't forget to glue everything in.
 
Thanks, chappers.
Risers and treads are already in, in a 18mm ply. I'm putting a finishing timber on top of ply risers and treads.
But I guess the same applies?
The stringers are cut, rather than rebated.

I'm undecided about closing in the stringers with a skirting, or leaving the edges of the timber of risers and treads in view.
 
Last edited:
Same still applies. With regards to the finish what are the strings, risers and treads made of and what finish will they have.
If you leave the edges exposed, won't you also see the ply or is that fitted within the string ?
A photo would be good.
 
Sponsored Links
Same still applies. With regards to the finish what are the strings, risers and treads made of and what finish will they have.
If you leave the edges exposed, won't you also see the ply or is that fitted within the string ?
A photo would be good.
Stringers 2 X 25mm ply glued and screwed together, Also central stringer, i.e. 3 stringers in total.
Treads and risers 18mm ply.

Finish will be same timber as upper floor floorboads, 25mm X 250mm pine, sanded, stained and floor wax.
I'm planning on covering stringers as well.
Understairs cupboard will be plaster boarded in and a door fitted.

Landings 18mm ply on top of 100mm X 50mm frame with 2 interval cross joists.

Lower floor has now been finished with floor tiles. Upper floor sanded, stained and wax'd.
All plastering now completed and majority of decoration finished.

upload_2016-2-16_11-17-17.png
 
Last edited:
I would fit your risers, then cover your strings and riser ends and then fit the treads, with a slight overhang at the sides. But the main issue is somewhere you are going to have end grain to contend with, which you could obviously sand well to a fine finish.
There are a few alternatives. You could run the boards along your string following the pitch and cut out the treads and riser shape which would then be cross grain which would be a bit better. or you could fit your risers and treads with no overhang and then follow their shape with some say 25x25 strips mitred as a feature and then cover the remaining part of the string, but then you wouldn't be able to cover any nosing and treads flush with the risers may look a little odd. you could get around this by rebating the top 10mm of the risers by 10mm and creating a shadow gap.
All just a matter of aesthetics really
 
Thanks, chappers, you've helped me organise my thinking.
As I'm going to be staining and waxing, any end grain is going to take the end grain differently than the cross grain. It might look a bit like a pedestrian crossing. So..
I'm thinking: newels first, leaving room to slide under the treads. (not balustrade yet purely for working space)
then clamp on the stringer covering and mark the tread/riser cutouts. Mitre the riser joints (with the intention of mitering the risers as well to avoid any end grain.) Re-clamp the stringer covering but don't fix yet.
Risers, mitre and fit. If all is well, fix also stringer covering.
Treads, fit, and cover ends with 25mm X 25mm half round or similar, mitered into treads to avoid any end grain.
Balustrades and spindles.

I have some decent tools (table saw with sliding table, circular saw, jig saw, band saw, belt sanders, palm sanders) so mitering etc, should be no problem

Does that sound OK?
 
yeah that sounds perfect a fair bit of work but definitely be worth it because as you say you will get different finishes on the end grain. You seem to have all the gear so it will work out fine. Just make sure you glue and clamp your nosings onto the treads well as they will be taking a fair bit of punishment I would keep them to a minimum and as you suggest just use half round either that or make them a decent size so they have a firm footing on the constructional tread the mitred change of grain direction would probably look ok as a feature
 
The nosings to the front of the treads, I was going to route on to the actual tread. (I've already routed an insert for the top tread/floor board, 'cos it was at perpendicular to run of boards, with a temporary riser to give proper dimension. There was a double joist to make it easy)
It was only the ends of the treads that I was thinking of half-round mitered in, slightly over-hanging the stringers, like this:

upload_2016-2-17_13-29-22.png

Having drawn that, I've realised that I might be better to mitre and fix the end strip prior to routing the end and the front nosing.

Thanks again.
 
Yeah that will work. I agree I would glue and fix the ends and then route the whole lot as one
 
Yeah that will work. I agree I would glue and fix the ends and then route the whole lot as one
Thanks chappers. You've been an excellent sounding board and helped me to organise my approach.
 
No problem, there is quite a bit of fairly intricate work there but with patience it should work out fine. Good luck
 
No problem, there is quite a bit of fairly intricate work there but with patience it should work out fine. Good luck
Thank you. If I remember I might post a picture of the finished stairs.
 
Bringing up an old thread because I've discovered a new problem, if it is a problem.
I'm just about to start on the newel posts.

From the picture in an earlier post, (new one added showing mocked-up newel posts) it is obvious that the two lower newels, either side will be the same height.
However the second pair of newels, at the first landing will be different heights, the right-hand newel higher to account for the balustrade for the second flight of stairs.
The left-hand newel will accommodate the left-hand balustrade for the stairs and the landing, whereas the right-hand newel will have to accommodate the balustrade for the first and second flight.

Is this normal? It looks a bit odd with the newels simply placed roughly in position without balustrades, etc and them being different heights.
The same issue does not arise with the third newel post on the right-hand side, at the second landing, because there will not be a comparison newel on the left-hand side.

I don't have the luxury of special mouldings for the balustrades, like turned ends, dropped ends, etc.

Another query: does it matter if the newel posts bottom are not sat on a tread or the floor? For instance, to set the newel posts at an optimum height, the bottom of the post may be say, halfway up a riser. Does this matter, or will it look naff?

BTW, the newels will be part rebated into the treads and risers.
 
Last edited:
I did say I'd post a picture of the finished stairs:

upload_2016-9-21_13-14-40.png


It's been a long job, maybe because I had to make most of the parts my self.

I didn't, in the end, rebate a piece into the ends of the treads because the end grain wasn't that much of a problem. Maybe because I rounded the ends to match the edges.

I've still got to put doors on the cupboards under, but that's a minor job now.
 

Attachments

  • IMG_0326.JPG
    IMG_0326.JPG
    77.1 KB · Views: 188
  • IMG_0327.JPG
    IMG_0327.JPG
    96.3 KB · Views: 189
Last edited:

DIYnot Local

Staff member

If you need to find a tradesperson to get your job done, please try our local search below, or if you are doing it yourself you can find suppliers local to you.

Select the supplier or trade you require, enter your location to begin your search.


Are you a trade or supplier? You can create your listing free at DIYnot Local

 
Sponsored Links
Back
Top