Fitting architrave after plastering

Joined
23 Sep 2021
Messages
13
Reaction score
2
Country
United Kingdom
Hi all. First post here, hoping for a bit of advice :)

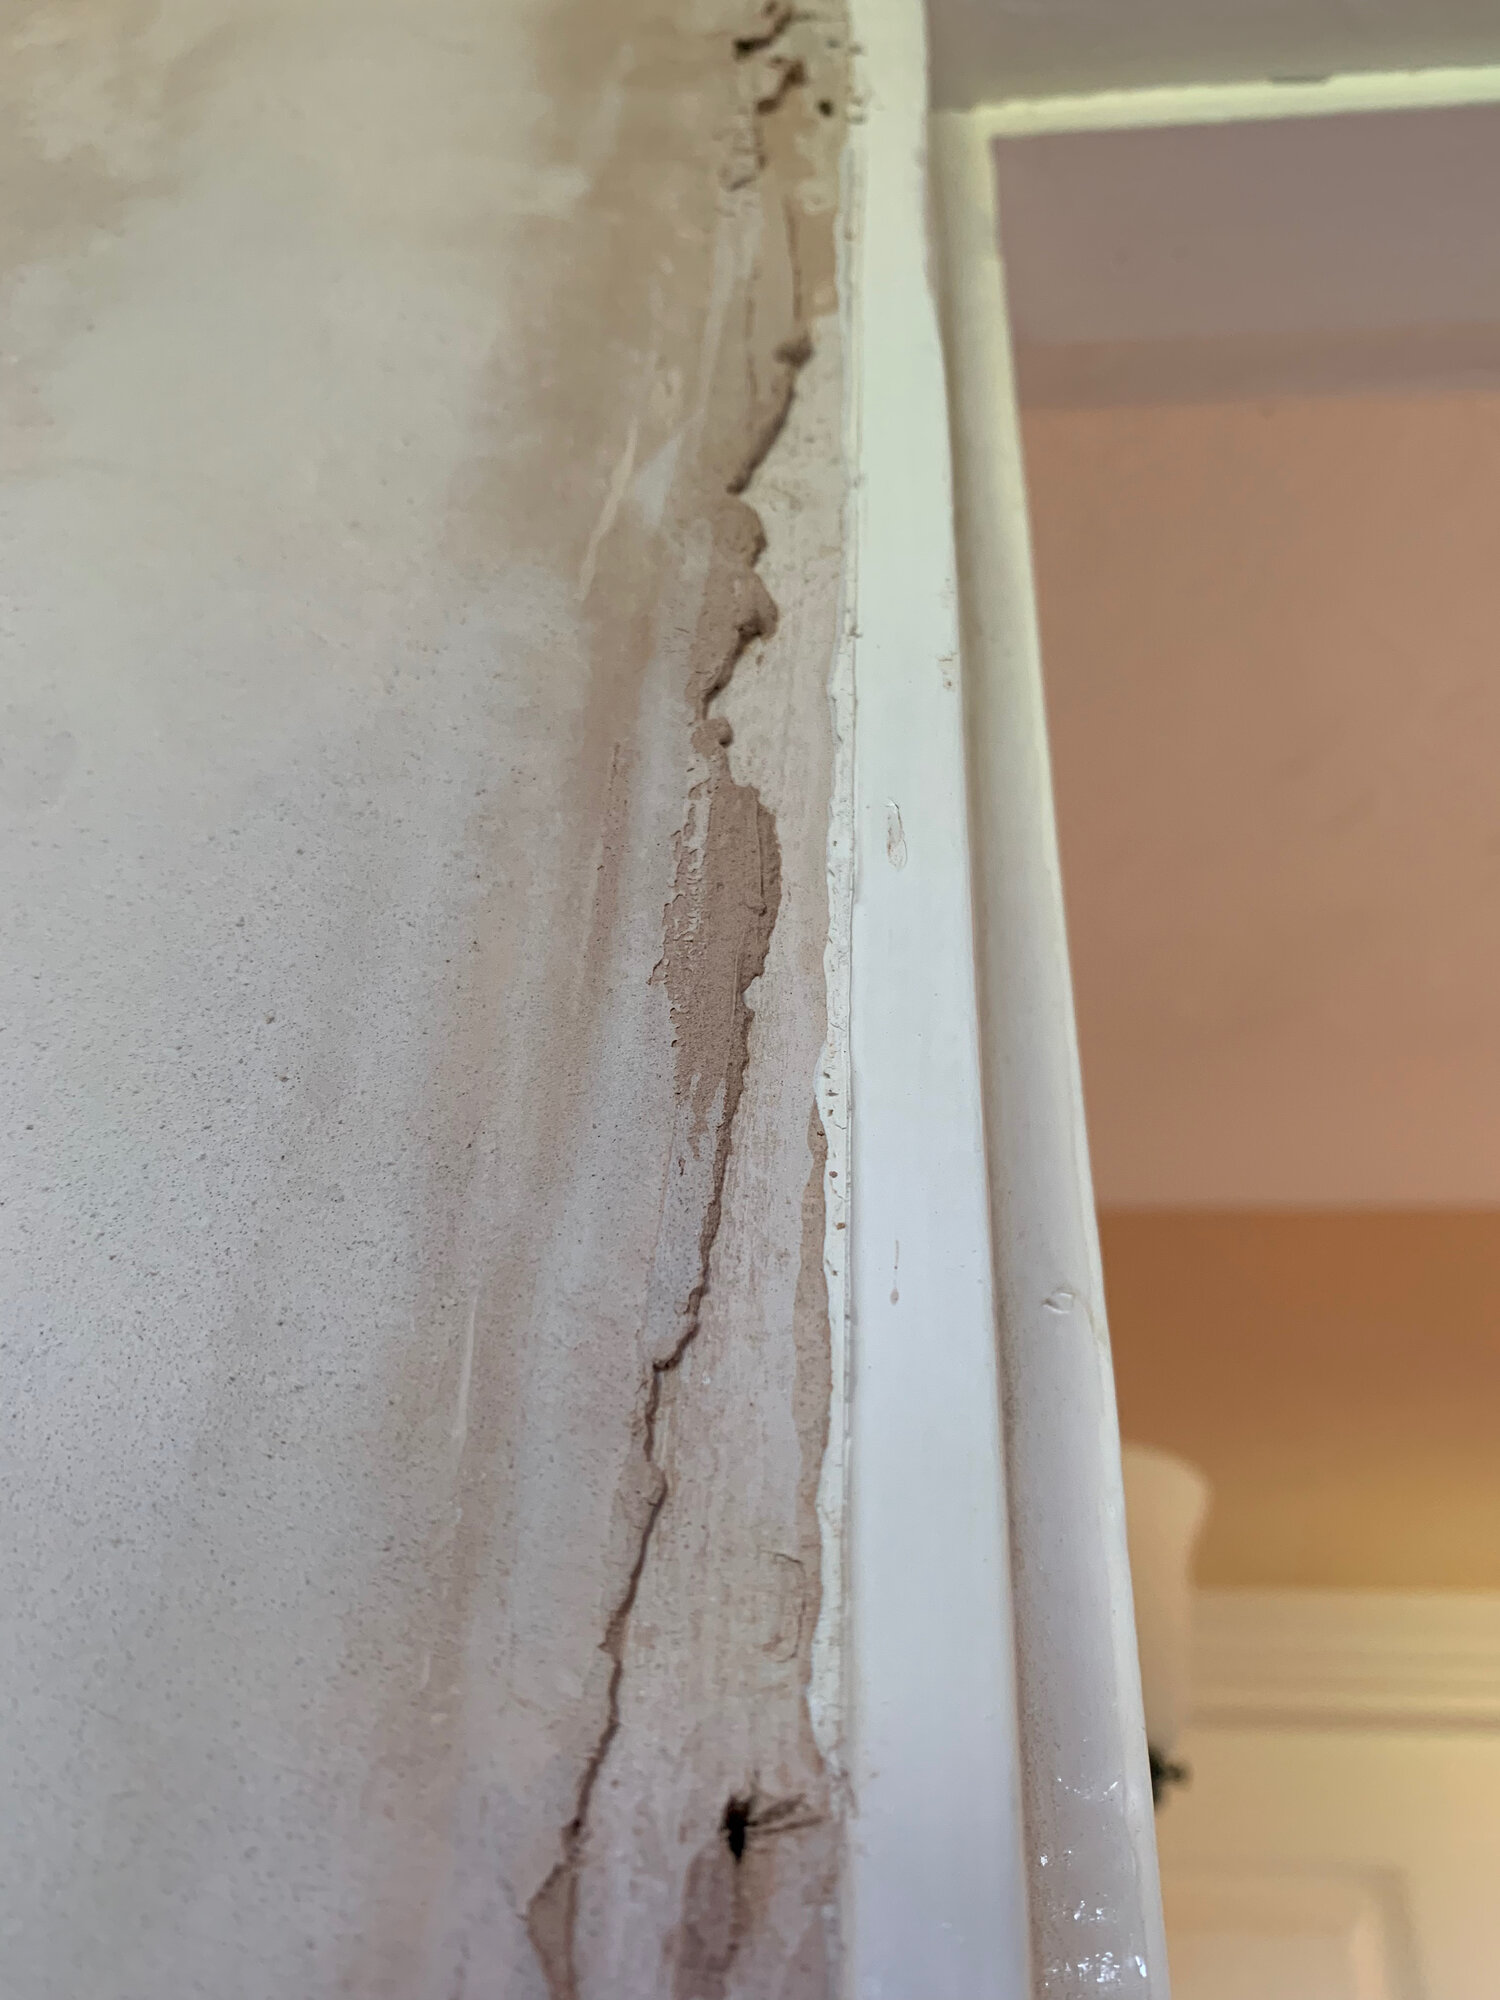
We are currently renovating a bedroom, so have stripped off all the skirting and architrave to be replaced. We then had a plasterer come in to skim the walls. I asked him if I should fit the new skirting and architrave first and he said better not to, but now we are left with the situation where the plaster protrudes further from the walls and the door frame and in some places overlaps the wood of the door frame.


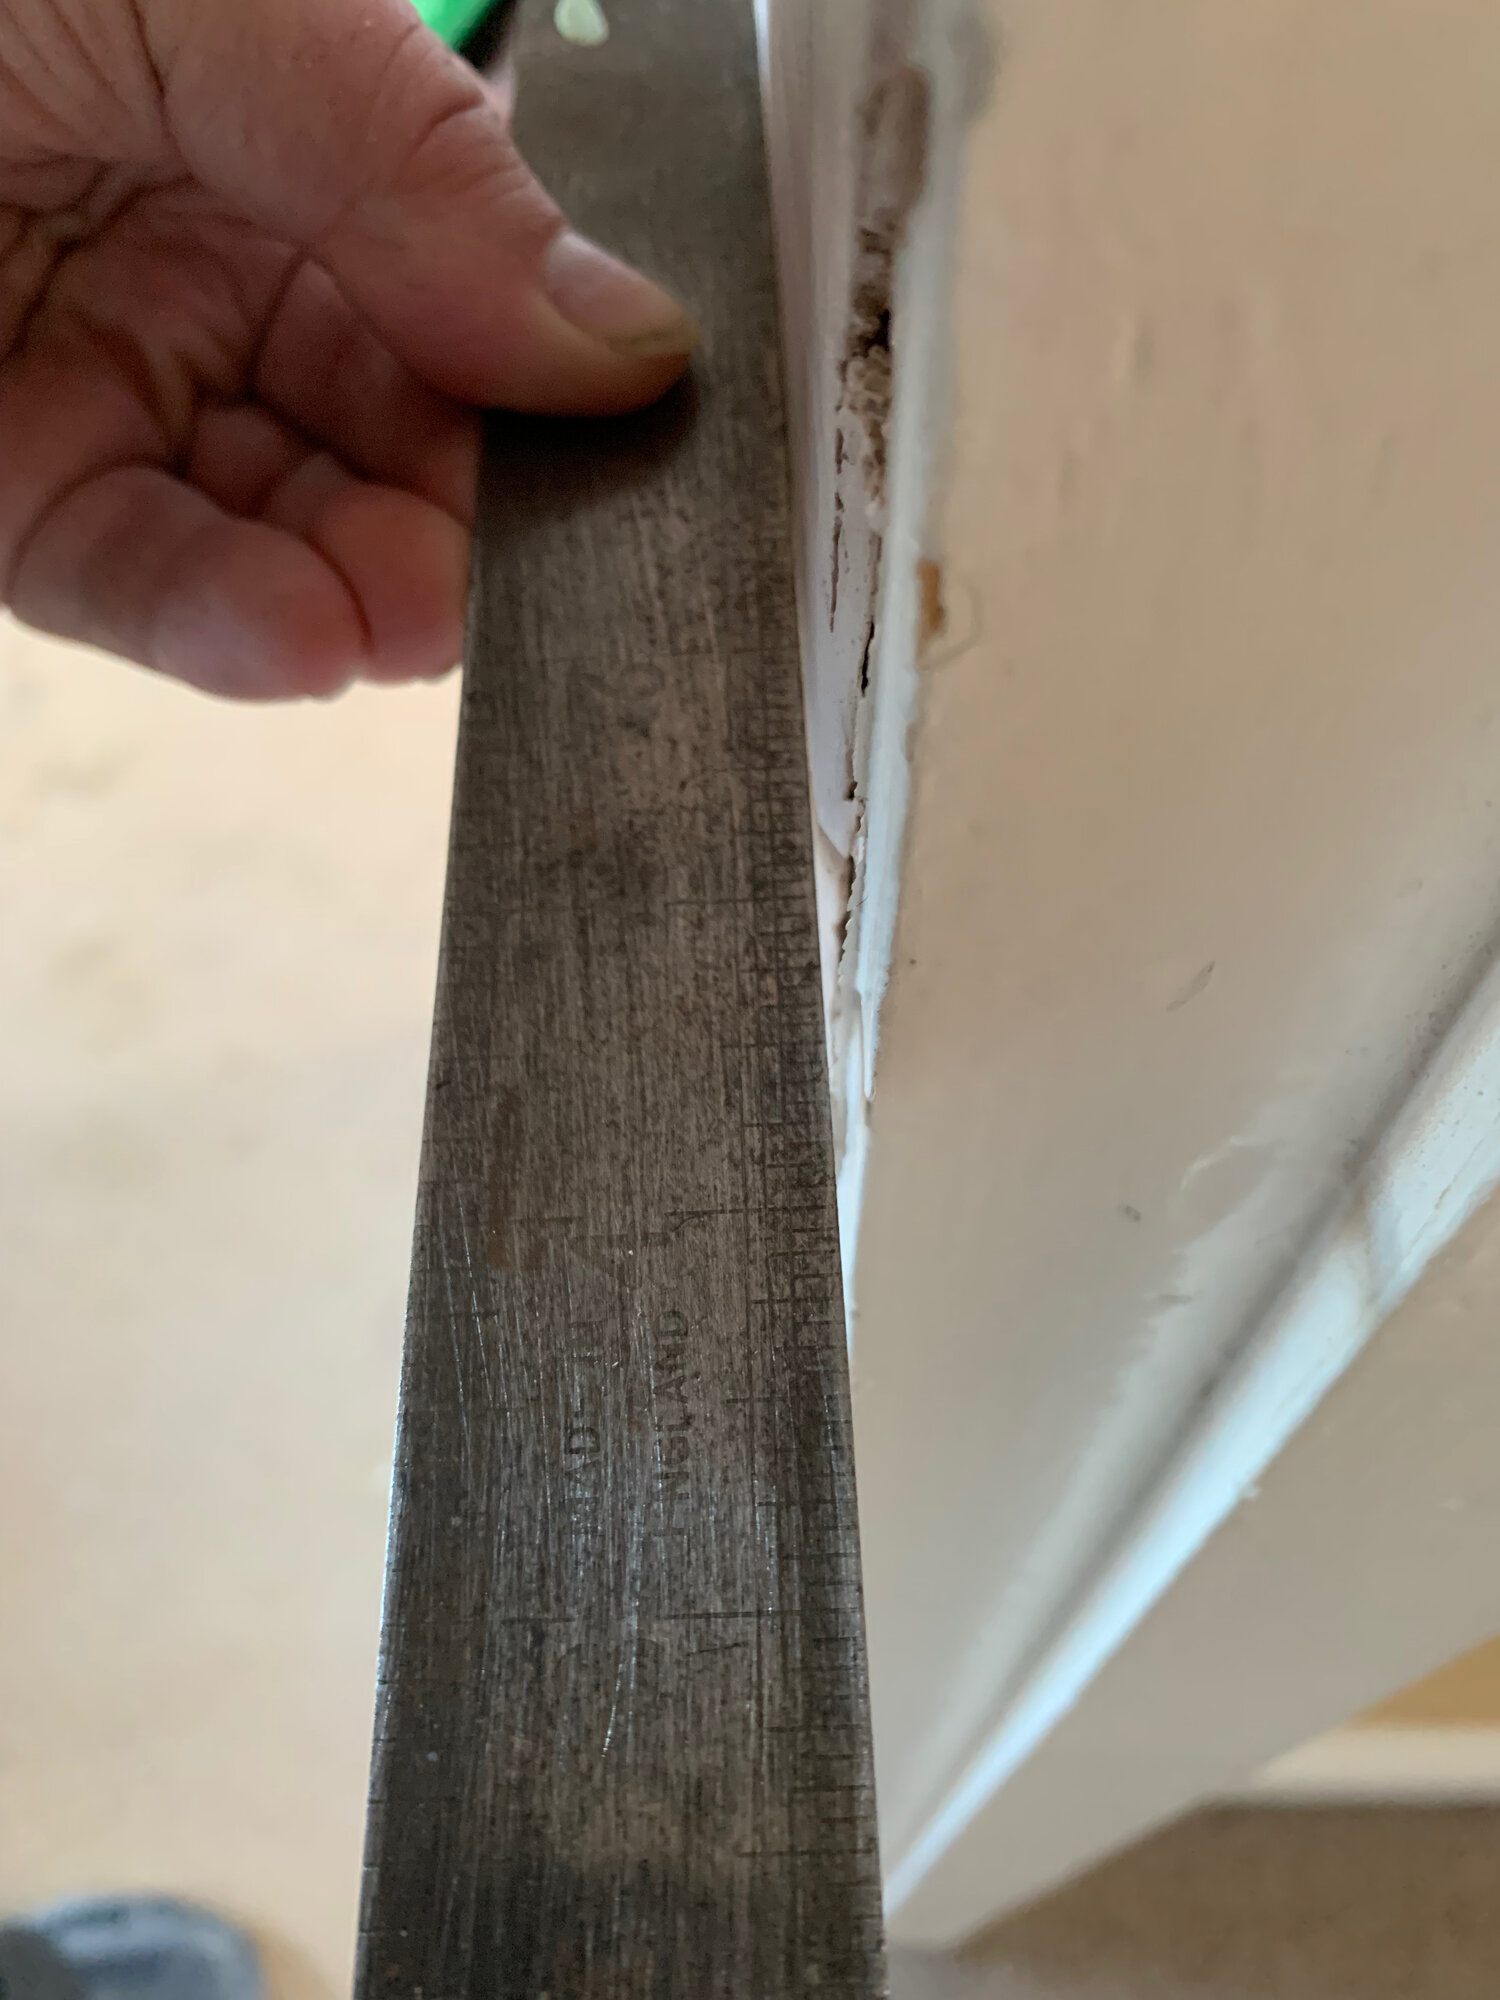
Clearing the plaster off the door frame should be fairly easy, but I'm not sure of the best way to go about fitting the architrave. I can think of 3 possible options

  • Just put the architrave on top of the plaster, accept there'll be a gap between the architrave and doorframe, and caulk it. This seems like a bad idea - the architrave probably won't sit straight, and there will likely be variations in the size of the gap.
  • Somehow create a 2-3mm thick strip of wood the same width as the doorframe, and use this to space the architrave away from the existing doorframe so that it's not sitting on the plaster
  • Mark a line on the plaster showing where the architrave will extend to horizontally (for the vertical parts of the architrave) and sand back the plaster to the level of the door frame allowing the architrave to fit flush against the doorframe, and then tidy up where the architrave meets the plaster with some caulk
Any suggestions as to the best way to deal with this?

Thanks

Neil
 
Sponsored Links
When the plaster protrudes in front, you sit the architrave in place and mark down the outside edge and cut away the plaster from the door frame up to that line.
 
All three options are correct, you will have to select the best option.

A fourth option, very similar to the second option - fit a thin strip to the door frame, but rather than line it up with the edge of the door lining, line it up with the edge of the architrave instead.

May be a less obvious join.

All comes down to your personal preference.
 
Thanks for replies, very useful. Option 4 sounds like a good one too

Does anyone know where it's possible to buy 2mm strip wood? Most places don't seem to go thinner than 4 or 6mm
 
Sponsored Links
I believe you can get 3mm plywood sheets, you may well be able to get 2mm, I don't know.

This could be cut into strips.

Some B&Queue stores have a cutting service.
 
Take a piece of architrave, mark on the plaster where it will sit, then with a strong straight edge (spirit level?) Score the plaster several times with a stanley knife.
Then chip the bit where the architrave will go and it will all sit flush.
For the skirting you'll have another task, because where it joins the architrave, it will protrude by a few mm.
You could use a planer or sander to chamfer the ends so to make it flush.
 
Had to do this a few times. I always go for option 3. I'd scrape the worst of it off with a sharp utility scraper, being careful not to jab at it too much or you'll get bits flaking off.
 
Thanks again for all the suggestions, I'm hoping to tackle this this weekend. Will post results...
 
The best tool for this is actually a multitool I've found. You can run it once down the side of the temporarily pinned arch, making a cut a few mm deep, and then with the same blade just slice in from the side level with the casing. You get a neat cutaway and the arch fits neatly into place.

From the little I can see in the pictures, it's a period house, if you end up with the skirt sticking out more than the architrave, you could consider using plinth blocks. Some people don't like them - your call.
 
Several months later, I finally remembered I should update this thread so it might be useful to others at some point. I ended up doing a combination of all the above suggestions, and some others

- Some places, where the step was minimal, the architrave just went over the plaster and the gap was caulked. You can't really tell now it's all painted

- Some places I had to take some (quite a bit) of the plaster off, both for the architrave and then for where the skirting mated to it. See image below. Fortunately the skirting runs that ajoin the doors are fairly short, but again once caulked and painted it looks absolutely fine

- Other places I took off some of the back of the architrave with an electric plane so that it sat flush on the door frame. Again, I also had to do this with the skirting in a couple of places in order to get that to mate nicely with the architrave. Again, all looks fine once finished

Thanks to all for the replies/suggestions

IMG_4653.jpeg


IMG_4654.jpeg


IMG_4655.jpeg


IMG_4658.jpeg
 
Several months later, I finally remembered I should update this thread so it might be useful to others at some point. I ended up doing a combination of all the above suggestions, and some others

- Some places, where the step was minimal, the architrave just went over the plaster and the gap was caulked. You can't really tell now it's all painted

- Some places I had to take some (quite a bit) of the plaster off, both for the architrave and then for where the skirting mated to it. See image below. Fortunately the skirting runs that ajoin the doors are fairly short, but again once caulked and painted it looks absolutely fine

- Other places I took off some of the back of the architrave with an electric plane so that it sat flush on the door frame. Again, I also had to do this with the skirting in a couple of places in order to get that to mate nicely with the architrave. Again, all looks fine once finished

Thanks to all for the replies/suggestions

View attachment 271383

View attachment 271384

View attachment 271385

View attachment 271386

Good job, but can I say one thing about your skirting board. You don't mitre the corners but you coping saw it.
 
I wish I knew what that meant!
It means the internal corners should be coped not mitred. It makes for a better joint. Basically one pice is left as is and t'other is scribed to it. Easiest way to cope the joint is to run mitre saw across at a 45 bevel and then use a coping saw to follow the edge to cope the joint.
 
Good job, but can I say one thing about your skirting board. You don't mitre the corners but you coping saw it.
I usually do for messed up frames, but if I fit the frames, I know they're straight and mitre the joints.
 

DIYnot Local

Staff member

If you need to find a tradesperson to get your job done, please try our local search below, or if you are doing it yourself you can find suppliers local to you.

Select the supplier or trade you require, enter your location to begin your search.


Are you a trade or supplier? You can create your listing free at DIYnot Local

 
Sponsored Links
Back
Top