
You are using an out of date browser. It may not display this or other websites correctly.
You should upgrade or use an alternative browser.
You should upgrade or use an alternative browser.
Fitting integrated extractor hood to a unit with back panel
- Thread starter jacoscar
- Start date

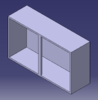
View attachment 264541
Outside depth 300mm (without doors)
Back panel 8mm
Service void 17mm
Internal depth 275mm
Central post thickness ~20mm
Outside depth 300mm (without doors)
Back panel 8mm
Service void 17mm
Internal depth 275mm
Central post thickness ~20mm
D
Deleted member 174758
I did mention top hungs before, John, but I think that maybe the OP is going with this because the supplier doesn't do a suitable top hung box. Who knows?If you're putting a top box over the cooker to mount a canopy extractor, a top-hinged flap door is more usual.
Remember you want it high enough that you can't bang it with your face.
Last edited by a moderator:
D
Deleted member 174758
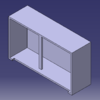
OK. Now we've got all the info it's a lot simpler, especially as there is no requirement to have a front cover. The back cut-out is still an inverted "T" as shown in an earlier drawing (which will help hide the back wall), the packings at either side are still needed (to carry the extractor unit per the installation instructions, but the cut out takes almost all the bottom out, thus:View attachment 264541
Outside depth 300mm (without doors)
Back panel 8mm
Service void 17mm
Internal depth 275mm
Central post thickness ~20mm
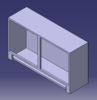
I wouldn't be too happy about such a thin strip across the front, though, as it will be incredibly weak. I think I'd want to cut back the centre upright and add in an additional stretcher to put back some stiffness and strength, thus:
That is a 50mm wide rip of plinth which will just sit below the hinges - a 44 x 22mm (2 x 1in) PAR softwood lath would do the same job, The reason for the strengthener is because without it the top of the cabinet will possibly sag over time. TBH on a paid job I'd still do a full boxed-in job with a screwed-in panel and hinge cut-outs, if only for extra strength:
Edit: Just had a quick look at the hinges in our kitchen. Any cut out to accommodate the hinges would need to be about 80mm high, but only 30mm deep
Last edited by a moderator:
D
Deleted member 174758
Sketch Up. I find it a lot neater than the near unintelligible scrawls I do on site on scraps of timber
D
Deleted member 174758
Did that last one make sense? Basically if I am trying to fathom out some details I find that building a scaled 3D drawing of the major elements is a big plus, especially as the program allows you to rotate, duplicate components, etc
Last edited by a moderator:
...and just an example of (more or less) exactly what J&K suggested in post #11! ")

I think what JobAndKnock sketched has a problem: once the backsplash is fitted, the extractor will be partially blocked by it, I would only be able to move it towards me by 5mm or so
I've thought of an alternative that would allow the splashback to be installed before the extractor is secured to the cabinet; this would involve cutting the base of the cabinet up to the front, cutting and the vertical post, then create a support structure that goes around the front of the extractor


then create a support structure that goes around the front of the extractor


If I've missed something obvious please let me know
I've thought of an alternative that would allow the splashback to be installed before the extractor is secured to the cabinet; this would involve cutting the base of the cabinet up to the front, cutting and the vertical post, then create a support structure that goes around the front of the extractor
then create a support structure that goes around the front of the extractor
If I've missed something obvious please let me know
Attachments
Last edited:
D
Deleted member 174758
Cut the splash back to stop below the kitchen unit, then. Angle grinder and a file (assuming stainless steel), Done that enough times. Just because a splashback comes in a fixed size doesn't mean it needs to be installed at that size.
Bear in mind that the materials you use to replace the bottom you have cut out need to be strong enough to hold the cabinet together and look reasonable and will need to be installed before you cut out the base of the cabinet.
Also your design looks like it will foul the bottom hinges of the doors. You do need to deal with that.
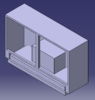
Furthermore it was stated specifically (either in what you wrote or the manufacturer's destructions) that the extractor needs to be fitted to the back wall, presumably due to weight - you cannot work on the basis that you are going to hang it off your cabinet sides alone as that puts a dangerous amount of load onto the cabinets, IMHO. Your drawing appears to push the extractor to the front, so how do you then hang it off the wall? Note that the backs of upper cabinets are fairly thin (3 to 6mm painted MDF or sometimes 8mm MFC/MF-MDF but are NOT fixed in place or if they are, only lightly (they often just float in grooves) and there is a small service void between the back of the back panel and the rear of the cabinet - to allow space for the cabinet hangers and rails. You don't seem to have taken this into consideration:

Note that my drawing shows an 18mm back held in a 5mm deep groove up the sides and across the top, but pinned or stapled to the back of the cabinet bottom and with a 10mm gap between the rear of the cabinet and the rear face of the cabinet back. Many cabinets have a thinner back, but they will all have that 10mm or so void, otherwise you couldn't get the mounting rail or claw hangers in there (looking up the spec you cabinet supplier states 17mm service void, 8mm thick back panel)
This is why I'd cut the back of the cabinet out and hang the extractor off the wall (even if it needed battens to support it) as well as modify the backsplash if needed.
Bear in mind that the materials you use to replace the bottom you have cut out need to be strong enough to hold the cabinet together and look reasonable and will need to be installed before you cut out the base of the cabinet.
Also your design looks like it will foul the bottom hinges of the doors. You do need to deal with that.
Furthermore it was stated specifically (either in what you wrote or the manufacturer's destructions) that the extractor needs to be fitted to the back wall, presumably due to weight - you cannot work on the basis that you are going to hang it off your cabinet sides alone as that puts a dangerous amount of load onto the cabinets, IMHO. Your drawing appears to push the extractor to the front, so how do you then hang it off the wall? Note that the backs of upper cabinets are fairly thin (3 to 6mm painted MDF or sometimes 8mm MFC/MF-MDF but are NOT fixed in place or if they are, only lightly (they often just float in grooves) and there is a small service void between the back of the back panel and the rear of the cabinet - to allow space for the cabinet hangers and rails. You don't seem to have taken this into consideration:
Note that my drawing shows an 18mm back held in a 5mm deep groove up the sides and across the top, but pinned or stapled to the back of the cabinet bottom and with a 10mm gap between the rear of the cabinet and the rear face of the cabinet back. Many cabinets have a thinner back, but they will all have that 10mm or so void, otherwise you couldn't get the mounting rail or claw hangers in there (looking up the spec you cabinet supplier states 17mm service void, 8mm thick back panel)
This is why I'd cut the back of the cabinet out and hang the extractor off the wall (even if it needed battens to support it) as well as modify the backsplash if needed.
Last edited by a moderator:
D
Deleted member 174758
And the bottom hinges?
And the bottom hinges?
I would cut a slot for them
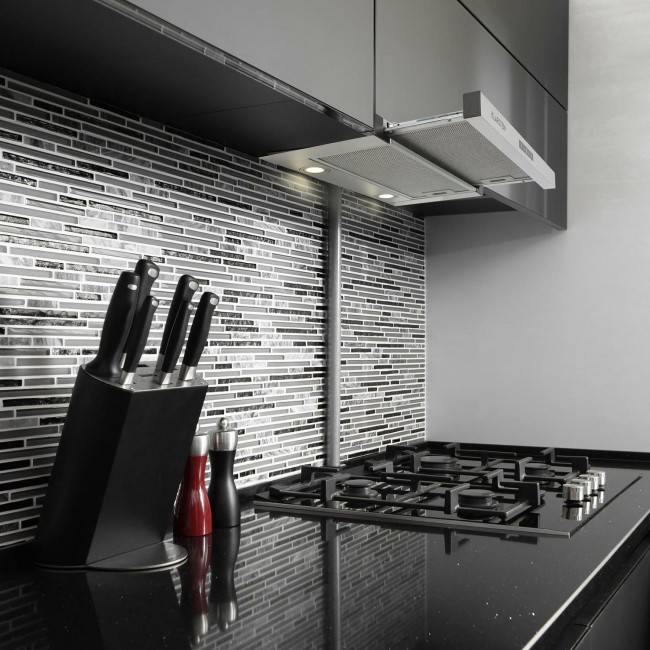
If I fit the extractor too close to the wall, then the splashback (20mm quarts) will partially cover the lights
Also, it seems to have been fitted to a certain distance from the wall in this picture (don't know what that vertical pipe is!)
D
Deleted member 174758
Can't see the photograph.
You may need to cut away more of the back than you suspect - your upstand is 20mm thick, but the service void is 17mm and the back is 8mm thick (so 25mm). Standard batten is ex-2 x 1in softwood (so 44 x 22mm from many merchants). I'm concerned at how you think you are going to cut out such a large chunk of the bottom of the cabinet and then replace it by such a thin piece of MFC(?). Your sequencing is all wrong - you need to put the strengthening in firstt, I think it will need to be more than 30mm(?) and the bottom shouldn't be cut out before the new front stretcher is fixed in. TBH with a need to accommodate hinge cut-outs and a front cut-out I think you are looking at 125 to 150mm tall for it to be strong enough. I am also left wondereing how you will get that extractor in there, as the cabinet plus doors is 320mm deep, but you lose 20mm for battens (leaving 300mm to the face of the doors) whilst the manufacturers instructions calls for a service depth of 307mm (which will leave your extractor sticking out 7mm at the front) - see below:

Seems to me that having a 20mm thick splashback without taking the extractor into account is a bit of a design error on the grounds that you are trying to fit a quart into a pint pot so to speak. Maybe you need to consider making up timber grounds to pull all the tap cabinets forward by 20mm or so to overcome this issue
BTW, my original drawings weren't intended to be a worked through design, just an idea which shows how such installations are approached. For a fully worked example I charge!
")
You may need to cut away more of the back than you suspect - your upstand is 20mm thick, but the service void is 17mm and the back is 8mm thick (so 25mm). Standard batten is ex-2 x 1in softwood (so 44 x 22mm from many merchants). I'm concerned at how you think you are going to cut out such a large chunk of the bottom of the cabinet and then replace it by such a thin piece of MFC(?). Your sequencing is all wrong - you need to put the strengthening in firstt, I think it will need to be more than 30mm(?) and the bottom shouldn't be cut out before the new front stretcher is fixed in. TBH with a need to accommodate hinge cut-outs and a front cut-out I think you are looking at 125 to 150mm tall for it to be strong enough. I am also left wondereing how you will get that extractor in there, as the cabinet plus doors is 320mm deep, but you lose 20mm for battens (leaving 300mm to the face of the doors) whilst the manufacturers instructions calls for a service depth of 307mm (which will leave your extractor sticking out 7mm at the front) - see below:
Seems to me that having a 20mm thick splashback without taking the extractor into account is a bit of a design error on the grounds that you are trying to fit a quart into a pint pot so to speak. Maybe you need to consider making up timber grounds to pull all the tap cabinets forward by 20mm or so to overcome this issue
BTW, my original drawings weren't intended to be a worked through design, just an idea which shows how such installations are approached. For a fully worked example I charge!
Last edited by a moderator:
DIYnot Local
Staff member
If you need to find a tradesperson to get your job done, please try our local search below, or if you are doing it yourself you can find suppliers local to you.
Select the supplier or trade you require, enter your location to begin your search.
Please select a service and enter a location to continue...
Are you a trade or supplier? You can create your listing free at DIYnot Local
Similar threads
- Replies
- 11
- Views
- 13K