Floor re-build

Joined
15 Oct 2013
Messages
19
Reaction score
0
Location
Nottinghamshire
Country
United Kingdom
Hello all,

Been a regular reader of this forum, but not posted much until now. I am now going to attempt to re-build my timber dining room floor as most of it is rotten.

(Unfortunately, there's not a whole lot I can do to improve ventilation without installing a fan. The underfloor void is a good 1.2 m deep and has standing water (lower than surrounding ground, poor draining ground). I have a little soily gravel that I can use to raise the levels to be just above our garden, beyond the patio.)

I am trying everything I can to use good timber and reduce contact with wet masonry. So I was thinking of using joist hangers, rather than re-using the brick pockets. Is there a recommended way to retrofit hangers without a wall plate?

I can chase out the mortar and put hangers in, but don't want to cause structural instability with a new hole in the mortar every 400 mm on each wall...is that likely to be a problem? I have a bay window, with walls at about 45 degrees. What should I do with joists on the angled walls?

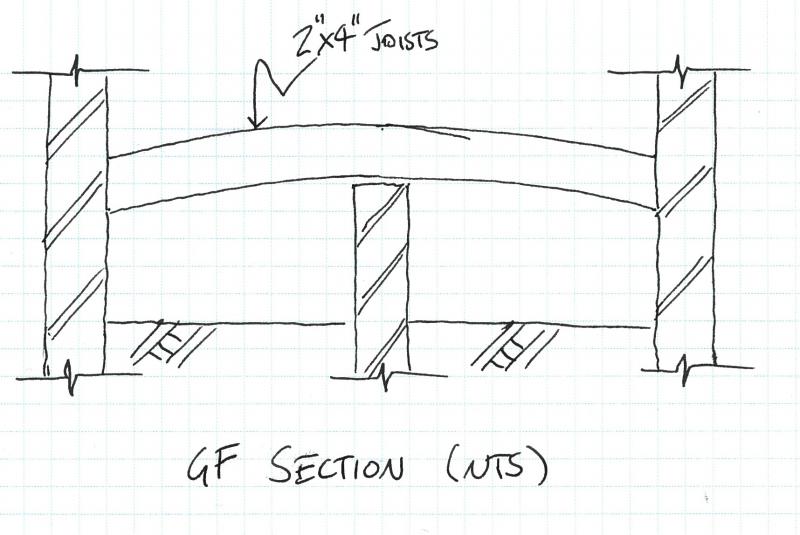
Finally: the floor span is halved by a sleeper wall, that has unfortunately settled less than the rest of the house. The result is a cambered floor at the moment. I can knock a course off the wall, but am not sure how to level the new joists to get it right. Maybe roof tiles on a wall plate (with DPM!)?

Thanks for any advice!
 
Sponsored Links
Why not use pressure treated timber for the joists?

BTW I've just bought a house with identical cambered floor. :p

Also, whilst the floor is up I'd insulate it if I were you.
 
Yeah, will be using pressure treated C16s. But I want it to last for a while, so was thinking of using the hangers.

I'll be using breathable mineral fibre insulation, using nettings. Might not be able to achieve the full depth recommended as the joists are only 2x4s...
 
PS, good luck with your new home!

It's a bit of a pain if you only need to replace one or two joists: getting a camber to match. I did this in our living room, and ended up cutting the joists in half, and scabbing together with coach bolts. I 'softened' the crown in the centre with a planer, then used large plywood sheets to curve over the centreline. There's a little bit of a step difference between the old and new, but not much. I used a thick plastic DPM to even out the difference. Not ideal, but it saved doing the whole floor.
 
Sponsored Links
The standing water isn't as much of a problem as having no airbricks. If it gets deep install a pump :eek:
 
It smells like wet rot, but that's not surprising! There are some fairly good cast iron vents. There's just not much room to add more. In addition, it's a semi, and the historical addition of a solid floor in the kitchen means there's just not great airflow. I'll clean the vents out and use treated timber. But I was wondering if joist hangers will also help.
 
I suspect that no settlement has taken place but the joist tails in the wall pockets have rotted and dropped leaving the flooring over the knee wall slightly high, hence, the camber.

Do you intend to replace all your joists?

Using a line level, why not take a level string line across the room from wall to wall, just graze the top of the knee wall and see where you are level at either wall?

If required, the top course could be removed from the knee wall and a wall plate on a DPC fixed down. The treated joists would meet on the treated wall plate.

Cap the ends of the joist tails in DPC material and set the joists in existing pockets in the brickwork. Cut new pockets if req'd (even in the bay) and roughly brick up any unused pockets.

Your FFL must flow into any adjoining room thresholds.

As above, lots of ventilation, and perhaps a sump pump or fill above the water line with gravel, and cover with a Membrane to give a little damp protection.
 
Thanks for your reply.

Unfortunately settlement did occur, as I checked the levels in the adjoining room late last year. I was thinking along the same lines wrt wall plate and pockets. Means I will have to cut each joist in half and scab together, but there we go. My colleague tells me there is known to be an underlying layer of peat in the area etc etc, and we are on softish alluvium anyway.

I think I may be able to squeeze a couple air bricks in the space below the back door threshold, which is obviously not load bearing anyway. Should help hopefully!

We will be knocking down a load bearing wall between this room and the kitchen, which has a very old solid floor. They didn't duct through the air vents, so that could be part of the problem. I'm slightly worried that our new dining room floor, with 18mm WPB and vinyl overlay will be slightly lower than the old concrete floor---but it is not easy to check. If there is a little height difference, what do people recommend for the joint/step?
 
How do you know that settlement has occurred?

What levels were checked? If you are claiming settlement indications along a whole elevation of the house then you have far more to worry about than a dining room floor.

And this settlement has taken place in approx. six months?

How have you differentiated what you see as settlement from other similar structural difficulties?
 
Hello Ree,

I don't know for certain that settlement has occurred, but the image below shows what I encountered in the living room last year, and I am 95% sure we will have the same in the adjoining dining room.


The difference in level is about 30 mm. The house was built in 1936, on alluvium, and the whole area flooded in 1945ish. The settlement could have occurred in the last 78 years. I suppose there's the alternative possibility of uplift on the dwarf wall, but this seems less likely to me.

It certainly made tying-in a partial floor replacement in the living room a tad tricky!
 
I just noticed you're posting from California. Where are you based, if you don't mind my asking? I'm originally from eastern Bay Area.
 
In theory, if your joist is dropping 30mm at each end then each end wall is dropping 30mm but not the knee wall in the middle - could be but seems odd.

Just noticed the 2" x 4" joists; that section's way too light, which suggests non-original joisting but past repair work/joist replacement.

Have you actually crawled the sub-area and probed all the joist tails?

Do any window or door heads show signs of dropping to one side - are there any internal or external cracks?

If you answer all my questions it helps.

I used to live and work in the East Bay (never the "eastern Bay").
 
Thanks ree. I grew up in Concord mainly, but I haven't lived in the States since 11 yrs old, so my phrases could be off!

The joists are indeed small, but that's the largest that will fit in the brick pockets, so I assume they are original. A few had been replaced as far as I can tell, though they rotted quickest. 2x4s just about work to serv. limit using the TRADA tables---it's only twin 1.8 m spans.

I've crawled below, but not probed all the joists. The ones in the bay window have failed (the floor is bouncy and has sunk 20 mm). Visual inspection, from a distance, shows all the joists to be damp at brick bearings.

The severe wet rot in the adjoining room started at the bay window and reduced in severity into the centre of the room. I am expecting a similar trend in the dining room. Next door replaced their joists maybe 10 years ago and tell us our joist ends were a bit dodgy (where they join at a party wall).

There are a few fine cracks in the plaster over lintels and beams. Generally from the ends towards the centre and upwards. There are some cracks dotted here and there, but nothing severe. There are quite a few upstairs in the lathe-plaster ceiling, but I thought that was common. Not surprised that some movement has occurred over 78 yrs!

I agree it seems odd, but I struggle to accept that they constructed it this way with joist camber purposely retained. And I am not so convinced by uplift. I don't think any settlement is recent, so I'm not too concerned.
 

DIYnot Local

Staff member

If you need to find a tradesperson to get your job done, please try our local search below, or if you are doing it yourself you can find suppliers local to you.

Select the supplier or trade you require, enter your location to begin your search.


Are you a trade or supplier? You can create your listing free at DIYnot Local

 
Sponsored Links
Back
Top