Gap at kitchen worktop question, Help needed !

Joined
8 Nov 2014
Messages
115
Reaction score
0
Location
Yorkshire
Country
United Kingdom
Hi All ,
I am about to commence tiling my kitchen splashback , but have a query/concern regarding an aspect of the job.

I recently fitted new worktops , but due to them being square edged I lost 16mm in depth across the top of the units .

This meant I wasn't able to scribe them to the wall the rear of the worktop doh!.

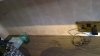
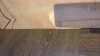
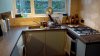
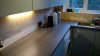
This has left me gaps in places which are over 10 mm and I am concerned about how to rectify this (see images).

Where do I start with the tiles ? , usually I would start in the centre of the wall but , this is where the worktop butts up against the wall and I am concerned that I will have to put the tile adhesive on so thickly at the gap points that it will slump.

I am also worried about getting my tile faces all level across the full run of the wall.

Am I better to try and fill in the recesses (with plaster / easifill )where the worktop has the widest gaps but still maintaining a flush level across the entire run of the wall ( I am crap at plastering !)

Lastly I was going to use 2 mm spacers between the worktop and the bottom course of tiles but the gap is going make this more complicated.

Any advice or guidance would be very gratefully recieved.

Many Thanks in advance for any help

Glenn
WP_20170409_18_15_26_Pro.jpg WP_20170409_18_15_37_Pro.jpg
 
Sponsored Links
Can you get an upstand to match the worktop. This would cover the gap, and then let you tile on to easily.
 
Is this one run of worktop or a U-shaped arrangement?
Are the sink & hob already installed?
How much w/t overhang do you have at the front of the units?
Is the backsplash a single row of tiles or full cover of tile from w/t to wall units?

No tile will look good on that surface so perhaps think in terms of some kind of impervious panelling?
 
Hi Chaps ,
Thanks for your responses I'll answer them in order;

Doggit , Unfortunately , I purchased the worktops last year , but I snapped my achiles tendon and was out of action for a long period. I returned to the supplier but they the worktop is now discontinued and a matching up stand is not available now. Mu concern with this option prior to that info , was how would I attach the upstand as the gap is greater than the depth of the up stand (10 mm I believe)

Vinn ; The kitchen is U shaped and the sink and hob are already installed. The worktop overhang at the front is very minimal <10 mm at the most. The back splash is from WT to the Wall units. The problem is only on the longest run on one side and isn't near the sink or hob.

I had thought of using 9 mm hardwood ply and securely attaching it in multiple places with plugs and screws, I was going to pre treat it with a couple of coats of 5/1 pva. I didnt want to go to 12mm as I would lose worktop space in the flush areas. (is this a good idea ?)

Many thanks in advance for any help it is very much appreciated.

Glenn
 
Sponsored Links
Post a picture please Glenn (of all walls) , and we can then comment further.
 
Hi Doggit , thanks for your fast response,

I was intending only to use the ply on the longest run without the hob or sink.

Sorry the pics aren't fantastic but my phone has no flash !

Many Thanks again

Glenn
 

Attachments

  • WP_20170412_19_10_51_Pro.jpg
    WP_20170412_19_10_51_Pro.jpg
    86.6 KB · Views: 575
  • WP_20170412_19_11_08_Pro.jpg
    WP_20170412_19_11_08_Pro.jpg
    92.9 KB · Views: 469
  • WP_20170412_19_11_24_Pro.jpg
    WP_20170412_19_11_24_Pro.jpg
    118.6 KB · Views: 411
  • WP_20170412_19_11_45_Pro.jpg
    WP_20170412_19_11_45_Pro.jpg
    89.4 KB · Views: 527
  • WP_20170412_19_11_58_Pro.jpg
    WP_20170412_19_11_58_Pro.jpg
    101.8 KB · Views: 546
  • WP_20170412_19_12_26_Pro.jpg
    WP_20170412_19_12_26_Pro.jpg
    134.6 KB · Views: 427
  • WP_20170412_19_12_33_Pro.jpg
    WP_20170412_19_12_33_Pro.jpg
    100.6 KB · Views: 457
You could fill the gaps at the back of the worktops which would then support your spacers, and then use a thicker bed of adhesive, but I suspect you may not get a good finish that way. You could well use the 9mm ply on the cupboard wall, but if there are gaps by the sink as well, then I'd be inclined to find a pasterer that will bring the wall out to the worktop.
 
Hi Doggit ,

Thanks for that , Think I will proceed with lining the cupboard wall section only,(the gaps are only a couple of mil on the other walls.

two further questions for you please ?

What would you fill the gaps with ? Timber ? Silicone ?

Is it a good idea to prime the ply with 5/1 pva then 3/1 as I'm tiling , (what do you think ?)

Many thanks for your help you've been a god send !

Best regards

Glenn
 
A personal favourite is to dot n Dab walls to get a spot on substrate for tiling and also alot easier then ply
It won't need any PVA or any other prep so you can tile onto it directly
 
Sorry Glenn, which gaps are you refering to, but silicone would be fine, or even caulking; it'll shrink back over a couple of weeks, but it'll be fine to get you going. Use 3/1 pva, let it dry, and then tile, but having thought about it, (and as happy suggest) you could use 9.5mm plasterboard rather than ply, but gripfill might be better than plasterboard adhesive, as you don't want it coming out too far.
 
Trowel the PB adhesive using 8mm trowel or even Gripfil is fine .I have used rapidset tiling adhesive before too
 
firstly don't tile onto ply and don't use PVA as a primer.
if the gap is 10mm how thick are your tiles. a bed of adhesive with a 6mm notched trowel and a tile will normally come out at about 9-10mm. cover any remaining gap with a bead of silicone
 
How about lengths of End Cap/ Corner joints ( these come in assorted colours Corner joints width size up to 10mm) inserted into the gap and resting on the work surface, then tile trim along the edge of the tiles

You could then seal the remaining gap with silicon prior to tiling.
 

DIYnot Local

Staff member

If you need to find a tradesperson to get your job done, please try our local search below, or if you are doing it yourself you can find suppliers local to you.

Select the supplier or trade you require, enter your location to begin your search.


Are you a trade or supplier? You can create your listing free at DIYnot Local

 
Sponsored Links
Back
Top