Google Nest Installation Advice

It's the boiler that controls the pump overrun, in that its keeps the pump running for a short time when the boiler shuts down at the end of a heating cycle. Therefore there are dedicated terminals in the boiler that the pump should be connected to.

The pump has an overrun facility but doesn't look like it's directly connected to the pump in the wiring centre.

Are you sure?

capture-jpg.250806


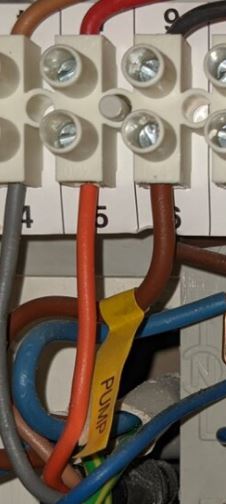
However, it's quite normal though for the wires connecting the pump and the boiler to pass through the wiring centre as a means of connecting the wires from each together. Maybe the same thing has been done at the programmer. As long as the wires go to and from where they should do, and are correctly connected it won't be a problem.
 
Last edited:
Sponsored Links
Many thanks. Not sure what's going on between the programmer in the kitchen and the wiring centre. There are two cables that leave the programmer both are 5 core, 2 black, 1 brown, 1 blue and 1 earth but by the time the cables reach the wiring centre only one of these is still present which is for the programmer controls, the other cable labelled for the boiler instead is now a 4 core and has a brown, black, grey (neutral) and earth. Something must be hidden behind the walls somewhere and not sure what's happened which messes up my plans for understanding how the system works.
 
clear.png

2. CONNECT THE NEST THERMOSTAT
If you wish to power the Nest thermostat from the Heat link then T1 and T2 at the Heat link are connected to T1 & T2 at the Nest thermostat, or alternatively use a separate plug in power supply for the thermostat.

Spent the evening pre reading ahead of installing a Nest learning thermostat and have to say thank you for the advice you’ve been handing out over the years across many threads. I’m planning on connecting the thermostat to the heat link however no existing wiring I can repurpose. Couple of questions if you don’t mind
- Correct in thinking 0.75mm 2-core would be sufficient for the connection from heat link to thermostat?
- Is there a proper place to terminate earth from heat link? Closest options appear to be earth on body of boiler, bonded copper pipe or presumably in fused spur box?

Thanks!
 
Yes 0.75mm squared 2 core is fine, and the Earth relates to the incoming l-n-e I think, which you don’t mention.
 
Sponsored Links
Thanks for the advice. In terms of the earth I was thinking of the below - as I’m using T1 and T2 to power the thermostat, the instruction is to connect the heat link to earth. Can I just connect it to the boiler/spur box earth? If not, where?
991D1746-956D-4174-91BC-7C8EC6C837F6.jpeg
 
Sorry, yes, connect to spur. Are you using 3 core for the supply in?
 
Good point - hadn’t cracked the existing programmer open until this point. It does use 3 core for the supply in however programmer doesn't need earth so whoever installed it crimped them off.

Appreciate I could use one of the existing earths however I'd prefer to use a fresh 1-core green/yellow to the spur rather than opening up the boiler itself. Is there any reason I shouldn't?
 
One final question before I decided whether to scrap this project or not. If I wanted to keep the existing programmer in the kitchen (as it does double as a handy clock and would be easier than completely disconnecting if I ever wanted to reverse the changes) would I need to just isolate the HW and CH on wires at either the programmer or wiring centre or both and leave the other lives, neutrals where they were OR just tee the heatlink into the same terminals as the programmer is currently connected in the wiring centre but then would need to ensure that the programmer is set to always on for both HW and CH?
 
Algorithm's, WiFi and fancy software aside. From an electrical wiring point of view the Nest simply comprises two basic switches; exactly the same as your existing programmer. So, swapping one for the other isn't rocket science, and is by far the easiest way to DIY. The wires simply go from the terminals of the existing programmer to the Nest Heat link terminals that have exactly the same function. Estimated level of difficulty 2 out of 10.

It you wish to wire the Heat link to the wiring centre, you would need to know which is the other end of each of the wires from the programmer and where they terminate at the wiring centre. This can be tricky especially when there are several wires of the same colour. Unfortunately many installers don't follow any convention, so the terminal numbers used in the wiring centre (unlike the programmer) can't be relied upon for identification.


PG.jpg

Do you know which terminal each of the wires from the programmer is connected to at the wiring centre, or how to work it out?


Once you have identified each of the wires from the programmer and the functions of the terminals at the wiring centre that they have just been removed from, they can be removed. Or, if you plan to reinstate them at some time they should be isolated in some additional terminals safely out of the way. The Heat link can now be connected to the wiring centre using the appropriate terminals that the programmer wiring has just been disconnected from. The danger here is that if you make a mistake and get one wire wrong, it may be a case of having to identify where most of the wires in the wiring centre go before finding the mistake. You have been warned. Estimated level of difficulty 7 out of 10.

If you wish to keep the existing programmer wired in, it's possible (but horrible) Again the wires would need to be identified at the wiring centre as before, but the additional wires from the Heat link would have to go in terminals that already have wires from the programer in. As the programmer and Nest would be wired in parallel, then the programmer would need to be set to be permanently 'off' so that the only the Nest would have control. Estimated level of difficulty 8 out of 10.

Trying to remember in 5 years time the changes you have made and then reversing them.......Estimated level of difficulty 9 out of 10. ;)
 
Last edited:
Ok so I've managed to acquire a nest learning thermostat and wired it up this morning. All seem to be working fine, although boiler would take nearly 2 minutes to fire after setting the temperature for call for heat which seems excessive compared with existing system.

Went out for a few hours and came back and put the heating on but boiler would not fire at all. HW would come on instantly. I saw a message briefly that heating was delayed for 2 hours whatever that means. Not sure if this is a quirk of the system that I can turn off or something to do with my wiring. Seems odd it was working this morning however.

Have had to reverse changes tonight as is freezing and Mrs was complaining. Any help would be gratefully received.
 
If the heating came on originally, for that to happen, it would indicate the wires were connected to the right places. From your comment, it would seem that the Nest is purposely delaying switching the heating on with the "delayed for 2 hours" message. Nest is a "learning thermostat" and I have been told that it can do odd things during the learning process until it settles down. Unfortunately I'm out when it comes to the programming / set up part.

If you have been delving into the settings and changed things, it may be worth reverting to the factory settings and starting again. If not hopefully someone in the know will be able to advise.
 
clear.png

When it comes to the wiring, the Drayton programmer and the Nest are both just two simple switches one is simply exchanged for the other.

The Drayton programmer connections are.....

drayton-jpg.210519


.....so, all of the existing wires are transferred from the Drayton to the terminals at the Heat link that have exactly the same function as shown below.

heatlink-jpg.210520


So in your case:

1. CONNECT THE HEAT LINK

Wires in Drayton N, L, E.....> Nest N, L, E

Brown Wire in Drayton 3 (HW on)....> Nest 6 (HW Call for heat)

Black Wire in Drayton 4 (CH on)....> Nest 3 (CH Call for heat)

Then both Nest 'Common' terminals 2 & 5 should be linked to Nest L terminal

2. CONNECT THE NEST THERMOSTAT
If you wish to power the Nest thermostat from the Heat link then T1 and T2 at the Heat link are connected to T1 & T2 at the Nest thermostat, or alternatively use a separate plug in power supply for the thermostat.

3. DECOMMISSION THE ORIGINAL THERMOSTAT
The old thermostat should be decommissioned to stop it interfering with the Nest. The easiest way for DIY, if you don't mind leaving the old stat in place, is to move the black wire from terminal 3 of the thermostat and put it in the L terminal with the brown wire. This way there's no need to touch any of the wiring at the wiring centre.

If you do want to remove the old thermostat, it involves tracing the thermostat cable back to its origin at the wiring centre. [In your case it looks fairly easy as the wires are labelled] When the origin is found, note where the brown and black wires are connected. The cable can now be disconnected and removed completely a wire inserted between the two terminals where the brown and black wires have been removed from completes the circuit.

Whether the old thermostat cable, once disconnected, can be used to connect the Nest thermostat to the Heat link T1 & T2 will depend on how the original installer wired it in. It's unusual for it to be located close to where the Heat link is.

The black cable going to the motorised valve is not secured properly it should be fixed under one of the cable clamps at the bottom of the wiring centre, something like this:

View attachment 250444

As it stands only the thin copper connections are holding yours in place, it could easily get snagged, pulled out of the terminals and expose live wires.
Great post.
 

DIYnot Local

Staff member

If you need to find a tradesperson to get your job done, please try our local search below, or if you are doing it yourself you can find suppliers local to you.

Select the supplier or trade you require, enter your location to begin your search.


Are you a trade or supplier? You can create your listing free at DIYnot Local

 
Sponsored Links
Back
Top