Had plasterer put up new coving to match old

Joined
22 Apr 2023
Messages
14
Reaction score
0
Country
United Kingdom
Hi,

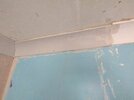
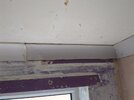
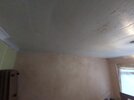
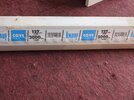
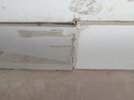
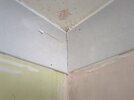
Had plastering work done recently and at the time he also put up new coving to match existing coving (we had built in wardrobes when we moved in, took them out and there was no coving behind).

When he installed it he told me that cause the old coving has been painted on so much over years there's a difference in size, it looks to be a couple mm, so he advised caulking round so it matches I'm terrible at caulking at the minute and not good with verbal instructions, so could do with some written advice for getting this to match up, my concern is If I caulk the few mm so it's same size as old coving, it will have a different profile, won't my caulk be sort of curved, and the old coving be straight at the edge ? Guess I could then caulk the old coving slightly ? Not sure, could do with help. Also noticed if I do add caulk, I'll have to do it all way round as the new piece to new piece corner joint would be different then ?
 

Attachments

  • 1682151828719493827742602207281.jpg
    1682151828719493827742602207281.jpg
    137.8 KB · Views: 203
  • 16821518540637994246229160346136.jpg
    16821518540637994246229160346136.jpg
    162.9 KB · Views: 178
  • 1682151900547563760041102622610.jpg
    1682151900547563760041102622610.jpg
    179.3 KB · Views: 176
Sponsored Links
The plasterer is talking b'loxs.

The difference in size is not down to paint.

Do not try to hide the difference using caulk.

You can however use filler to sort it out. Faced with that, I would wrap some polythene around a 12(ish)" piece of timber. Place the timer flat on the ceiling, with one inch pushed against the edge of the old coving and the other end of it touching the new coving, then use a pallette knife to push filler in to the gap between the timber and new coving.

Over a 11" section you will go from 0mm to the difference between the new and old.

Once filled, you can remove the timber, the poly will stick to the filler and can be removed once the filler starts to set. At that point, you can use a wide filling knife to trim away any excess filler that may have pushed under the timber.

I would use something like Toupret TX110 filler, and then 120 grit sand paper to tidy it up.

If the above isn't clear, please post back.

Thought so, I appreciate your idea and was thinking something similar but my issue is that the new sections follows round, so I'd have to then do an entire wall to match the side walls of that makes sense, can't see a way round this, you got any advice ? It's same in two rooms, pics attached but it's hard to show meeting points on camera from a distance, also a section that he's done has fallen down over night so that's why there's a blank part.
 

Attachments

  • 16821545024025919394110353111918.jpg
    16821545024025919394110353111918.jpg
    92.2 KB · Views: 74
Sponsored Links
The plasterer is talking b'loxs.

The difference in size is not down to paint.

Do not try to hide the difference using caulk.

You can however use filler to sort it out. Faced with that, I would wrap some polythene around a 12(ish)" piece of timber. Place the timer flat on the ceiling, with one inch pushed against the edge of the old coving and the other end of it touching the new coving, then use a pallette knife to push filler in to the gap between the timber and new coving.

Over a 11" section you will go from 0mm to the difference between the new and old.

Once filled, you can remove the timber, the poly will stick to the filler and can be removed once the filler starts to set. At that point, you can use a wide filling knife to trim away any excess filler that may have pushed under the timber.

I would use something like Toupret TX110 filler, and then 120 grit sand paper to tidy it up.

If the above isn't clear, please post back.

Other pic of other room, if you zoom closely on both you can see old coving and new meeting points
 

Attachments

  • 16821545187096123290385541893538.jpg
    16821545187096123290385541893538.jpg
    120.4 KB · Views: 101
  • 1682154593243673355172186961639.jpg
    1682154593243673355172186961639.jpg
    117.6 KB · Views: 90
You've been well and truly fobbed off there, the new coving is smaller nothing to do with paint. What he's done looks a mess too.

I'm guessing it's gonna be smaller / hard to match the size due to it being an older coving ? How come it looks in a mess ? Thanks for reply
 
Thought so, I appreciate your idea and was thinking something similar but my issue is that the new sections follows round, so I'd have to then do an entire wall to match the side walls of that makes sense, can't see a way round this, you got any advice ? It's same in two rooms, pics attached but it's hard to show meeting points on camera from a distance, also a section that he's done has fallen down over night so that's why there's a blank part.

I would still recommend tapering it over about 11". From the images, it looks like a 4 or 5mm difference. I don't think that anyone else that walks in would notice, hence no need to doing anything with the section that fell down.

The fact that it fell down is however worrying. I can see the dots of adhesive on the wall, but none on the ceiling. That leads me to suspect that the level of suction on the ceiling absorbed all of the moisture in the adhesive before it had set.

I don't do coving very often but when I do, I don't drive nails in to it. The nails go in to the wall and ceiling (if required) whilst the adhesive sets and are then removed after. In your case, when you remove the nails, the raised sections where the nails had been will be incredibly difficult to sand flat, given that it is paper faced plaster. It is much easier to fill and sand the holes in the walls and ceiling.

Thanks for your reply, I'm concerned if I fill in the side wall sections as you described it will just be 4-5mm bigger at the mitre section though, I know you said people won't notice but won't it just be the same difference it is now, but at the mitre points ?

I don't fully understand the technique you described so if you have any clearer wording or images/Vids that would be great as I am new to DIY.

I get what you mean with filling the paper coving, didn't think of that, I guess I can't sand it ?

Do you think this is salvageable ? Been just done over with electrics and had to get that sorted, can't afford to get it all replaced, or all coving taken off and walls plastered if it damages old walls.
 
You needed gyproc 127mm coving. B&Q sell.
Think he used the 120mm coving sold at some places. Example GTEC COVE 120 at jewsons.
So there is a difference in size. Think this is because 127mm is 5 Inch and the 120mm is modern metric size.
If I patch cove I often remove to both corners Vs join in the middle..
Get him back
Get down B@Q or other trade centre for correct size cove
 
I'm guessing it's gonna be smaller / hard to match the size due to it being an older coving ? How come it looks in a mess ? Thanks for reply

The meeting faces on the joins are a mess. Why did he leave so much adhesive on them? I'd ask him to sand them when he comes back to put the section that fell down back up. Coving adhesive is normally quite soft, but I have come across premixed adhesive that is very granular and so hard that you rip the paper face of the coving whilst trying to sand the filler.

The difference in coving sizes may be down to imperial vs metric.

I hope that his plastering was better than his coving.

Ultimately, the advice that I have given you with regards to dealing with the size differences is something that a competent plasterer could deal with faster than a DIYer.
 
so I'd have to then do an entire wall to match the side walls of that makes sense
opps is advocating tapering the mismatch in size down to nothing over a foot or so, not advocating adding 5mm onto the coving all the way round
 
You needed gyproc 127mm coving. B&Q sell.

Think he used the 120mm coving sold at some places. Example GTEC COVE 120 at jewsons.

So there is a difference in size. Think this is because 127mm is 5 Inch and the 120mm is modern metric size.

If I patch cove I often remove to both corners Vs join in the middle..

Get him back
Get down B@Q or other trade centre for correct size cove

Some coving came loose and fell off over night, getting him back to fix that but it's let me see the back of it and it's 127mm size, so what would the old coving be ?
 

Attachments

  • 16821574564878882063276562014875.jpg
    16821574564878882063276562014875.jpg
    464.5 KB · Views: 74
opps is advocating tapering the mismatch in size down to nothing over a foot or so, not advocating adding 5mm onto the coving all the way round

Ah I see what you mean, just measured the length of it and it's 2ft /615mm, about 4-5mm, noticed it's slightly off on some parts at the bottom too, and even on the newer sections, any advice for this ?
 

Attachments

  • 16821577676908705298800701622066.jpg
    16821577676908705298800701622066.jpg
    88 KB · Views: 60
  • 16821578223798636474463933471313.jpg
    16821578223798636474463933471313.jpg
    145.9 KB · Views: 61
Wickes sell that coving made by knauf.

Nothing bigger on market than 127mm

If your old coving is bigger, then it's running coving. Was moulded in place. Look up running coving..
Best bet is to remove old coving and replace with 127mm.

As for sticking I only ever use gyproc cove adhesive. Great stuff. Some use plaster or board adhesive but it's naff. Wickes own cove adhesive is board adhesive in different bag. It's terrible stuff and won't stick to painted surfaces.

I think it's running coving you have looking at thickness in picture
 
Thanks for your reply, I'm concerned if I fill in the side wall sections as you described it will just be 4-5mm bigger at the mitre section though, I know you said people won't notice but won't it just be the same difference it is now, but at the mitre points ?

I don't fully understand the technique you described so if you have any clearer wording or images/Vids that would be great as I am new to DIY.

I get what you mean with filling the paper coving, didn't think of that, I guess I can't sand it ?

Do you think this is salvageable ? Been just done over with electrics and had to get that sorted, can't afford to get it all replaced, or all coving taken off and walls plastered if it damages old walls.

In the following image, as you look up at the ceiling, the red is the coving, the black is the timber. Fill the white wedged area with filler. The longer the wedge, the less obvious the difference.

coving.jpg

If the plasterer is unwilling to do it properly, you could follow @Wayners advice and get a coving that matches. It isn't difficult to put up, but it is easier with two people.

Frankly, I would not be happy with the current set up if I were the one paying.
 

DIYnot Local

Staff member

If you need to find a tradesperson to get your job done, please try our local search below, or if you are doing it yourself you can find suppliers local to you.

Select the supplier or trade you require, enter your location to begin your search.


Are you a trade or supplier? You can create your listing free at DIYnot Local

 
Sponsored Links
Back
Top