

Hi all,
Really need some advice please, I am currently trying to redo my downstairs toilet. This time I have decided to try and do some of the work myself and some with professionals.
I was going to have a go at the painting and tiling myself but have got a plumber in to do all the pipework. As these are big tiles 600 x 600 and there are only a few to put down I decided to give it a go.
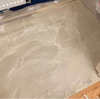
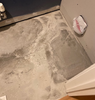
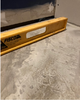
Anyway, the concrete floor seemed fairly level, I have cut all the tiles to size and was ready to start laying them when I had a change of mind and decided the floor wasn't level enough. Poor planning I know. I used some cement based leveller from screwfix designed for 0-10mm as the floor wasn't to bad. It did set quicker then I thought, at a glance it appeared very flat but when putting a tile or straight edge down it is obvious there are some lower spots by the walls, I had another go with levelling compound to try and address the issues after reading the forum. You can see in the pictures the darker spots where I have tried to raise the level. This has made it better but there are lips where it joins the first batch I put down. Long story short when I lay the tiles there is a bit of rock on some of them and a lip of around 2-3mm between a couple of the tiles. I assume there will also be small gaps underneath bits of the tiles. I know there is lots of advice onlineView media item 70455 but are any of the below an option? I don't want to make it any higher ideally so don't want to screed again.
Would a thick layer of tile adhesive take up the gaps?
Can I chisel it out and go again?
Would a concrete floor grinder help?
Should I give up and get someone in to fix my mess? If so is this a quick job? Only reason I ask is that it's been nightmare trying to get people in at the moment as everyone seems booked up for weeks.
Thanks all
Really need some advice please, I am currently trying to redo my downstairs toilet. This time I have decided to try and do some of the work myself and some with professionals.
I was going to have a go at the painting and tiling myself but have got a plumber in to do all the pipework. As these are big tiles 600 x 600 and there are only a few to put down I decided to give it a go.
Anyway, the concrete floor seemed fairly level, I have cut all the tiles to size and was ready to start laying them when I had a change of mind and decided the floor wasn't level enough. Poor planning I know. I used some cement based leveller from screwfix designed for 0-10mm as the floor wasn't to bad. It did set quicker then I thought, at a glance it appeared very flat but when putting a tile or straight edge down it is obvious there are some lower spots by the walls, I had another go with levelling compound to try and address the issues after reading the forum. You can see in the pictures the darker spots where I have tried to raise the level. This has made it better but there are lips where it joins the first batch I put down. Long story short when I lay the tiles there is a bit of rock on some of them and a lip of around 2-3mm between a couple of the tiles. I assume there will also be small gaps underneath bits of the tiles. I know there is lots of advice onlineView media item 70455 but are any of the below an option? I don't want to make it any higher ideally so don't want to screed again.
Would a thick layer of tile adhesive take up the gaps?
Can I chisel it out and go again?
Would a concrete floor grinder help?
Should I give up and get someone in to fix my mess? If so is this a quick job? Only reason I ask is that it's been nightmare trying to get people in at the moment as everyone seems booked up for weeks.
Thanks all

")