Help with Hive on Potterton Promax Combi

Joined
18 Mar 2020
Messages
3
Reaction score
0
Country
United Kingdom
Hi, I am new to the forum, I am after a bit help with my Hive Active Heating if possible, please.

I am quite confident with the allowed electrical maintenance tasks DIYers are allowed to perform around the house and thought I would give this a go. Instructions on the Hive itself looked pretty easy. The problem for me was that the old thermostat was not wired separately to the boiler, so It was not a simple case of changing the wires "like for like".
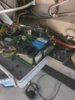
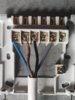
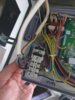
I also a wireless battery-powered thermostat and a receiver next to the PCB and that confused things for me [FMReciever pic]

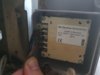
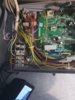
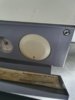
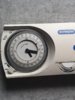
After some further reading, I now (believe) I have it wired up correctly. The Hive receiver/hub/thermostat all appear to be working correctly and doing their job. [Hive Setup & New Setup pics]

The issue I have is with the boiler, not clicking on (radiator Light) when I turn the dial on the thermostat past the current temp.

Hot Water is fine and with no issue
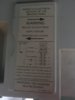
This is my boiler:

https://mediacdn.potterton.co.uk/-/...icing_manual.pdf?la=en&v=1&d=20180111T015411Z

If I do have the PCB wired up correctly, is there something else on my boiler that is interfering with the Hive?

I've included some pics, hope these help

Thanks
 

Attachments

  • Block to FMReceiver.jpg
    Block to FMReceiver.jpg
    236.3 KB · Views: 868
  • FMReceiver.jpg
    FMReceiver.jpg
    142.7 KB · Views: 852
  • Original Setup.jpg
    Original Setup.jpg
    311.5 KB · Views: 895
  • PCB cover  Diagram.jpg
    PCB cover Diagram.jpg
    174.5 KB · Views: 833
  • Hive set up.jpg
    Hive set up.jpg
    293.2 KB · Views: 981
  • New set up.jpg
    New set up.jpg
    244.3 KB · Views: 1,294
Sponsored Links
If the grey and black wires in the bottom two boiler terminals.....

Boiler.JPG

....are the same as those going to Hive 1 & 3

Hive.JPG


And the Hive N (blue wire) and Hive L (brown wire) are those going to the boiler N & L, and nothing else is connected apart from the 230v supply to the boiler, then that looks right to me. So, all I can suggest is check:

1) The wiring terminals are secure and the boiler wiring screws are clamped on the conductors and not the insulation
2) The fuses are OK
3) You have the right version of Hive (Single Channel)
 
Last edited:
Little bit more Info just to add. I set my (old) wireless thermostat to constant on, the wireless receiver indicator on the boiler flashes as per normal operation. At this point, I am able to use the Hive thermostat to control the heating! I took the batteries out the old thermostat and all appeared ok. however, after about an hour, the connection is once again lost and I can't control via hive any more.

This gives me a bit more confidence that the wiring is correct and the internal FM receiver is causing issues??
 

Attachments

  • FM reciever status light.jpg
    FM reciever status light.jpg
    146.2 KB · Views: 270
  • Old Thermostat.jpg
    Old Thermostat.jpg
    362 KB · Views: 335
If the old thermostat receiver is part of the boiler then it will have to be on 24/7 for the Hive to work.

Or, disconnect the two black wires at the receiver here and join them together in an insulated terminal.

aa.JPG
#

I suspect your boiler may be one where you have had to open up a room sealed compartment to access the wiring. If so, that should have only been done by an RGI (Gas Safe) who can make the necessary safety checks to make sure it is properly sealed up again afterwards. Might be wrong on this as I can't remember every boiler in detail.
 
Last edited:
Sponsored Links
If the old thermostat receiver is part of the boiler then it will have to be on 24/7 for the Hive to work.

Or, disconnect the two black wires at the receiver here and join them together in an insulated terminal.

View attachment 186233#

I suspect your boiler may be one where you have had to open up a room sealed compartment to access the wiring. If so, that should have only been done by an RGI (Gas Safe) who can make the necessary safety checks to make sure it is properly sealed up again afterwards. Might be wrong on this as I can't remember every boiler in detail.

Perfect, that did the trick. Disconnected the two blacks and joined them together in an insulated terminal.

Many thanks for your help Stem!
 
@stem, depending on the version of promax, I think he may be ok on these, as the cover is 2 screws and lifts off. Another sealed panel hides the combustion parts and chamber. It’s one of the things I like about them.
 

DIYnot Local

Staff member

If you need to find a tradesperson to get your job done, please try our local search below, or if you are doing it yourself you can find suppliers local to you.

Select the supplier or trade you require, enter your location to begin your search.


Are you a trade or supplier? You can create your listing free at DIYnot Local

 
Back
Top