Hive Heating & Hot Water - Disconnecting Old Thermostat

Joined
27 Nov 2021
Messages
5
Reaction score
0
Country
United Kingdom
Afternoon All

I’ve recently installed Hive heating & hot water which was really straight forward (or so I thought!) The hub and the receiver are installed fine and I currently have heating and hot water coming on fine via the app and doing what I’d expect. Trouble starts as soon as I disconnect the old wired thermostat (an ES1) which seems to stop the boiler from firing up. The Hive receiver still kicks in and the green lights are lit for heating and hot water but nothing happens from there. As soon as I reconnect the ES1, the boiler starts up fine.

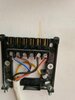
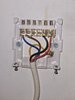
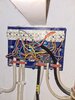
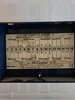
Attached image 1 shows the wiring for the original programmer (a UP1), image 2 is the wiring for the Hive receiver, image 3 is the wiring for the ES1 and image 4 and 5 are the wiring for the main wiring box for the heating system.

Can anyone advise on what I need to do to allow the ES1 to be disconnected but for everything to work as it should?
 

Attachments

  • Image1.jpg
    Image1.jpg
    130.8 KB · Views: 175
  • Image2.jpg
    Image2.jpg
    184.8 KB · Views: 164
  • Image3.jpg
    Image3.jpg
    175.4 KB · Views: 241
  • Image4.jpg
    Image4.jpg
    294.3 KB · Views: 163
  • Image5.jpg
    Image5.jpg
    206.1 KB · Views: 168
Sponsored Links
The old thermostat is no longer required as the Hive incorporates time and temperature control in one unit, making the old thermostat redundant. However, you can't just remove it otherwise the wiring will be permanently 'open circuit' and the heating won't operate, so it has to be decommissioned properly.

The easiest way is to leave the ES1 in place and simply move the yellow wire from terminal 3 and put it in terminal 1 with the red wire loop already there. There shouldn't be so much exposed copper visible through. [The amount showing on the blue wire in N is about right (y)]

Capture.JPG


However, if you want to remove the old thermostat completely:

1. Trace the thermostat cable back to its origin.

2. Take take a photo, or make a note of where the live switching wires (Yellow and Red) are connected at their origin.

3. You can now disconnect all of the wires going to the old thermostat including the neutral and earth. You can now remove the cable and thermostat.

4. Insert a wire link between the terminals where the two live switching wires (Yellow and Red) have just been removed from, so that they are now electrically joined together.
 
Thanks Stem.

My preference is to remove the ES1 altogether as It’s not needed and I have the Hive wireless thermostat too. So, looking at your advice on what to do to remove the old thermostat, would you expect that the ES1 would terminate in the main wiring box (Image4)?
 
Probably, although I can't see the wires clearly enough from your photo to determine for certain. The wiring centre has not been wired up very neatly. :(

The switched live of the thermostat (yellow wire) should go to the brown wire of the central heating motorised valve, so looks like it could be the yellow wire in terminal 13. Assuming of course that it is connected to the brown wire of the black cable on the left, and that this is the cable to the central heating motorised valve (not the hot water motorised valve) In which case, the yellow wire looks to me like it originates from the cable 3rd from the left.

Capture.JPG


However, you shouldn't guess, so to be certain you will either need to trace it physically, or test it with a multimeter.
 
Sponsored Links
It is a bit of a mess isn’t it! I’ll take a closer look tomorrow and message back on it. Thanks for your help so far Stem (y)
 
Yes it's untidy aesthetically, but the electrical connections look sound, there isn't excess conductor showing beyond the terminals, and the cables are secured by clamps, so it's a lot better than many that appear on here.
 
Hi Stem. I’ve finally been able to take a look at the wiring centre and can confirm that your thoughts about the yellow and the brown wires are correct. In fact, everything you said is correct.

On this basis, what would you suggest I do?
 
The old thermostat is no longer required as the Hive incorporates time and temperature control in one unit, making the old thermostat redundant. However, you can't just remove it otherwise the wiring will be permanently 'open circuit' and the heating won't operate, so it has to be decommissioned properly.

The easiest way is to leave the ES1 in place and simply move the yellow wire from terminal 3 and put it in terminal 1 with the red wire loop already there. There shouldn't be so much exposed copper visible through. [The amount showing on the blue wire in N is about right (y)]

View attachment 252227

However, if you want to remove the old thermostat completely:

1. Trace the thermostat cable back to its origin.

2. Take take a photo, or make a note of where the live switching wires (Yellow and Red) are connected at their origin.

3. You can now disconnect all of the wires going to the old thermostat including the neutral and earth. You can now remove the cable and thermostat.

4. Insert a wire link between the terminals where the two live switching wires (Yellow and Red) have just been removed from, so that they are now electrically joined together.

Great answer.

I did exactly this when installing something similar, in fact i removed all of the redundant wiring and tidied up the install altogether.
 
OK, so once you have identified the terminals that the thermostat wires are in. Note where the red and yellow wires are connected and then disconnect all of the wires in the cable and remove it from the wiring centre so that the disconnected wires don't inadvertently touch anything.

Then add a wire to join the two terminals where the red and yellow thermostat wires have just been removed from so that they are electrically connected.

When you disconnect the thermostat wires, make sure that the other wires in the same terminals remain securely in place.

A thermostat is usually nothing more than a switch. Your system has made it redundant, so everything it did is now redundant.
You simply remove it all and connect back the live wire in the junction box which was feeding the switch.

This needs a bit of electrical competency, so either get an electrician in or leave the stuff as is and bridge as per the post above.

If you can read diagrams, look at the boiler/stat/valve wiring diagrams and it should be obvious what to do.
 
So, hoping I’m not messaging too soon but….. all now seems to be working fine after making the changes you suggested Stem! You are a true god and I can’t thank you enough. The ES1 is no more and we have a boiler that’s firing up when it should. Thank you so much for all your help.
 

DIYnot Local

Staff member

If you need to find a tradesperson to get your job done, please try our local search below, or if you are doing it yourself you can find suppliers local to you.

Select the supplier or trade you require, enter your location to begin your search.


Are you a trade or supplier? You can create your listing free at DIYnot Local

 
Sponsored Links
Back
Top