Hive installation removal of room stat confused by wiring

Joined
24 Dec 2022
Messages
5
Reaction score
0
Country
United Kingdom
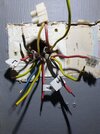
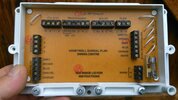
Hello good people I hope you can steer me to what I should do to achieve the above. My system is a Y plan with my boiler, hotwater tank, water supply tank, 3 port valve and wiring centre all located in my attic. I have installed hive and all appears to be working fine by connecting the live and call for heat together at the wall stat end.
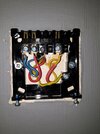
Ideally I would like to disconnect at the wiring centre but this where I get confused as its a Honeywell sundial type. The live wire I beleive is the one located in the room stat block along with the earth. I cannot see where the yellow call for heat wire is likely to be connected, or even where it is !!
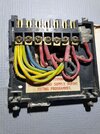
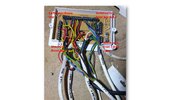
When I installed the hive 2 channel reciever the wiring was the same as my old programmer but there were some additional wires that were either connected together or tucked away behind the programmer. In my photos you will see i numbered the wires as I disconnected them from the old programmer. I dont know if its of any significance but the red wire from the labelled No1 cable connects together with the yellow wire (red sleeve) on the the No 4 cable. Is this my thermostat yellow wire :unsure:
What I hope to acheive is hiding the thermostat dead wires in the wall cavity (but accessible just in case it needs to be reinstated) and bridging whats needed at the wiring centre.
A bit long winded I know but any advice /direction would be greatly appreciated.
 

Attachments

  • 20221230_102533.jpg
    20221230_102533.jpg
    283.4 KB · Views: 68
  • programmer.jpg
    programmer.jpg
    322.1 KB · Views: 57
  • thermostat.jpg
    thermostat.jpg
    274.3 KB · Views: 58
  • Wiring centre.jpg
    Wiring centre.jpg
    156.6 KB · Views: 69
  • WIRINGCENTRE.jpeg
    WIRINGCENTRE.jpeg
    211.3 KB · Views: 75
Sponsored Links
The wiring colour might have changed via the fused connection unit, I would look in there.
 
If your intention is to bypass the roomstat perhaps the easiest is just to replace it's back plate with a terminal block. Place the blue and yellow/Green (Earth) into separate terminals to isolate them. Then place the red and yellow into a common terminal. You then effectively have set the roomstat to permanently on. Also as you wish it makes any future re-instatement simple.

With that to one side, I'd recommend you carefully record what goes where in the wiring centre. You have 8 cables coming in and it's far from obvious which connections they go to. For example the roomstat block apparently only has 2 cores connected (red & earth) yet at the actual roomstat there are 4 cores (red, blue, yellow & earth). Onced mapped that should allow you to marry up the connections as per diagrams at the excellent


I found that site very helpful in matching up the cables in my wiring centre.
 
Last edited:
Thanks Ian I think you are right and I have actually taken the easy route by placing the red and yellow in a common terminal and the hive is working as it should.
The wiring is a bit of a mystery as to what goes where so unless someone else comes up with a definitive answer for removing the stat from the wiring centre I will leave it as it is currently.
 
Sponsored Links
Until you trace the roomstat cable back to the wiring centre you are somewhat stuck. What is strange is that the cable marked "STAT" also says "+ HW OFF". It's almost as if there is another set of connections between the roomstat & wiring centre. Hence my recommendation to identify the cables as best you can.

If only there had been a set of blue/red/yellow/Earth cores going into the ROOMSTAT terminals in the wiring centre it would have been easy to bridge across.
 
The cables were all marked by me so I could try and get my head round what went where by tracing them to where they are connected in the wiring centre. I marked that cable as rm stat because the red wire and earth wire went to rm stat in wiring centre, there is a third wire in that cable which is black with red sleeve and is connected to HW Off in the programmer ??
I don't know if the additional wiring that I described in the OP that were tucked behind the programmer when i installed the hive receiver has anything to do with why things are not as what would be expected ?
As you mention in your last point and the research I had been doing beforehand that's exactly what I was expecting but alas confusion dot com Grrrrrrr
As it stands though I will tidy up what I have done to date and tuck the wires away safely and cover with a blanking plate. Thanks for your suggestions and advice (y)
 
Whilst it's stating the obvious. At the roomstat you have Blue, Red, Yellow & Earth cores in the cable but at the wiring centre you see Red, Earth and Black cores. That implies there is a junction somewhere along the link.

Anyway it seems to be working so perhaps best left as is.
 
It looks to me like it's wired to the clock.
The red wire in terminal 4 and the yellow in the connector.
So disconnect them both along with the blue that is in the same cable, then put the red that was in the connector (with the yellow wire) onto terminal 4.
 
Last edited:
  • Thanks
Reactions: CBW
Sorry I have not been back to you sooner. I now have time to experiment again. Forgive me if im being thick but are you suggesting I should not connect the wire I have labelled 4 but instead connect to terminal 4 the red wire that was in the connector block with the yellow?
The other wires within the original cable do they then become redundant / dead meaning that the cables at the thermostat end are now dead and if I wanted to, could remove them ?
 
Yes that's what I was suggesting, assuming that that is the room stat wire. You would have to check to make sure.
 
Thank you very much, I will do that as the thermostat is located about 2 feet away from programmer so should be easy to do a continuity check on each wire.
Thanks all for previous advice and suggestions very helpful (y)
 

DIYnot Local

Staff member

If you need to find a tradesperson to get your job done, please try our local search below, or if you are doing it yourself you can find suppliers local to you.

Select the supplier or trade you require, enter your location to begin your search.


Are you a trade or supplier? You can create your listing free at DIYnot Local

 
Sponsored Links
Back
Top