Hive installation

Joined
9 Mar 2017
Messages
21
Reaction score
0
Country
United Kingdom
Hi all, wanting to fit Hive to my boiler but have the usual wiring compatibility issues - In short my existing controller has wires connected to N L 1 3 4 (but not 2) (there is no 5) I am hoping to get the dual Hive controller but am not sure if I have enough wires to make it work. Anyone know please?
 
Sponsored Links
Going to need more information than that. What boiler do you have? What controller do you have at present?
 
I thought it wouldn't be that simple.
It's a pj bubble pressure jet oil fired boiler with a Satronic Honeywell DKG 972 control box on top (I think thats the model number)
The Danfoss Randall controller and wiring pic to the controller should be below (if I get the upload correct!)
 

Attachments

  • IMG_0277.jpg
    IMG_0277.jpg
    184.6 KB · Views: 65
  • IMG_0275.jpg
    IMG_0275.jpg
    256.5 KB · Views: 67
The top one looks like a Danfoss, the bottom one after googling model number is for solar charging?

Take the Danfoss off and upload a photo of the rear - should have the wiring diagram
 
Sponsored Links
The Danfoss wiring is:

DF.JPG


And the Hive Dual Channel is:

Hive.JPG


Lucky you....As you can see, the wiring is exactly the same. :)

As the Hive has both time and temperature control built in, any existing room thermostat would need to be either set to it'a maximum setting and left there so that it doesn't interfere with the operation of the Hive, or decommissioned properly and a small wiring modification made. It can't just be disconnected. If you need any help with that post back details of the existing room thermostat.
 
  • Thanks
Reactions: CBW
@stem, how come there’s x3 wires though in 1,3 &4, but not 2?
 
it is as simple as remove the existing programmer and clip on the hive receiver, no wiring at all is needed, forget about no wire in terminal 2 you dont need anything in there
 
  • Thanks
Reactions: CBW
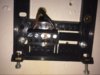
Yes, with a dual channel Hive they should be a straight swap. The backplates are in theory supposed to be a universal fit, and generally they are, but I have found one or two to be a bit tight / loose though, across the various manufacturers.

However, I always swap the old backplate for the new one that came with the Hive anyway, then both parts are new together, and I know that the contacts / pins will align properly just in case there was any wear, or damage to the existing backplate.

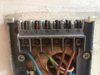
Electrically speaking the two devices are identical internally, so if there isn't a wire in terminal 2 now, it won't be needed with the Hive either.

Apart from the N & L, S-Plan systems require a wire to 3 & 4 Hot water and central heating on

Y-Plans also require a wire to 3 & 4 Hot water and central heating on, plus a wire to 1, hot water off.

It's years since I saw a system use the central heating off connection (terminal 2). It was a system with a Momo (Motor on, motor off) motorised valve which requires a live supply to close the valve, as well as open it. Don't expect to see one though, they are pretty much as rare as hens teeth.
 
  • Thanks
Reactions: CBW
That's great guys - thanks for all the info. Yes I do have a 3 way valve and yes it is a solar charger (I live on a canal boat and have both 12v and 240v) All looks good but am not sure what I do about the existing thermostat (I've posted pics of it (sorry about blurred one)). I thought I could just disconnect but I guess not. Turning it up full is not really an option as I'm replacing it as it has started having a mind of it's own (I have changed batteries but to no avail) so don't want to have to buy another. I'm not sure where the thermostat wires go (I haven't looked) but presume to the boiler, Easy enough to find out. So what will I have to do with the existing thermostat wires?
 

Attachments

  • IMG_0281.jpg
    IMG_0281.jpg
    200.2 KB · Views: 51
  • IMG_0284.jpg
    IMG_0284.jpg
    140.9 KB · Views: 46
Ooops, almost forgot, for the record attached is the pic of the Danfoss wiring.
 

Attachments

  • IMG_0279.jpg
    IMG_0279.jpg
    248.1 KB · Views: 57
No need, it's as per the diagram I posted earlier (y)

a.JPG


b.jpg


Regarding the thermostat, just connect the two wires together. Either at the thermostat, or trace the cable it back to its origin, note where the two wires are connected and remove the old thermostat cable and its wires, then join the terminals that you have just removed the wires from together.
 
  • Thanks
Reactions: CBW

DIYnot Local

Staff member

If you need to find a tradesperson to get your job done, please try our local search below, or if you are doing it yourself you can find suppliers local to you.

Select the supplier or trade you require, enter your location to begin your search.


Are you a trade or supplier? You can create your listing free at DIYnot Local

 
Sponsored Links
Back
Top