I glad i read from the start. Was going to ask if you got permission from the M.O.D to demolish that bunker. Had issues when had my extension built. Tarmac patio with 4 to 5 inch york stones under that. Cleared that lot away ready for the builder. Mini digger arrived to start digging down. About 3 inch of soil then thick sticky clay. lol The digger guy was on his own. After about half an hour he gave up. Call the builder for help and they had to scope a bucket full out and the labourer then had to scrap the clay out the bucket. Was a right mess and didn't get any easier. Down to 800mm and asked inspector if ok to go to 900mm and he said no. Which in fairness is right but the clay is like solid mass and with street on a hill water runs off so on ponding happen.

You are using an out of date browser. It may not display this or other websites correctly.
You should upgrade or use an alternative browser.
You should upgrade or use an alternative browser.
Honestly how difficult can it be......... Rear extension
- Thread starter scaffers
- Start date
- Joined
- 17 May 2018
- Messages
- 99
- Reaction score
- 13
- Country

was out there today for a bit, well another 3+hours, managed to cut / release that cranked steel beam..........9 x cutting discs and a monkey wrench and a 4ft of tube. broke the rest of the pond inhalf with a breaker ready for mr diggerman to pull out tomorrow and hide it in another pond im filling in. Building inspector here tomorrow to have a look at the digging for footings ....fingers crossed
scaff
scaff
Yeah hopefully get going. Looks like and sounds like you've had some serious grafter to do on that. Have a think about the future before filling in that pond. I buried those yorkstine flags and tarmac then later tried to put anchours in for a swing/slide thing. What a nightmare.
- Joined
- 17 May 2018
- Messages
- 99
- Reaction score
- 13
- Country
No worries there m8, I have no need for swings etc the only sessions my kids have now are in wheterspoons.
just gonna hole the linings fill em up with crap, top soil and turf over it.
The ponds are about 35 foot long each x 10 foot wide and 2ft deep. We had no intention of keeping them so this is as good a way as any of filling them in.
just gonna hole the linings fill em up with crap, top soil and turf over it.
The ponds are about 35 foot long each x 10 foot wide and 2ft deep. We had no intention of keeping them so this is as good a way as any of filling them in.
Coming on nicely then now. Having the ponds a lucky break as saved a few quid on skip hire. Just got a letter from my P.P.I claim yesterday. Mancave in loft going to be going full steam ahead by end of month hopefully. Peace and quiet at last. Time to look for a comfy chair. Cant decide on whether a Jag or BMW drivers seat. Yes i know sounds funnily but saw a guy on youtube with one. Had the full monty.. heat massage etc. Put it on a small frame and wired to 12v.
- Joined
- 17 May 2018
- Messages
- 99
- Reaction score
- 13
- Country
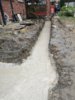
Today isn't Friday........
It's concrete day.
The lorry turned up after 3pm and sorta managed to get near the dug footings, he had a 4m shoot, shame as I'd hoped it'll be nearer 5.5m as they said on the phone when I ordered. Still a bit of ply and 2 battens an we had another 2.4m on its reach.
Incidently the cost of concrete....... I was quoted £130 plus vat per meter cubed by one supplier and got it for £88 plus vat per meter cubed, pays to ring about.
He dropped it in the short 4.5m return and I had to pull it down the 10m run...... Not easy, in fact it was a f%@#ing nightmare. The lorry driver was a Saint and helped out. We barrowed the last half a cube in by hand. Boy did I feel it after that..... Some painkillers and a beer.
It's taking shape, what shape I've no idea but now I don't have a hole to lose me dogs in or reinact the trench warfare of the first world War.
Bring on the bricks
Scaff
Attachments


I see the grafter out to inspect your work lol. Hopefully now thats the nightmare over and plain sailing. Fingers crossed for some good weather for you to crack on.
- Joined
- 11 Jan 2004
- Messages
- 46,627
- Reaction score
- 3,877
- Country
Yeah, it's always good when you're almost out of the ground.
- Joined
- 17 May 2018
- Messages
- 99
- Reaction score
- 13
- Country
Gents
Bit of help pls if poss on the bricks.
I've set up a string line 300mm in from the outside wall this will give me the inside wall face, 100mm brick 100mm cavity 100mm block as per the plans. I waited till dark and popped a laser level on it and its straight.
Now the bricks where is the best place to start laying them, from the corner and work back to the house or house to corner and then 90degrees to house again
Also, I need to go up about 10 courses in engineering brick to take the block and beem floor, would it be better to do that in foundation blocks (440mm x 300mm x 215mm) I'm not worried how it'll look where the ground is low as I'll be building a deck outside.
Cracking on i see. Just looked at my extension. Builder has done row of foundation blocks then engineering bricks before damp proof course. With the blocks being bigger i'd say you'll get a nice flat level squared frame to work off.
By the way. You cutting into the house brickwork or using wall starter ?
By the way. You cutting into the house brickwork or using wall starter ?
Now the bricks where is the best place to start laying them, from the corner and work back to the house or house to corner and then 90degrees to house again
I would lay them all out dry first to ensure the bond is correct and then i'd start from the corners and work back to the house. You may need to adjust the perp joints slightly or even put a cut or two in.
DIYnot Local
Staff member
If you need to find a tradesperson to get your job done, please try our local search below, or if you are doing it yourself you can find suppliers local to you.
Select the supplier or trade you require, enter your location to begin your search.
Please select a service and enter a location to continue...
Are you a trade or supplier? You can create your listing free at DIYnot Local
Similar threads
- Replies
- 0
- Views
- 804