

Day 326 in the big brother house. . .
Spent the day there today and feel like I've been at it all day but hardly got anything done.
I got the battens fixed onto 3 of the living room walls where the pipework runs to box it all in.
I also ran phone cables from the bt master to under the stairs, then to the tv point in the living room, then to roughly where the virgin media point may be located in the future. The idea is if we get virgin in future i can just drop the cable out of the bt socket.
 the electricians have all but finished. This is now the nerve centre for the electrics and the alarm. The electricians just have to finish the aerial system in the loft and the bathroom extractor, and the alarm sensors.
 plumber has been in for 3 days and got the boiler in and the pipework finished. He's just got to come back tomorrow to do the flue and pressure test his pipework. Then return to fit the radiators once the plastering is done. This photo is from below the airing cupboard.
 tiles we picked for the bathroom
 dining room radiator point
 one of my phone outlets behind the tellybox. Also i put a box for the sky cable which for simplicity I'll just put through a flex outlet.
 boxing in the radiator pipes
 lots of plaster fell off when the electricians made their chases
 plumber has been hard at work!
 more pipes.
Spent the day there today and feel like I've been at it all day but hardly got anything done.
I got the battens fixed onto 3 of the living room walls where the pipework runs to box it all in.
I also ran phone cables from the bt master to under the stairs, then to the tv point in the living room, then to roughly where the virgin media point may be located in the future. The idea is if we get virgin in future i can just drop the cable out of the bt socket.
the electricians have all but finished. This is now the nerve centre for the electrics and the alarm. The electricians just have to finish the aerial system in the loft and the bathroom extractor, and the alarm sensors. plumber has been in for 3 days and got the boiler in and the pipework finished. He's just got to come back tomorrow to do the flue and pressure test his pipework. Then return to fit the radiators once the plastering is done. This photo is from below the airing cupboard. tiles we picked for the bathroom dining room radiator point one of my phone outlets behind the tellybox. Also i put a box for the sky cable which for simplicity I'll just put through a flex outlet. boxing in the radiator pipes lots of plaster fell off when the electricians made their chases plumber has been hard at work! more pipes.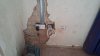


")


