

Renovating a house from top to bottom, part of which is the partial rebuild of a Sun Lounge. I'm a rank amateur at this game, and have learnt enormously from having to go through pain, so I'm jotting this down in case it may help others. Apologies to anyone (and there must be very many) at a greater skill level than me.
Please feel free to add comments, correct errors etc. I hasten to add that this is a narrative of my experience - my learning curve. I am in no way shape or form a builder ( as will become apparent!) and there are far better skilled folks on this forum from whom to seek advice and help.
Anything I put here is what I have seen, or been told, or advised.
The difference between a conservatory and a sun lounge is that a sun lounge has a solid roof (thanks Local Authority Building Control LABC).
As such, it needed Planning Permission and inspection with respect to Building Regs. It was built in 1970, and was inspected at Excavation For Foundations, Foundations and Damp Proof Course, but interestingly enough not after! This didn't come up in the searches carried out prior to purchasing, but through my own searching at the council offices. Buyer Beware!
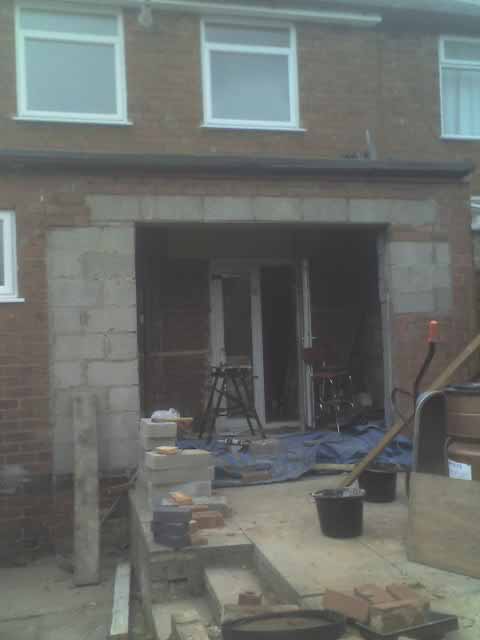
Sun lounge construction is interesting, in that there is a brick outer skin, block inner skin and a small cavity. Roof joists go the length of the lounge, rather than the shorter width. Thus, the supporting walls are the ones at the side of the lounge, rather than the one that contains the patio doors. Also, two very large wooden lintels are installed across the two supporting walls, covering the gap over the patio doors. Well, sort of!
In fact, the two wooden lintels, enormous and strong though they may be, support half a dozen lightweight blocks. The outer skin of brickwork is supported by the patio door frame!
Needless to say, the brickwork has failed, and needs replacing.
I have placed a Building Notice with the LABC, and paid the relevant fee. They have, to date, been extremely helpful answering my dim questions.
So I'm now ready to make a start.
I've taken away most of the brickwork, leaving a stub in the corner which helps hold up the roof (the outer-most joist rests on the brickwork too), having accrowed up the joists. Since the joists are not supported by the wall that I am removing, you may well ask why I bother with accrows. I do this because blokes that know what they are doing told me to do this. When I know what I'm doing, I might argue then, but not before!
Took the bricks out one by one by removing one or two from the top course, and then checking the accrows for any problems. Bosch Rotary drill justified the £90 I spent on it !
Now the planning for the replacement wall. This is an old property, so I've now spent a lot of time waiting for brickies and builders to tell me that I won't be able to match up the bricks and the courses because the bricks are impossible to get, and impossible to match for size. So it is impossible to have a brick outer skin that will look good. Since a number of them have said this, I now believe them. Lots of time lost though.
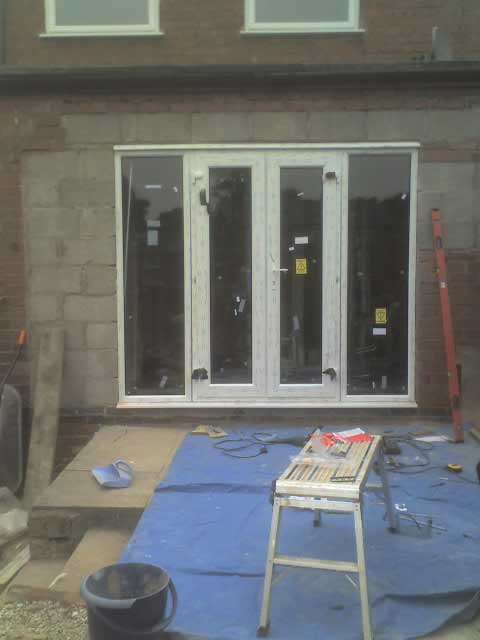
Only viable option is to rebuild the wall, then render and pebbledash. Should look OK.
Having planned the new doors, and triple-checked the size of the hole required to fit them, it's time to sort out the details.
LABC tell me that:
- I can use blocks if I'm going to render afterwards. External must be Class A, or 7 newton blocks. I learn that this is a measure of the density of the block.They are quite heavy too! 3.5 newton blocks are fine for the internal skin or leaf (wall to us non-brickies!). I chose 4newton thermalites.
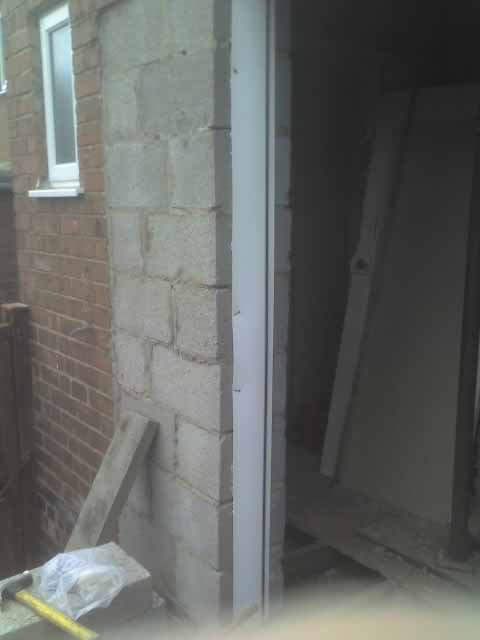
- If I'm adding to an existing wall, then I can continue whatever cavity (or absence of cavity) currently exists. If I'm building a new wall, then it has to be cavity, and 70mm.
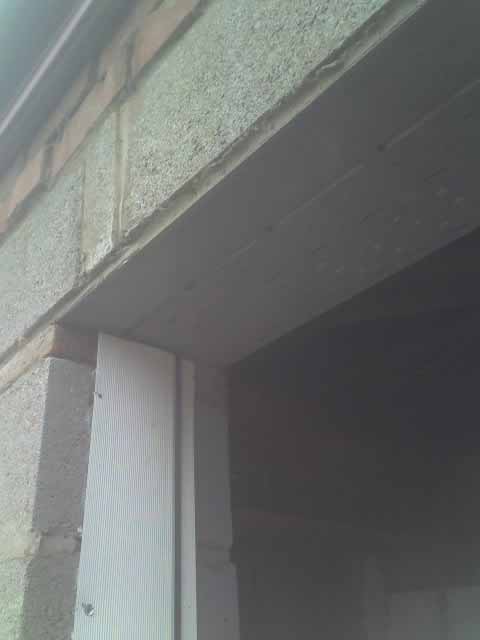
- Lintel choice then simplifies (have you seen how many different types sizes shapes ?). I need a cavity wall lintel, 300mm longer than the hole for the doors, since the lintel needs 150mm either side resting on the wall.
- They only need to inspect once the wall has been built, and before it has been plastered (so they can check on the presence and state of the lintel and cavity I guess). They also say that they will try to get out same-day if I call early enough in the morning.
I've discovered a number of things, mostly from this site, which I list now.
- cavity wall is filled with insulation batts
- the cavity must now be closed with cavity Closers, rather than simply putting a brick or block in the gap. This is to avoid thermal bridging, which reduces the effectiveness of the cavity.
- wall starters can be used to "key" the new wall into existing ones. These are strips of metal that are firmly screwed into the existing wall, and offer tags upon which the new wall can be started. Removes the need to remove bricks in the existing wall (toothing)
- I've had loads of conflicting advice from well-meaning folks. Get a brickie and a builder that you trust, talk it over with them and then check with the Building Control Officer (BCO).
- The technical support lines for manufacturers (eg Catnic for lintels) are very helpful, and give the sort of help and advice sometimes lacking at the Builders Merchants.
- metal ties are used to hold the two skins/walls together. This have a particular shape to stop moisture travelling across them. Should these ties get dirty (mortar etc) then the moisture may flow from external to internal wall, and thereby into your nice clean (expensive) plaster.
Next stage is to call my BCO to check a few assumptions I've made or had made for me, and also to check up on whether it is necessary to:
- put a Damp-Proof Membrane (DPM) between the cavity closer and the external wall
- put a DPM under the frame of the new doors (which will sit on the Damp Proof Course DPC)
- use Lintel End-Stops. These apparently ensure that any water that finds its way in across or onto the lintel, is dealt with.
- how many courses of engineering bricks (blues) are required (hopefully only 2)
- and of course "Is there anything that I've missed?"
Update tomorrow hopefully!
Please feel free to add comments, correct errors etc. I hasten to add that this is a narrative of my experience - my learning curve. I am in no way shape or form a builder ( as will become apparent!) and there are far better skilled folks on this forum from whom to seek advice and help.
Anything I put here is what I have seen, or been told, or advised.
The difference between a conservatory and a sun lounge is that a sun lounge has a solid roof (thanks Local Authority Building Control LABC).
As such, it needed Planning Permission and inspection with respect to Building Regs. It was built in 1970, and was inspected at Excavation For Foundations, Foundations and Damp Proof Course, but interestingly enough not after! This didn't come up in the searches carried out prior to purchasing, but through my own searching at the council offices. Buyer Beware!
Sun lounge construction is interesting, in that there is a brick outer skin, block inner skin and a small cavity. Roof joists go the length of the lounge, rather than the shorter width. Thus, the supporting walls are the ones at the side of the lounge, rather than the one that contains the patio doors. Also, two very large wooden lintels are installed across the two supporting walls, covering the gap over the patio doors. Well, sort of!
In fact, the two wooden lintels, enormous and strong though they may be, support half a dozen lightweight blocks. The outer skin of brickwork is supported by the patio door frame!
Needless to say, the brickwork has failed, and needs replacing.
I have placed a Building Notice with the LABC, and paid the relevant fee. They have, to date, been extremely helpful answering my dim questions.
So I'm now ready to make a start.
I've taken away most of the brickwork, leaving a stub in the corner which helps hold up the roof (the outer-most joist rests on the brickwork too), having accrowed up the joists. Since the joists are not supported by the wall that I am removing, you may well ask why I bother with accrows. I do this because blokes that know what they are doing told me to do this. When I know what I'm doing, I might argue then, but not before!
Took the bricks out one by one by removing one or two from the top course, and then checking the accrows for any problems. Bosch Rotary drill justified the £90 I spent on it !
Now the planning for the replacement wall. This is an old property, so I've now spent a lot of time waiting for brickies and builders to tell me that I won't be able to match up the bricks and the courses because the bricks are impossible to get, and impossible to match for size. So it is impossible to have a brick outer skin that will look good. Since a number of them have said this, I now believe them. Lots of time lost though.
Only viable option is to rebuild the wall, then render and pebbledash. Should look OK.
Having planned the new doors, and triple-checked the size of the hole required to fit them, it's time to sort out the details.
LABC tell me that:
- I can use blocks if I'm going to render afterwards. External must be Class A, or 7 newton blocks. I learn that this is a measure of the density of the block.They are quite heavy too! 3.5 newton blocks are fine for the internal skin or leaf (wall to us non-brickies!). I chose 4newton thermalites.
- If I'm adding to an existing wall, then I can continue whatever cavity (or absence of cavity) currently exists. If I'm building a new wall, then it has to be cavity, and 70mm.
- Lintel choice then simplifies (have you seen how many different types sizes shapes ?). I need a cavity wall lintel, 300mm longer than the hole for the doors, since the lintel needs 150mm either side resting on the wall.
- They only need to inspect once the wall has been built, and before it has been plastered (so they can check on the presence and state of the lintel and cavity I guess). They also say that they will try to get out same-day if I call early enough in the morning.
I've discovered a number of things, mostly from this site, which I list now.
- cavity wall is filled with insulation batts
- the cavity must now be closed with cavity Closers, rather than simply putting a brick or block in the gap. This is to avoid thermal bridging, which reduces the effectiveness of the cavity.
- wall starters can be used to "key" the new wall into existing ones. These are strips of metal that are firmly screwed into the existing wall, and offer tags upon which the new wall can be started. Removes the need to remove bricks in the existing wall (toothing)
- I've had loads of conflicting advice from well-meaning folks. Get a brickie and a builder that you trust, talk it over with them and then check with the Building Control Officer (BCO).
- The technical support lines for manufacturers (eg Catnic for lintels) are very helpful, and give the sort of help and advice sometimes lacking at the Builders Merchants.
- metal ties are used to hold the two skins/walls together. This have a particular shape to stop moisture travelling across them. Should these ties get dirty (mortar etc) then the moisture may flow from external to internal wall, and thereby into your nice clean (expensive) plaster.
Next stage is to call my BCO to check a few assumptions I've made or had made for me, and also to check up on whether it is necessary to:
- put a Damp-Proof Membrane (DPM) between the cavity closer and the external wall
- put a DPM under the frame of the new doors (which will sit on the Damp Proof Course DPC)
- use Lintel End-Stops. These apparently ensure that any water that finds its way in across or onto the lintel, is dealt with.
- how many courses of engineering bricks (blues) are required (hopefully only 2)
- and of course "Is there anything that I've missed?"
Update tomorrow hopefully!

