- Joined
- 8 Feb 2015
- Messages
- 241
- Reaction score
- 7
- Country

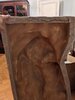
Howdy all
I want to display a heavy marble resin sculpture on my wall, but I'm struggling to figure out the safest way to 'hang' it.
It weighs about 20kg, and - unfortunately - I can't drill into it or otherwise attach any other kind of fixing.
The picture shows the reverse of the piece; you can see the 'lip' at the top. The lip is about 40mm deep.
I was planning to simply hang the piece, by placing this lip on a wall-anchored batten of similar dimensions. (And perhaps adding some kind of very mild adhesive to ensure it doesn't move off the batten).
Any other suggestions!?
Thanks!!