How do i secure this riser?

Joined
28 Apr 2021
Messages
285
Reaction score
3
Country
United Kingdom
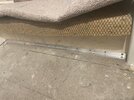
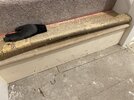
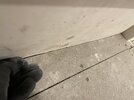
So the riser on the bottom step is not secured where it meets the chipboard floor. I can’t screw it into the floor because the chipboard ends right under the riser and there is a void. The riser flexes alot. How can I secure the riser so it doesn’t sound like its broken when it gets kicked?
 

Attachments

  • A09CBAD8-6F3B-4D0F-A87C-9F86F10E5355.jpeg
    A09CBAD8-6F3B-4D0F-A87C-9F86F10E5355.jpeg
    614.7 KB · Views: 62
  • 89928F4C-3A2B-48CA-9BB8-3DCA5D31AB44.jpeg
    89928F4C-3A2B-48CA-9BB8-3DCA5D31AB44.jpeg
    330.8 KB · Views: 61
Sponsored Links
Is there no option to screw something like a batten to the floor behind the riser, you could then glue/pin it on.
 
If it's possible to remove the rise from the front, you could fix a batten behind as suggested by Mr Chibs.
Mark a line along the front face of the board on the floor. Remove the riser and mark a second line behind the first equal to the thickness of the riser. Securely screw a batten along this line, (a 2" x 2" would be ideal), re-fit riser and pin/screw/glue in to position against the batten.
TIP: Have someone heavy stand on the bottom stair tread whilst you secure it to the batten to take out any movement when stepping on the stairs.
For added strength you could also put a small vertical batten up each side to affix to.
Firstly, I can’t see any way to get the riser out, there are no screws or nails, I guess its glued into the tread and stringers. Secondly, like I said, the floor ends under the riser, so there is nothing to fix a batten to anyway. You can see this in the second photo where I’m pushing the riser back revealing the edge of the chipboard
 
Sponsored Links
Surely there's got to be some floor behind there somewhere??.. can you access from behind?

Must be glued... or pinned in, are all those holes from gripper rods?
 
Surely there's got to be some floor behind there somewhere??.. can you access from behind?

Must be glued... or pinned in, are all those holes from gripper rods?
No there’s nothing behind it. Just a void, you can see where the floor ends in pic 2. No access. The other 3 side are glued I think, butbthe bottom moves about an inch if you press it. What about some brackets? The plywood isn’t particularly thick though…
 
If the riser is going to be covered by carpet, I would drive a couple of screws into the face of the riser. Using the claw of a hammer you could then tug the riser free. If the chipboard doesn't extend under the riser, simply put a piece in. The chipboard in front looks as though it must be on some form of joist/support. Which will probably extend under the stairs. If they don't, then simply sister a couple of lengths to the front joists and then put a piece of batten across them.
Where there's a will, there is a way. ;)
There is an angled plasterboard ceiling under this staircase (its on the first floor with another set of stairs directly below) so there is no room to sister any joists.
 
Angled batten glued to plasterboard and riser glued to batten so no banging nails involved?
 
Three similar solutions spring to mind. Screw a series of 19mm angle brackets (the sort used in kitchen installs) across the front of the riser to the riser and the floor: buy a length of 16mm aluminium angle profile which you drill, countersink and then screw into the same position; or glue and angle pin a length of coving beading into the same position, alternating the direction of the pins to left and right - pin into both the floor and the front of the riser. Carpet will hide all of these whilst 12mm thick laminate can be made to work with them as well so they aren't noticeable or even visible. If the riser is very flexible a long screw or two can be driven into it, your claw hammer hooked over it and the riser pulled into place to hold it whilst it is being fixed.

if.there is a need to stiffen the riser it may be possible to glue a piece of thin plywood onto it with contact adhesive yo thicken it.
 
Last edited by a moderator:
Three similar solutions spring to mind. Screw a series of 19mm angle brackets across the front of the riser to rhe riser and the floor: buy a length of 16mm aluminium angle profile which you drill, countersink and then screw into the same position; or glue and angle pin a length of coving beading into the same position, alternatingvthe direction of the pins to left and right. Carpet will hide all of these elehilst 12mm thick laminate can be made to work with them as well so they aren't noticeable or even visible. If the riser is very flexible a long screw or two can be driven into it, your claw hammer hooked over it and the riser pulled into place whilst it is fixed.

if.there is a need to stiffen the riser it may be possible to glue a piece of thin plywood onto it with contact adhesive yo thicken it.
Thanks I’ll try brackets. i’m putting engineered wood over this floor so I guess I’d have to either cut out a bit of the underlay around the brackets or chisel out the chipboard a couple of mm to sink them to the level of the floor?
 
I squirted some expanding foam into the gap to the void which seemed to hold it pretty good, then screwed in a countersinked aluminium L profile . Only problem I had was a couple of the screws didn’t hold in the riser because its quite thin and I wasn't being careful enough. And its hard to screw in straight in a corner like that. Seems solid though.
 

Attachments

  • E30E8C99-74F4-463C-A62D-CCD3877BEBA9.jpeg
    E30E8C99-74F4-463C-A62D-CCD3877BEBA9.jpeg
    466.8 KB · Views: 38

DIYnot Local

Staff member

If you need to find a tradesperson to get your job done, please try our local search below, or if you are doing it yourself you can find suppliers local to you.

Select the supplier or trade you require, enter your location to begin your search.


Are you a trade or supplier? You can create your listing free at DIYnot Local

 
Sponsored Links
Back
Top