How to connect to 6" old clay collar? - SOLVED

We've rigged up a very temporary solution for now until we can sort something out properly :
Screen Shot 2017-12-08 at 14.28.11.jpg


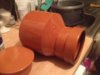
You can see the 6" clay pipe collar here more clearly :

Screen Shot 2017-12-08 at 14.28.19.jpg


These band seal connectors from Toolstation are a bit rubbish - they don't have fins on the inside to grip & create a seal like other manufacturers have. The clay pipe we had to connect onto was not ideal (the end of a y-junction, with a slight bend, with some chips on the underside creating a leak etc)

...we totally didn't end up wrapping duck tape around it in desperation at 1am last night.... *ahem* >_<

Obviously we should have dug more out and found a better bit of clay pipe, but we were already angle grinding at 11pm (the neighbours no doubt love us!) and we had no idea if what we uncovered would be any better. That clay section all needs to be dug out and replaced anyway (we suspect that is leaking too) once we have the inspection chamber in.

Screen Shot 2017-12-08 at 14.28.26.jpg
 
Sponsored Links
You can push the 4" a bit further in if you like so it passes the ridges.

You could mortar a plastic 6-4 reducer into the clay collar. I do it on awkward ones where I can't use a bandseal. I'd just use the Extra Rapid cement, big blob under it first to get it lined up then fill the rest of the collar. It's not worth getting anyone in now you have done the hard bit.


Where abouts are you?
 
First things first, I just want to thank you for your time and those incredibly helpful, clear photos to help explain it Ian.

Good point about pushing the pipe past the ridges. There seems to be a good length of the clay pipe behind the brick wall... maybe around 1m or so? (we will likely be sticking a go-pro on a stick with a torch attached down there tomorrow because we are sufficiently odd/intrigued to want to know what lies beyond!)

Couple of questions :

How far to insert plastic pipe?

I'm of the opinion that the plastic 4"/110mm should only be pushed in enough over the lip of the bandseal to avoid the ridges... however the guy in the photo thinks we might as well push it a good bit further inside - almost to where we think the clay pipe stops and drops off into the sewer.

He thinks this would avoid any possible backflow towards the seal, whereas I think it would provide a nice, dry little cosy alcove for rodents to nest... (I had a massive, intractable problem with rats in my last house, so I am super keen to make things as inhospitable nearby for them as possible!)

Should we cut collar off as best we can with angle grinder?

We were both thinking that when backfilling or over time, the unsupported collar could be knocked, damaged or crushed sending cracks along the clay pipe buried in the brick wall eventually causing a leak. On the flip side, leaving the collar would allow it to be changed to a mortared joint at some point in future if needed/wanted.
I definitely prefer the idea of the bandseal rather than mortaring if possible... I am aware that every joint we have found that has been mortared - even if we were very careful in chipping it off - has fractured the attached pipe when doing so. If theres any problem with this joint years down the line, I'd rather make some other poor sod's life a little bit easier by making the joint removable, rather than making them chip cement mortar off a pipe that is likely to crack, in the wall of a sewer! I'm of the mindset do it once, do it right - try and make it last as long as possible, whilst also ensuring it can be 'undone' as easily as possible with minimum waste/damage.

I also found these : Flexseal Icon Couplings which seal to the internal surface of pipes. However I don't think there is one that would suit, or if there is - it might need other fittings prior to the IC, to step down to 110mm plastic. Probably hard to source & expensive as well.

ICON-Flexseal-LR-web.jpg


Oh and I'm in Bristol.
 
Last edited:
Sponsored Links
I would fill the collar with mortar behind the bandseal if you do it that way.

Best would be to mortar in a 6-4reducer because you have time to let it cure and you will be able to see/feel that's its perfectly aligned. Once your new pipe is bedded on gravel it won't be going anywhere.
 
Ok. We will mortar it in before backfilling.

Do you mean one of these when you say 6-4 reducer? (that's all I could find - a level invert reducer)

image.jpeg


I'm possibly overly concerned, but this wouldn't have any kind of rubber seal between it and the inside of the clay pipe like the bandseal right? My faith in mortar joints remaining waterproof (particularly in this area which is prone to movement) especially when made by novices like ourselves, isn't high!

At least with the bandseal we can insert the 110mm plastic well past the end of it, so it should never be relying on the waterproof-ness of the joint anyway?

We have dug out a good amount more & are about to insert the IC. We have one of those floplast ones with the adjustable inlets (for flexibility) - I just read a thread where there was criticism of those adjustable bends, so now I'm worrying that the adjustable inlets on this might be prone to problems. Any opinions on them?
 

Attachments

  • image.jpeg
    image.jpeg
    310 KB · Views: 150
That's the same reducer I was on about, no rubber seal, just mortar into the collar. If you mortar the reducer in before connecting any 4" to it you can simply wipe any excess mortar that might enter the pipe and you will be able to see that you have made a good joint.

I'm not a fan on the adjustable bends, I've been a poo pusher for 14 years now and never needed to use one.
 
Ah, ok. Well - we've found that the pipe is actually a bit larger than 6" (hard to measure exactly how much without some kind of large vernier calliper!) - but the flexseal ac4000 doesn't quite fully touch the inner surfaces of the clay pipe... it's almost there but definitely not a sound seal.

I guess its either mortaring, or get Flexseal to make us a custom Icon coupling reducer (they can fabricate within 24 hours, but I suspect the cost will be very high...)
 
Definitely mortar. The reducer might go slightly inside the clay which will make mortaring easier.
 
In addition to the pipe being larger than 6", it is also cracked & probably not in the best condition :/

Old cracked clay pipe embedded in sewer wall.jpg


Since mortaring it would be difficult to reverse without damaging the pipe further, and it being embedded in the shared sewer wall - I am trying to get clarification from Wessex that they are 100% happy for this to be treated as private drainage (as was suggested on the phone). I just want to make sure its done in the best way possible without creating further problems.

I've also offered Wessex the opportunity to survey the sewers here whilst we have made access relatively easy for them, since there are no plans/records of this sewer & I think there have been problems with them before according to a neighbour (who mentioned dye had been put down them to try and clarify the route, but it all remains a mystery). Due to the issues with extensive damp in local houses & movement, I am thinking they might not be in the best of conditions & at some point they might need attention - a survey now might save them more grief/expenditure in future! Not that I know how viable this is, but thought I would offer them the opportunity.
 
A further update. I obtained an 8" spring calliper to measure internal diameter of the clay pipe. ID is 154mm or possibly 155mm. The crack travels 3" inwards, from where the internal surface of the pipe edge starts (ie. excluding the collar). The crack is definitely embedded in the brick wall of the sewer, by approximately 2-2 1/2" on the right side and around 1" on the bottom (it is hard to be 100% sure given the angle).

The 160mm OD (outer diameter) of the level invert reducer, means it would not be able to slot fully inside the clay pipe unfortunately - only into the clay collar, which would mean there would likely be a leak through the crack in the clay.

The AC4000 has an approx 150mm OD which means it fits neatly in the plastic with 160mm plastic pipe, but is 4 or 5mm too small for this particular clay pipe, therefore can't create a seal.

I am still awaiting an email response from Wessex confirming they consider this to be private drainage - to my mind, it seems to be part of the sewer wall - which is why I would like confirmation of their position either way.

I have also emailed Flexseal who wanted further information on the internal diameter of the clay pipe. They believe the Flexseal Icon IC150 with one or more of the bushes might work, connected to a 150 ID pvc pipe stub, then using a standard coupling to step down to a 110mm plastic. Of course, this could turn out to be a much more expensive solution than I was expecting. I am also concerned as to how we can cut a square end into this pipe beyond the crack to create a good seal, due to it being embedded within the sewer wall.

The saga continues...
 
Last edited:
Could you take a picture inside the clay pipe to see how long it is on the inside?

Another option would be a patch liner, about £220 but make a good strong repair.
 
heres how i would have done this not that i do much groundwork.
first give myself a good pit to work in..
dig clear well beyond any hubs an cut the pipe beyond the hubdont mess with the hub.use flex seal connecters to adapt from glazed to plastic.
clear off the soil above what you say is a manhole for connectin the row drainage to a common lateral.
go to the ends of the row of houses and find startin an finishin manhole cover then eyeball the line of any common lateral througgh the back gardens or back entry.

if the brickit is a lateralmanhole wall then come back an ill tell you what id donext
 
Could you take a picture inside the clay pipe to see how long it is on the inside?

Thanks Ian - we've measured that it projects around 70cm through the wall (its on an angle) before dropping off the ledge into main sewer run.

Another option would be a patch liner, about £220 but make a good strong repair.

Ah thats good to know theres another option. I'm guessing that would be a job for a professional though (I do want to ensure the job is done properly)

I actually now have an inspector from Wessex Water coming round tomorrow at 8am. Maybe he can shed some light on things too

Photos as requested from inside the clay pipe pointing down into the sewer :

Inside Clay pipe embedded in brick wall - cracked bottom right.jpg


Inside Clay pipe embedded in brick wall - peering into sewer.jpg


Sorry... he'd taken those photos before I'd had chance to tell him to chuck a bucket of clean water down first!
 
Last edited:
first give myself a good pit to work in..
dig clear well beyond any hubs an cut the pipe beyond the hubdont mess with the hub.use flex seal connecters to adapt from glazed to plastic.

Thanks bobasd, Not sure I follow all of this. We've dug a good pit - 1.2m deep, approx 1m wide - can't go much bigger due to space limitations. This is how we found the wall of the sewer. We can't use standard flex seal adapters due to the clay pipe being buried in the brick wall of the sewer, so without removing bricks (which I doubt wessex would be happy with) we can't expose a spigot to connect onto.

...clear off the soil above what you say is a manhole for connectin the row drainage to a common lateral.

Not sure its a manhole... I suppose its possible & the top was covered in concrete. Seems like an old brick built sewer to me, but I am new to all of this. I get the impression you might be suggesting this is just a pipe that serves a couple of houses upstream of me & joins a 'common lateral' downstream of me? We have put an endoscope camera down - its hard to tell, but we think the ID of the brick structure is around 2ft - much more than the 12" the dynorod guy predicted it would be when we picked his brains! Externally - when I dug down to expose the stone/concrete cap previously - I found it was around 1.5m wide.

...go to the ends of the row of houses and find startin an finishin manhole cover then eyeball the line of any common lateral througgh the back gardens or back entry.
Virtually none of the neighbours have manholes in their gardens - no one can find the start and end of the sewer... (presumably why they struggled to find the dye when a neighbour tried to establish the route previously) I'll have a look into this common lateral or lateral manhole thing you mentioned. Apologies if I'm being slow!
 
Last edited:

DIYnot Local

Staff member

If you need to find a tradesperson to get your job done, please try our local search below, or if you are doing it yourself you can find suppliers local to you.

Select the supplier or trade you require, enter your location to begin your search.


Are you a trade or supplier? You can create your listing free at DIYnot Local

 
Sponsored Links
Back
Top