Hi all, sorry, another leaking shower question.
Moved into my new house a year ago, and the shower in the ensure developed a leak through to the ceiling below, but couldn't pinpoint where. Resealing around the inside of the tray seemed to fix it, but leak has come back with a vengeance, so trying to do it from scratch this time. Have removed most of the old sealant, but have a few questions.
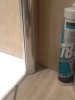
1) I understand I should seal the outside of the shower enclosure, to allow any water that works it's way into the frame to escape back into the tray. In my case, the frame channel has a circular profile, which means the outside section 'overhangs' onto the floor tiles surrounding the tray - a couple of photos show the situation, and cross section. How then could I just seal that horizontal bottom edge externally, and not end up with water sitting there outside the tray - can't imagine that would be good? Do I have to seal internally in this case?
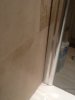
2) as the wall is out of true, the gap between the two pieces of the channel closes to almost nothing at the bottom. The current sealing inside has sealed between the wall tile and attached Channel down as far as it can go, but the last 5 inches bridges the two pieces of channel entirely - so water could get behind that and be trapped. Is that the right thing to do (should I seal the vertical inside the shower at all)? if not what's the right approach. Currently there's no sealing outside, except to close the gap at the bottom (already removed in the pictures)
3) should I seal along the bottom of the glass internally (as it has been) or just on the outside ?
4) back to first picture - you can see that water gets through outside the enclosure and along the wall/flor junction. Does that indicate the wall/tray behind the channel hasn't been sealed - presumably I would need to dismantle the whole thing to fix that, which I obviously hope I don't have to do.
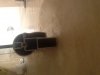
5) the gasket around the trap hasn't been installed quite right by the looks of things - you can see towards the bottom, and there some old sealant someone's applied, though the gasket does at least show all around. Does that look like a problem, if so anywAy to resolve it without removing the tray entirely? Would a repeat of the bodge with some more sealant help against any possible problems?
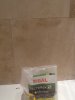
6) finally, planning to regrout the walls as some of the joints have broken down. The travertine tiles have almost no gaps, so any advice thereto make the grout bond properly - very hard to find a thin enough tool to scrape out existing. Or am I going to have to resort to silicone there as well.
Hope that's not too many questions, and appreciate any advice!
Moved into my new house a year ago, and the shower in the ensure developed a leak through to the ceiling below, but couldn't pinpoint where. Resealing around the inside of the tray seemed to fix it, but leak has come back with a vengeance, so trying to do it from scratch this time. Have removed most of the old sealant, but have a few questions.
1) I understand I should seal the outside of the shower enclosure, to allow any water that works it's way into the frame to escape back into the tray. In my case, the frame channel has a circular profile, which means the outside section 'overhangs' onto the floor tiles surrounding the tray - a couple of photos show the situation, and cross section. How then could I just seal that horizontal bottom edge externally, and not end up with water sitting there outside the tray - can't imagine that would be good? Do I have to seal internally in this case?
2) as the wall is out of true, the gap between the two pieces of the channel closes to almost nothing at the bottom. The current sealing inside has sealed between the wall tile and attached Channel down as far as it can go, but the last 5 inches bridges the two pieces of channel entirely - so water could get behind that and be trapped. Is that the right thing to do (should I seal the vertical inside the shower at all)? if not what's the right approach. Currently there's no sealing outside, except to close the gap at the bottom (already removed in the pictures)
3) should I seal along the bottom of the glass internally (as it has been) or just on the outside ?
4) back to first picture - you can see that water gets through outside the enclosure and along the wall/flor junction. Does that indicate the wall/tray behind the channel hasn't been sealed - presumably I would need to dismantle the whole thing to fix that, which I obviously hope I don't have to do.
5) the gasket around the trap hasn't been installed quite right by the looks of things - you can see towards the bottom, and there some old sealant someone's applied, though the gasket does at least show all around. Does that look like a problem, if so anywAy to resolve it without removing the tray entirely? Would a repeat of the bodge with some more sealant help against any possible problems?
6) finally, planning to regrout the walls as some of the joints have broken down. The travertine tiles have almost no gaps, so any advice thereto make the grout bond properly - very hard to find a thin enough tool to scrape out existing. Or am I going to have to resort to silicone there as well.
Hope that's not too many questions, and appreciate any advice!