How to tackle two walls not being square for a bath. Thick adhesive ok?

Joined
18 Feb 2025
Messages
169
Reaction score
7
Country
United Kingdom
Hi,

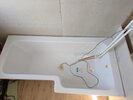
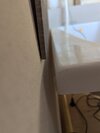
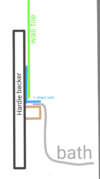
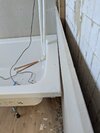
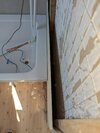
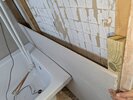
Done one wall of Hardie backer and realised the walls not square. This leaves a little gap on one of the walls (depending on which wall I square it).

I was hoping that as normally, you'd tile over the bath lip, it may help cover the gap. Tried placing a tile against the wall and I'm unsure if the gap could be covered once adhesive goes on.

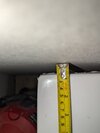
Just wondering whether having a really thick layer of adhesive is ok? Say maybe 15mm?

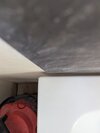
Or as it the bath edge would be supported by a baton, would it be better to tile normally and if there's a gap, just silicone the void?
 

Attachments

  • PXL_20250404_111026220.jpg
    PXL_20250404_111026220.jpg
    168.4 KB · Views: 61
  • PXL_20250404_111242608.jpg
    PXL_20250404_111242608.jpg
    130 KB · Views: 59
  • PXL_20250404_110951008.MP.jpg
    PXL_20250404_110951008.MP.jpg
    97.3 KB · Views: 55
  • PXL_20250404_110938545.MP.jpg
    PXL_20250404_110938545.MP.jpg
    102.7 KB · Views: 51
Any chance you could pack the wall out slightly behind, or use another hardiebacker?
But if I do that, same problem will arise as it still won't be square. Wall would be just thicker? Unless you mean shim it? I was thinking about as an option but worried about screwing the shower screen onto a shimmed wall
 
You could let you bath into the wall a bit,or get one of the L shaped bath seals you fit before tiling

Thank you and great idea. Do you mean something like the sketch? If so, there will be a small void space between the batton and L shaped seal (highlighted in purple). I assume I would just fill it with sealant. But if I'm doing that, is there real point to the L shaped seal?
 

Attachments

  • Screenshot_20250405-112331.png
    Screenshot_20250405-112331.png
    100 KB · Views: 35
The 'L' shaped edging will only highlight the fact that your bath is running off, and will look pants.
I'd be inclined to mark the bath height on the wall ( the long side ) and remove some of the H.B. between the corner and the join. The bath lip is usually 45 to mm high, then slide the bath back in and that will sort out the long edge. To really make it bulletproof you could get some tanking scrim, and fit a length a length of it around the edge, and carefully keep a 10mm overlap along the bath.

I did also think about this but to make a cut this long on a hardiebacker in situ is giving me headaches. The stuff is hard to cut accurately especially small slither like this to fit a straight edge bath.

I would have thought to leave a 3mm gap above the bath edge and would need to silicone instead of scrim (and presumably tile adhesive?) as it's a change in vertical plane
 
Dig a bit into the corner and slide the bath in so the gap reduces enough to be covered by the tiles.
I have a dedicated diamond router bit that I use to do such things with a palm router.
Also useful to fit kitchen end panels on walls not perfectly vertical.
 
But if I do that, same problem will arise as it still won't be square. Wall would be just thicker? Unless you mean shim it? I was thinking about as an option but worried about screwing the shower screen onto a shimmed wall
Nothing wrong with a shimmed wall if it's done robustly, it's the right thing to do.
 
Any suggestions on best way to shim it?

Little plastic wedges/foam pads?

Firring?

Plywood?

I was hoping it'll be the whole face of the stud and not wedges to avoid floating wall. Mainly as the Hardie backer screws are only 35mm. If HB board is 12mm, gap is around 10-20mm, it doesn't leave much stud for the screw to go into.

But finding right thickness and length of the whole vertical stud seems tricky
 
Longer screws are readily available, continuous diminishing strips in line with the studs would be ideal if you have the means to rip them down but suitable plastic spacers will work fine, your fixings should be every 200mm. Don't forget to tape the joints prior to tiling.
 
Get yourself a proper Hardibacker scoring tool ( green handle) and you will be able to gouge out enough of that corner board to push the bath in. The Tanking Scrim tape is like a thin bandage, and is applied with a special glue ( Google it). It has next to no thickness and is 100% waterproof. Don't put silicone in for a seal onto the HB - it doesn't stick to it very well.
 
Get yourself a proper Hardibacker scoring tool ( green handle) and you will be able to gouge out enough of that corner board to push the bath in. The Tanking Scrim tape is like a thin bandage, and is applied with a special glue ( Google it). It has next to no thickness and is 100% waterproof. Don't put silicone in for a seal onto the HB - it doesn't stick to it very well.
I do have their scoring tool but I find it hard to get any real depth to it. Definitely not enough to make up the 15mm gap.

I do have the mapei tanking kit. Would silicone stick better once HB is tanked? As I was going to be using it to stick the bath against it and the batton anyway
 
Just did more testing. If I was to shim it, the gap is bigger than I thought as you can see in the first couple of photos.

However, as it is so big, I could fit a baton on the furthest vertical stud. And then in the middle I could add plywood sheet or firring if I could find one.

Question is, does it matter that the baton is square and isn't tapered? Thinking about how it would screw in weirdly.
 

Attachments

  • PXL_20250406_104359912.MP.jpg
    PXL_20250406_104359912.MP.jpg
    205.7 KB · Views: 45
  • PXL_20250406_104420826.jpg
    PXL_20250406_104420826.jpg
    204.5 KB · Views: 41
  • PXL_20250406_104501057.jpg
    PXL_20250406_104501057.jpg
    260 KB · Views: 38

If you need to find a tradesperson to get your job done, please try our local search below, or if you are doing it yourself you can find suppliers local to you.

Select the supplier or trade you require, enter your location to begin your search.


Are you a trade or supplier? You can create your listing free at DIYnot Local

 
Back
Top