
You are using an out of date browser. It may not display this or other websites correctly.
You should upgrade or use an alternative browser.
You should upgrade or use an alternative browser.
Lead Flashing Repair
- Thread starter RK_London
- Start date
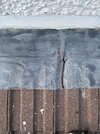
It's an ex/con split due to the constant flexing. Leave it alone and slip in a cover flashing patch over it, lapping about 150mm each side.Have a small tear to lead flashing after roofer replaced some tiles. Didn't see it until after work was done. I was wondering if the fix is easy. Attached a picture below.
Any advice appreciated. Thanks.
The lead looks like Code 3 (
") ) but I might be wrong.
) but I might be wrong.Is the cover patch easy to put for a DIY person or should I get roofer back?It's an ex/con split due to the constant flexing. Leave it alone and slip in a cover flashing patch over it, lapping about 150mm each side.
The lead looks like Code 3 (
It requires a wee bit of skill with an angle grinder a couple of wedges and a squirt of lead-mate.Is the cover patch easy to put for a DIY person or should I get roofer back?
- Joined
- 7 Sep 2022
- Messages
- 4,930
- Reaction score
- 1,436
- Country

Agree with the others, possibly the flashing was fitted in too long a length, beaten too thin at this point to follow the profile of the tile, or corroded thinner here due to some environmental effect and the constant flexing from heat/cool cycling has caused it to break here. The good news is it has essentially sorted itself out by breaking at this point so the lengths either side of it can now likely carry on their expansion/contraction cycles with coming to further harm but do keep an eye on it from time to time to see if any more develop
Have a look around your neighbourhood for someone getting their roof replaced and fob in their skip or ask the roofers if you can have an old soaker; they'll hopefully give you a small piece of lead about 8 inches square, easy to bend with bare hands. Check it for holes and bend it into an L shape with the holes as far away from the bend as possible, then fit it by lifting up your existing lead, placing it so the short tip of the L is well tucked up against the wall where the broken lead joins the wall, and shape the L so it follows the profile of the wall and down onto the tiles, then press the broken lead back down on top of it. It won't come out and and water that drips through the broken crack will drop onto this new bit you added and be channelled out into the tile
If you aren't confident about climbing up to do it, ask the roofer you're happy with, or any handyman, to help out when he is next passing - it's not a big job - I probably wouldn't even charge for doing it if I wasn't going out of my way for it
Side note, if you obtain a piece of new lead and it's all shiny, keep it indoors for a few days til it's gone dull grey. If you fit it and it gets rained on before the dull grey patina has developed it'll carbonate instead and become a source of white staining. If the old soaker you're given is covered in a white powdery appearance, clean it off with a pan scrub back to bright and leave it to go dull somewhere dry
Last edited:
Thanks - I cleaned the flashing and there was no tear before the roofer replaced some tiles which had too much cement that had fallen from his rendering work on the chimneyAs stated above
Or fitted under it .
It's nothing the roofer done . It's due to how the lead was fitted originally .could be low code too.
Thank you for taking time to give such detailed advice. It is appreciated.Agree with the others, possibly the flashing was fitted in too long a length, beaten too thin at this point to follow the profile of the tile, or corroded thinner here due to some environmental effect and the constant flexing from heat/cool cycling has caused it to break here. The good news is it has essentially sorted itself out by breaking at this point so the lengths either side of it can now likely carry on their expansion/contraction cycles with coming to further harm but do keep an eye on it from time to time to see if any more develop
Have a look around your neighbourhood for someone getting their roof replaced and fob in their skip or ask the roofers if you can have an old soaker; they'll hopefully give you a small piece of lead about 8 inches square, easy to bend with bare hands. Check it for holes and bend it into an L shape with the holes as far away from the bend as possible, then fit it by lifting up your existing lead, placing it so the short tip of the L is well tucked up against the wall where the broken lead joins the wall, and shape the L so it follows the profile of the wall and down onto the tiles, then press the broken lead back down on top of it. It won't come out and and water that drips through the broken crack will drop onto this new bit you added and be channelled out into the tile
If you aren't confident about climbing up to do it, ask the roofer you're happy with, or any handyman, to help out when he is next passing - it's not a big job - I probably wouldn't even charge for doing it if I wasn't going out of my way for it
Side note, if you obtain a piece of new lead and it's all shiny, keep it indoors for a few days til it's gone dull grey. If you fit it and it gets rained on before the dull grey patina has developed it'll carbonate instead and become a source of white staining. If the old soaker you're given is covered in a white powdery appearance, clean it off with a pan scrub back to bright and leave it to go dull somewhere dry
It's an aged stress fracture cause by incorrect fitting .Thanks - I cleaned the flashing and there was no tear before the roofer replaced some tiles which had too much cement that had fallen from his rendering work on the chimney
It's not an over bossed split
Last edited:
DIYnot Local
Staff member
If you need to find a tradesperson to get your job done, please try our local search below, or if you are doing it yourself you can find suppliers local to you.
Select the supplier or trade you require, enter your location to begin your search.
Please select a service and enter a location to continue...
Are you a trade or supplier? You can create your listing free at DIYnot Local
Similar threads
- Replies
- 7
- Views
- 12K