Main Eco Elite to tado receiver wiring help 2

Joined
27 Jan 2024
Messages
5
Reaction score
4
Location
London
Country
United Kingdom
Hello everyone,

I have recently bought and attempted to install a tado smart heating system to our flat and I've run into an issue. Having searched Google, I found this thread on this forum with a similar question. I didn't want to re-open it after two year so I am creating a new post in the hope someone may be able to assist.

All three tado devices (bridge, wireless receiver, and wireless temperature sensor) are paired and connected with one another successfully and showing in the app. However, when I request central hearing (25 degrees) from the app or temperature sensor, it does not activate the boiler/heating. The CH light comes on and I can hear a 'click' (relay) on the tado wireless receiver when I demand, and turns off when I turn heating off so I'm confident the tado wireless receiver is receiving the instruction, it's just not sending that instruction to the boiler.

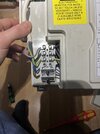
Existing (inherited) setup:

Main Eco Elite Combi boiler .JPG

Main Eco Elite Combi wiring diagram.JPG

Main Eco Elite Combi boiler wiring.JPG

Honeywell 42002116-001 Junction box.JPG

Honeywell 42002116-001 wiring.JPG

Drayton Lifestyle LP711.JPG

Honeywell T6360B1028.JPG

In the spirit of including every detail – however irrelevant it may be – there is a fused switch that turns the boiler on and off adjacent to the old Drayton LP711 now tado wireless receiver.
IMG_2487.JPG

At the start of installation, I followed the in-app instructions to install the tado replacing the Drayton Lifestyle LP711. However, as mentioned above, when I increase the temperature on tado, the heating does not turn on.

From what I've read and been advised so far, I understand I need to connect L from boiler/junction box to CH COM on the tado wireless receiver; is this correct, or does anyone have any other recommendations?

Thanks in advance.
 

Attachments

  • Main Eco Elite Combi boiler wiring.JPG
    Main Eco Elite Combi boiler wiring.JPG
    254.8 KB · Views: 19
Sponsored Links
Ok, from what I’ve deduced (imo). Did you alter any of the wiring in the Honeywell wiring center? Try turning the Honeywell thermostat up to maximum and see if that’s makes a difference.
 
Ok, from what I’ve deduced (imo). Did you alter any of the wiring in the Honeywell wiring center? Try turning the Honeywell thermostat up to maximum and see if that’s makes a difference.
Goodness, I tried to be as detailed as possible in my first post and neglected to mention one key thing... I have disconnected the Honeywell T6360B1028 thermostat, securing the wires with wagos. I should try rewiring that back in as it was before, turn it up to the max and test?

Thanks
 
  • Thanks
Reactions: CBW
Goodness, I tried to be as detailed as possible in my first post and neglected to mention one key thing... I have disconnected the Honeywell T6360B1028 thermostat, securing the wires with wagos. I should try rewiring that back in as it was before, turn it up to the max and test?

Thanks
Did you join the the live and switched live of the thermostat (terminals 1 and 3)? If not, do this as it’s the same as setting to maximum. (They’re red and yellow)
 
Last edited:
Sponsored Links
Did you join the the live and switched live of the thermostat (terminals 1 and 3)?
No, i didn't do anything with the wires connected to the previous Honeywell thermostat other than secure.
Honeywell T6360B1028 (post decommission).JPG

Now I think about it, there's no return to the Drayton/tado wireless receiver. So to confirm, join red to yellow? Using something like this?
Honeywell T6360B1028.JPG
 
  • Thanks
Reactions: CBW
No, i didn't do anything with the wires connected to the previous Honeywell thermostat other than secure.

Now I think about it, there's no return to the Drayton/tado wireless receiver. So to confirm, join red to yellow? Using something like this?
It’s a good job you didn’t put the red and blue together, otherwise you’d have short circuited it! Yes, join red and yellow together- these can go in the Wago, or put them back in the thermostat and turn to max, both do the same job. If you want to get rid of the wires so you can decorate, do it at the Honeywell wiring center.
 
It’s a good job you didn’t put the red and blue together, otherwise you’d have short circuited it! Yes, join red and yellow together- these can go in the Wago, or put them back in the thermostat and turn to max, both do the same job. If you want to get rid of the wires so you can decorate, do it at the Honeywell wiring center.
Thanks. If it's not already obvious, I'm inexperienced with electrics and whilst I've had a bit of advice, I'm still practicing extreme caution and double checking before I do anything understanding the risk/consequence of wiring incorrectly. To that end, I'm really grateful for your guidance in this.

Another picture I neglected to include is how the tado wireless receiver is currently wired as per tado in-app instructions replacing the Drayton LP711:

tado wireless receiver.JPG

Back to the wiring modification at the old Honeywell wall thermostat, in an ideal world, I don't want this on the wall of our hallway anymore and would like to replace it with the tado wireless temperature sensor. The Wago splicing connectors that I linked earlier are expensive, presumably because of their brand and that they're tool free. Would these be a safe alternative sitting in the old thermostat backbox to join red and yellow?

Thanks

EDIT/UPDATE: I have rewired the old Honeywell thermostat back in and turned it up to max and the CH demand from tado wireless receiver is now heating rads. Thank you so much for the guidance. I will buy a connector strip today to semi-permanatly join red and yellow cables which will enable me to remove the old Honeywell thermostat and cover with the tado wireless temperature sensor.
 
Last edited:
  • Thanks
Reactions: CBW
Like I said, you could join them at the wiring center if needed. Well done for sorting it out and you’re welcome.
 
Like I said, you could join them at the wiring center if needed. Well done for sorting it out and you’re welcome.
Just wanted to pop you a quick thank you, again, for your help. I'm really grateful and it was lovely to have a heated home again :)
 
  • Thanks
Reactions: CBW
Just wanted to pop you a quick thank you, again, for your help. I'm really grateful and it was lovely to have a heated home again :)
You’re most welcome, thanks for the feedback, not everyone takes the time.
 

DIYnot Local

Staff member

If you need to find a tradesperson to get your job done, please try our local search below, or if you are doing it yourself you can find suppliers local to you.

Select the supplier or trade you require, enter your location to begin your search.


Are you a trade or supplier? You can create your listing free at DIYnot Local

 
Sponsored Links
Back
Top