
You are using an out of date browser. It may not display this or other websites correctly.
You should upgrade or use an alternative browser.
You should upgrade or use an alternative browser.
Miele W844 EL200C Red Lights Check Inlet and Check Drain
- Thread starter smcuk
- Start date


Think your at the wrong end of the hose but would be nice to know how clean it is inside that white block, follow up the pipe and see what it connects to, should be the pressure switch. Don't forget to check that the pipe is clear.
Brushes look good, presumably the carbon ends freely push in and spring load back out, don't push too far in or they may jam in.
Good continuity between carbon ends and contacts.
What does the motor rotor that fits between the brushes look? Good clean condition?
Brushes look good, presumably the carbon ends freely push in and spring load back out, don't push too far in or they may jam in.
Good continuity between carbon ends and contacts.
What does the motor rotor that fits between the brushes look? Good clean condition?
Oh, right that unit in the picture is at the bottom front of the drum, there is a narrow gauge rubber pipe that leaves that unit and goes right up to the top of the machine and actually passes through the hole on the EL200C board to a connector on the fascia...
The Carbon ends of the brushes push in freely and the motor rotor looks in good clean condition.
The Carbon ends of the brushes push in freely and the motor rotor looks in good clean condition.
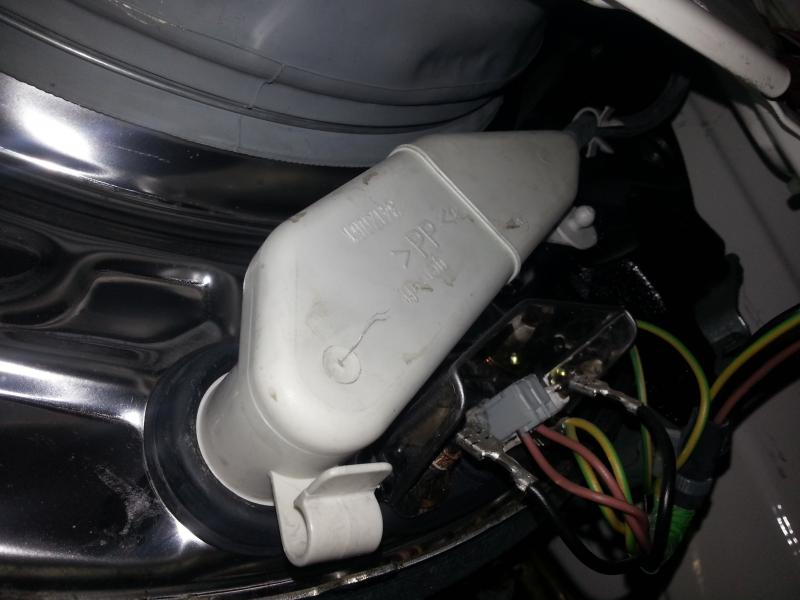
Looks like it is the pressure chamber, found these instructions on another site...
...The presssure chamber is connected to a small diameter black rubber tube which either goes to a electronic switch on the front board or to a mechanical pressure switch in the machine.
The chamber is located next to the heating element, middle bottom part of the front plate of the outer drum. It's an odd shaped white plastic container held in via a 8mm bolt and a seal.
Remove the bolt, grab hold of the chamber and give it a gentle pull. Once you have the chamber in your hand, you should be able to run water from the larger hole which was pushed into the seal in the drum so it runs out of the smaller hole which was attached to the small black rubber tube. If not it's blocked. Replace it or clean it out.
Spray a small amount of WD40 onto the seal before pushing it back home, it will help it pop back in.
I will give this a go tomorrow...
Be interesting to see whats in the bottom white block, i'm guessing nothing but a large hole that reduces down to a smaller hole that the water fills creating air pressure to rise up the smaller bore pipe to the pressure sensor at the front fascia panel.
If theres scale/fluff or other obstruction inside it may be blocking the smaller hole so probably best to remove and inspect rather than just blow down the pipe.
Check the pipe for leaks/splits or perishing and its making a good seal.
Is split etc.near the bottom its likely water would be leaking out.
If split etc.near the top its likely the air pressure would be leaking out the hose and not reaching the pressure switch and of course with movement from the drum spinning could cause a small enough split to sometimes be open and other times not so would somwtimes be a problem and other times not. Just scenarios, but possible ones!
Look for obvious signs of water leaking but don't think thats your issue.
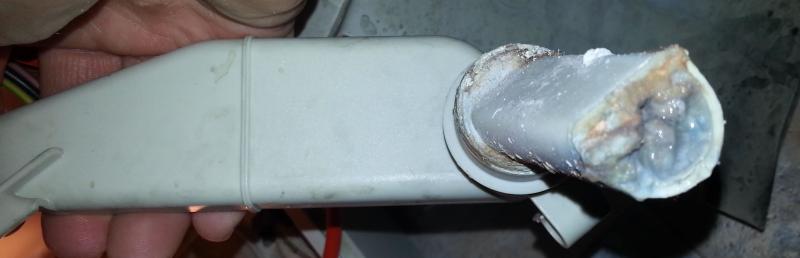
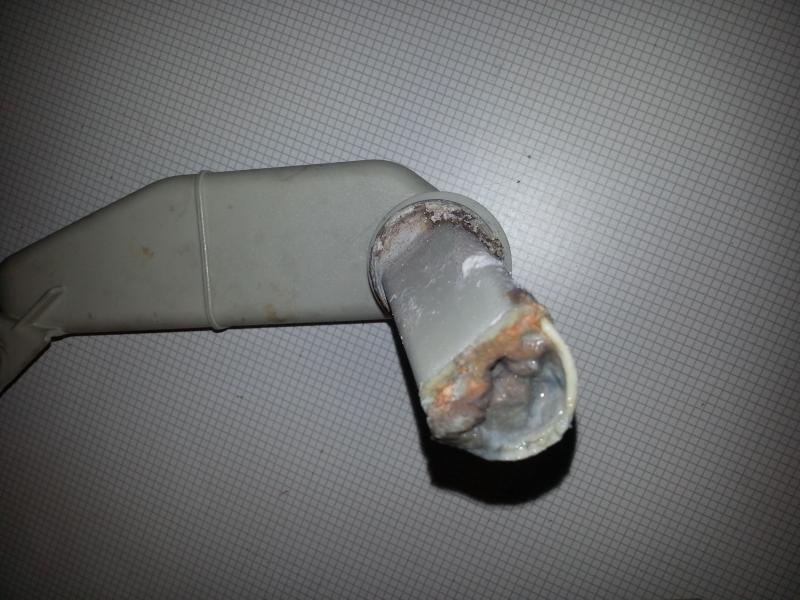
Right, well I decided to remove and clean all the obvious parts including the Pressure Chamber.
First was to remove the large black rubber tubing that takes the water from the powder compartments down to a white u-bend chamber that enters the drum. I also removed the white chamber itself by taking out the push in white clip and pulling the plastic unit out of its rubber housing. This was heavily calked up and needed a good clean with viakal.
Next was to remove the pressure chamber , again just one white plastic push clip and then pull out the chamber from its rubber grommet in the locating hole in the drum. The other end of the pressure chamber has a small rubber tube connected which has to be carefully prised off.
Immediately it could be seen the large hole was in a bit of a state see images below. I then took it away for a good viakal cleaning.
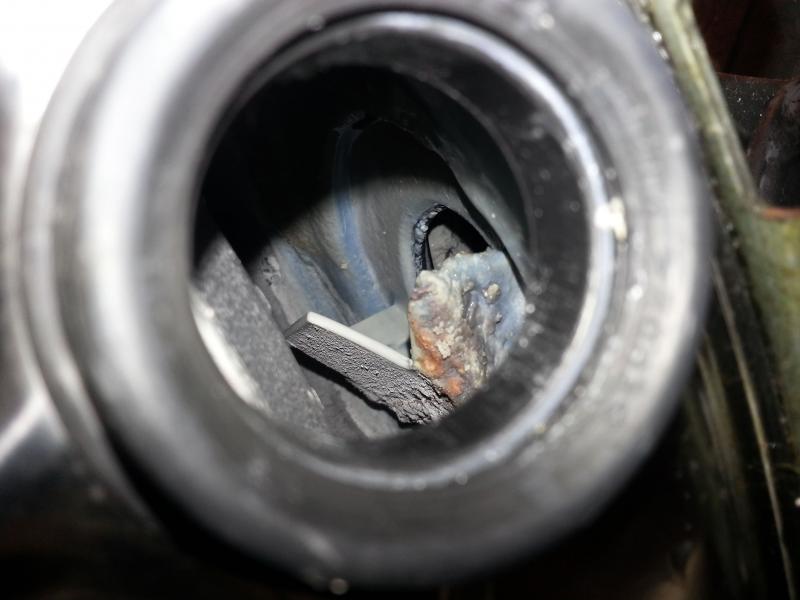
For some weird reason I couldn't help taking a picture straight through the pressure chamber location hole into the drum. God knows what that image has picked up there but its an interesting view.
Next step was somewhat concerning having to reassemble everything back again in the right place and hope this was the cause of all my problems.
Fired up the machine on a quick wash with fingers crossed staring madly at the Check Inlet/Drain lights. All was going very well water entered perfectly, heated up Ok, then on reaching the drain stage still no sign of the dreaded red lights, then disaster struck as I saw a river of water pouring out of the bottom of the machine, panic set in and I killed the machine and grabbed towels sheets and anything to mop up the unwanted tsunami...
...opened the machine again and the u-bend inlet chamber had blown out. BIG LESSON here, make 100% sure you refit the rubber seal correctly, take it out of the drum and you can see there is a ridge around the centre of it which fits perfectly around the protruding plastic ring on the inlet pipe of the u-bend chamber. This must be perfectly fitted to avoid a flood.
After that was re-fitted, I then poured a few pints of water into the drum, set the machine to drain and fired it up again. This time the water was expelled via the correct route.
Next stage is to test properly again with a full wash load standing over the machine in case there is another drama, and hope there are no warning lights.
This will have to wait until tomorrow as I need a beer....
First was to remove the large black rubber tubing that takes the water from the powder compartments down to a white u-bend chamber that enters the drum. I also removed the white chamber itself by taking out the push in white clip and pulling the plastic unit out of its rubber housing. This was heavily calked up and needed a good clean with viakal.
Next was to remove the pressure chamber , again just one white plastic push clip and then pull out the chamber from its rubber grommet in the locating hole in the drum. The other end of the pressure chamber has a small rubber tube connected which has to be carefully prised off.
Immediately it could be seen the large hole was in a bit of a state see images below. I then took it away for a good viakal cleaning.
For some weird reason I couldn't help taking a picture straight through the pressure chamber location hole into the drum. God knows what that image has picked up there but its an interesting view.
Next step was somewhat concerning having to reassemble everything back again in the right place and hope this was the cause of all my problems.
Fired up the machine on a quick wash with fingers crossed staring madly at the Check Inlet/Drain lights. All was going very well water entered perfectly, heated up Ok, then on reaching the drain stage still no sign of the dreaded red lights, then disaster struck as I saw a river of water pouring out of the bottom of the machine, panic set in and I killed the machine and grabbed towels sheets and anything to mop up the unwanted tsunami...
...opened the machine again and the u-bend inlet chamber had blown out. BIG LESSON here, make 100% sure you refit the rubber seal correctly, take it out of the drum and you can see there is a ridge around the centre of it which fits perfectly around the protruding plastic ring on the inlet pipe of the u-bend chamber. This must be perfectly fitted to avoid a flood.
After that was re-fitted, I then poured a few pints of water into the drum, set the machine to drain and fired it up again. This time the water was expelled via the correct route.
Next stage is to test properly again with a full wash load standing over the machine in case there is another drama, and hope there are no warning lights.
This will have to wait until tomorrow as I need a beer....
So far so good, the Miele is now 100% dry and I have completed four consecutive washes all of which have been trouble free, no sign of any warning lights.
Maybe its my imagination but the clothes seem to be cleaner and smell fresher...
I am now going to call this project a success and declare a small victory...but one last thing I will need to do is to order a new pair of shock absorbers...
thanks yardie for your support in helping solving this tricky one and that was a great shout from assuhors...and hope the thread helps someone else.
Hi smcuk and Yardi.
Hi had a problem with my Miele water in and out warning light as you described.
I don't have any experience in electronic so I didn't do any test or control on the machine electronic table.
I just follow the second step you described above: cleaning inlet pipes and circuits, cleaning the filter and water out pump and mainly I focused on the pressure chamber.
The chamber was in the same condition described and shown in yours pictures.
Followed your instruction step by step and clean everything.
Now is working as new") .
.
Unfortunately I discover after reassembling back everything that the heater element are gone.
following some others suggestions I wanted to do a 75° wash the water remain cold and the program flash
I will soon replace the heaters and the shocks absorbers as well.... the machine work since 15 years, 10 wash a week.
Thank you a lot for the wanderful description and for taking the time to share it with the world.
Hi had a problem with my Miele water in and out warning light as you described.
I don't have any experience in electronic so I didn't do any test or control on the machine electronic table.
I just follow the second step you described above: cleaning inlet pipes and circuits, cleaning the filter and water out pump and mainly I focused on the pressure chamber.
The chamber was in the same condition described and shown in yours pictures.
Followed your instruction step by step and clean everything.
Now is working as new
.Unfortunately I discover after reassembling back everything that the heater element are gone.
following some others suggestions I wanted to do a 75° wash the water remain cold and the program flash
I will soon replace the heaters and the shocks absorbers as well.... the machine work since 15 years, 10 wash a week.
Thank you a lot for the wanderful description and for taking the time to share it with the world.
Six years on from my last post following the fix above and I can report all trouble free and perfect running on my wonderful Miele W844, now 27 Years Old and looking young and fresh as a daisy (unlike his owner I might add).
...that is up until today and aaarrgghh the dreaded Flashing Red CHECK DRAIN Light appeared again.
Had to manually drain the water out of the full machine using the pipe outlet by the filter. 16 pyrex dishes full of water later I could finally remove the filter and check inside the housing. Nothing obvious until I pushed my fingers right inside up against the impellor and found a foreign lump of calcium wedged in the blades (see offending lump below).
All cleaned out, filter re-fitted, press start and the W844 is performing again in it's own inimitable way.
What a machine...damn thing will out live me though !
...that is up until today and aaarrgghh the dreaded Flashing Red CHECK DRAIN Light appeared again.
Had to manually drain the water out of the full machine using the pipe outlet by the filter. 16 pyrex dishes full of water later I could finally remove the filter and check inside the housing. Nothing obvious until I pushed my fingers right inside up against the impellor and found a foreign lump of calcium wedged in the blades (see offending lump below).
All cleaned out, filter re-fitted, press start and the W844 is performing again in it's own inimitable way.
What a machine...damn thing will out
live me though !DIYnot Local
Staff member
If you need to find a tradesperson to get your job done, please try our local search below, or if you are doing it yourself you can find suppliers local to you.
Select the supplier or trade you require, enter your location to begin your search.
Please select a service and enter a location to continue...
Are you a trade or supplier? You can create your listing free at DIYnot Local
Similar threads
- Replies
- 0
- Views
- 2K
- Replies
- 7
- Views
- 2K