Potterton EP 2000 swap with Honeywell T6R

Joined
23 Feb 2024
Messages
4
Reaction score
1
Country
United Kingdom
Hi All, done some reading on older threads on similar subjects but wanted to sense check before i start on mine.

Currently have a Potterton EP2000 running in a Y-Plan (i think) and want to swap with Honeywell T6R-HW.

I have mapped the existing wiring as below:
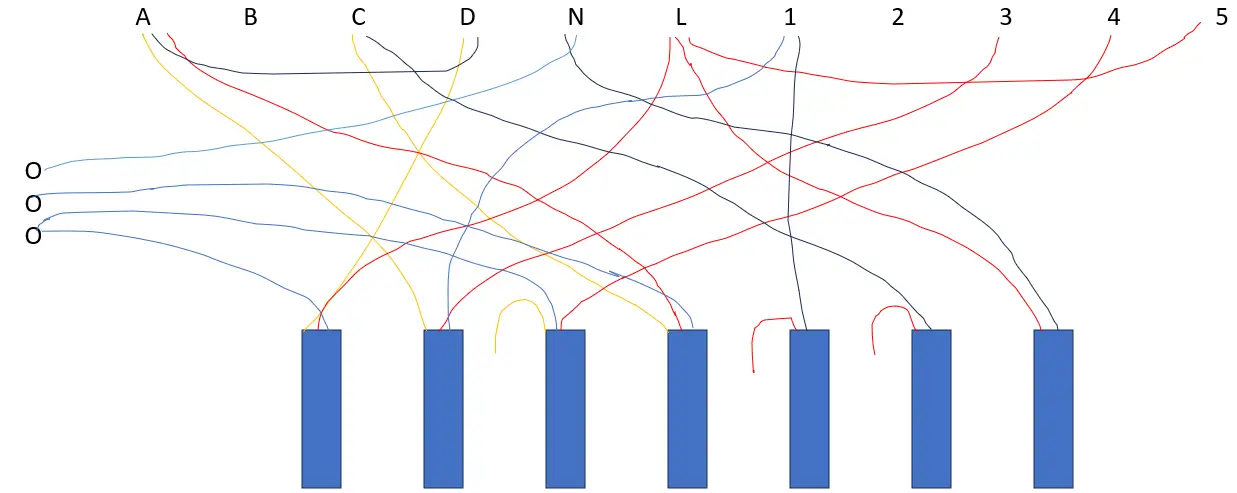
1708696429077.png


The Potterton wiring guide is as below:
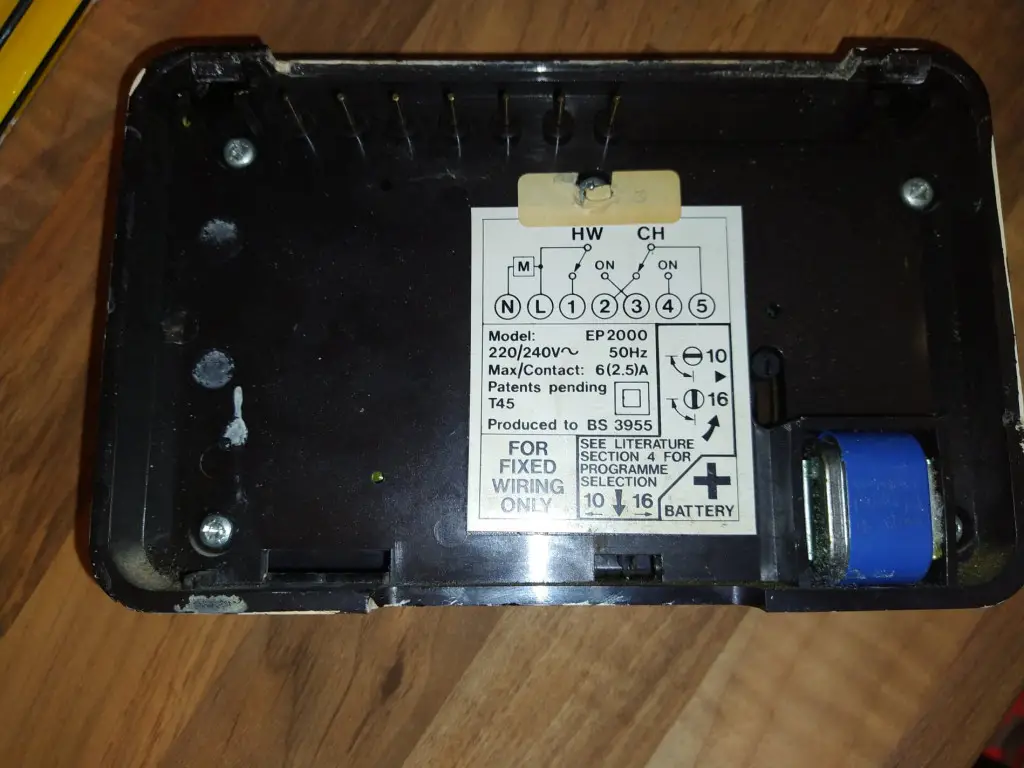
1708697095505.png


Below is the Honeywell wiring guide for both S and Y Plans:
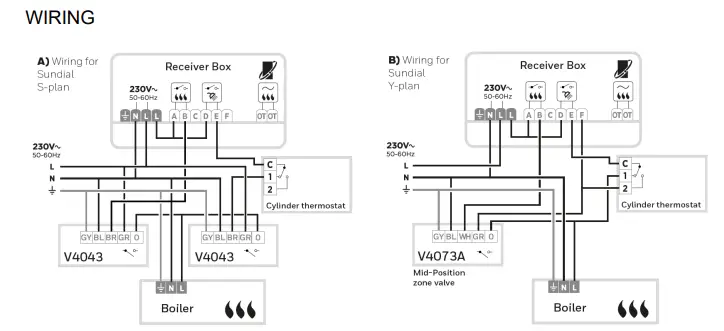
1708697364542.png


Can someone help me understand why both Letters and Numbers in the Potterton? I have tried to follow threads from a Potterton to a Hive to give me a guide but still confused by the volume of wires i have compared to others.

Any help would be appriciated.

Thanks

David
 
Sponsored Links
The E, N and L terminals are self explanatory and the same for both devices. Both of the L terminals in the Honeywell are connected together so are effectively the same terminal.

Then from the diagrams you have posted you can see what each of the terminals do for both devices. So, the wires are moved from the Potterton terminals to the Honeywell terminals that have exactly the same function as follows:

Potterton 1 = Honeywell F [Hot Water Off only used with Y Plan, not required for S Plan]
Potterton 2 = Honeywell C [Heating Off but not usually used in the UK]
Potterton 3 = Honeywell E [Hot Water On]
Potterton 4 = Honeywell B [Heating On]

The Honeywell common terminals A and D should both be linked to L as shown in the diagram. The second L terminal is provided to make this easier - This connection is effectively what the Potterton wire link between L and 5 is doing.

Your existing room thermostat should be set to maximum, or if you want to get rid of it, it can't just be disconnected otherwise the heating won't work. A small wiring modification will be required. Post back details of it if you need any help dong that.
 
As @stem says above, copy over the L, N, HW on and off and CH on wires and the L link wires for the commons.
Potterton to a Hive to give me a guide but still confused by the volume of wires i have compared to others.
The Potterton was designed to combine the programmer and wiring centre into one unit. Hence extra spare terminals.
Simply connect the extra wires from Pottertons A, B, C and D terminals into separate terminal blocks, that hopefully you'll find space for behind the Honeywell.
...although it appears that the wire in D is connected to A, so only two terminal blocks would be required.
 
Last edited:
Thanks both! Massive help.

I have remapped the wiring to the Honey well as below and included T1, T2 & T3 as Terminal Blocks.

What i am still not clear on is the blue wires to the three connections on the left. What are these and where do i need to connect these?

Space is not an issue as on the garage wall.

1708705822894.png


Thanks

David
 
Sponsored Links
What i am still not clear on is the blue wires to the three connections on the left. What are these and where do i need to connect these?
Ahh, forgot about those!
They are common terminals for neutrals. Another terminal block required.

And it appears that the wire in T3 can be moved to T1.
 
Great, thanks for quick reply.
So down to this:
1708707260020.png


Last question re the thermostat. From this diagram can you determine which is the thermostat without tracing it? I see a mention from Stem re removing it. Challenge i have is it has been placed into the roof void during replastering and can no longer access it. Can i do anything from this end to remove it from the loop?

Thanks
 
From this diagram can you determine which is the thermostat without tracing it?
It's a little difficult. The wire coming from C/H on, should lead to the thermostat.
However, your mapping only shows one other wire on that cable being used - a neutral.
That suggests the live return from the thermostat comes back through a different cable.
Can you post a photo of your wiring and we may be able to have a guess!
 
Sure.... although there are a lot of wires so its not easy to view which is why i tried to draw it out.

1708709047786.png


If there is a specific wire that needs to be double checked and mapped let me know and i can re-check.

Thanks!
 
although there are a lot of wires so its not easy
Blimey, someone liked making it difficult for themselves (and everyone else who follows)!

I believe one of the wires in T2 should be connected to B (instead of the existing red wire) - although I'm not sure which one at the moment (although I prefer yellow!).
It would be fine to try them in turn and see which worked (safely isolating power before making modifications etc.).
 
Last edited:
Terminals L, N 1, 2, 3, 4 are the business end. The rest are just a junction box. So:

All of the blue wires in the N strip need to stay connected together,
Green/yellows in earth strip stay connected together
The wires in A stay connected together
The wires in B stay connected together
The wires in C stay connected together
The wires in D stay connected together

Looks like A and D are doubled up, but the principle is the same.

If it helps another poster made the same swap, you can read their thread here.
 

DIYnot Local

Staff member

If you need to find a tradesperson to get your job done, please try our local search below, or if you are doing it yourself you can find suppliers local to you.

Select the supplier or trade you require, enter your location to begin your search.


Are you a trade or supplier? You can create your listing free at DIYnot Local

 
Sponsored Links
Back
Top