Potterton PRT2 stat to Tado wireless

Joined
30 Dec 2022
Messages
9
Reaction score
1
Country
United Kingdom
Dear DIY, Professionals
First let me wish you all a happy new year

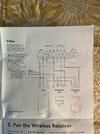
Despite of 100s of posts about Potterton wiring but here I am got a bit lost here about how to decommission PRT2 the way how Tado posted on their YouTube link.

Basically after I finished installing the receiver next to boiler went to old thermostat I set it to 30 to keep it always on meanwhile control actual temperature through new tado wireless stat.
Working fine but I want to ensure get it decommissioned just in case somebody touch it and ruin the circuit for me.

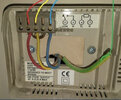
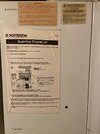
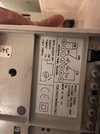
I am attaching the current wiring setup and picture how tado using compact splices to decommission similar stat
 

Attachments

  • 3D518E2C-1856-427E-929E-3C63B51F2987.jpeg
    3D518E2C-1856-427E-929E-3C63B51F2987.jpeg
    448.2 KB · Views: 117
  • 26E527C0-7F0D-4AAE-9538-B65F6F6FB22E.jpeg
    26E527C0-7F0D-4AAE-9538-B65F6F6FB22E.jpeg
    438.7 KB · Views: 87
Sponsored Links
You need to join the switch wires, which appear to be 2 & 3 but there’s a small link wire, but just looks like a live. What boiler do you have?
 
You need to join the switch wires, which appear to be 2 & 3 but there’s a small link wire, but just looks like a live. What boiler do you have?
Hi,
Boiler Potterton Suprima 40
 

Attachments

  • image.jpg
    image.jpg
    305.7 KB · Views: 65
Ok, so you need to find the signal wires in the wiring center and join these, or follow post #2.
 
Last edited:
Sponsored Links
When I replace it potterton programmer with tado wireless receiver I followed tado Y plan as per picture attached. And I see from Potterton programmer CH NO is yellow.
Should I safely assume to connect yellow wire (3) with red wire (2) will make it permanently opened?
 

Attachments

  • 10323036-C787-4C7A-B38A-57BAA8DB232A.jpeg
    10323036-C787-4C7A-B38A-57BAA8DB232A.jpeg
    310.3 KB · Views: 76
  • 3B675C99-856F-4F34-851F-F0478601970F.jpeg
    3B675C99-856F-4F34-851F-F0478601970F.jpeg
    356.8 KB · Views: 71
  • C1474F10-DCBB-4995-B809-E40D76CACDAD.jpeg
    C1474F10-DCBB-4995-B809-E40D76CACDAD.jpeg
    275.6 KB · Views: 71
I don’t know which number 2 you refer to, but transfer wires in a similar fashion, L’s to L, N’s to N, Heating On to heating NO, hot water on to Hot Water NO, and hot water off to NC. The links are included, not sure what others are like C,
 
The number 2 and 3 I mentioned earlier was related to PRT2 thermostat
Do you believe if I connect 2 and 3 and leave 5 isolated would make the thermostat on permanently?
 

Attachments

  • 44908D00-C0B0-472D-ADCA-646E469FA041.jpeg
    44908D00-C0B0-472D-ADCA-646E469FA041.jpeg
    448.2 KB · Views: 57
  • Thanks
Reactions: CBW
basically trying to copy tado installation instructions see video minute 1:24

 
@stem sorry to bring you here but seems you had the previous version installed of tado wired stat over PRT2
You may have idea on how I can make PRT2 on by connecting the wires
 
But there is doubt here about small link between 2 and 4. Should I ignore it?
Looks like the old stat was wired incorrectly, I think the red wire should have gone into terminal 4 with the live from 4 linked to com on 2. Still works just the wrong way around.
 
@stem sorry to bring you here but seems you had the previous version installed of tado wired stat over PRT2
You may have idea on how I can make PRT2 on by connecting the wires

I believe that the Potterton PRT2 is a bit of an oddity when it comes to thermostats. The symbol I've marked below on most thermostats would correspond to a small accelerator, a device that is energised when the thermostat is calling for heat. It warms the thermostat mechanism and improves its operating accuracy. This is what I originally believed that it was.

1.JPG


However, I could never understand why one of the terminals was marked TL (Thermostat Live) if it was an 'accelerator' it should only be made live when the thermostat was calling for heat, and not connected to the live supply to the thermostat.

In addition, I also noticed that when removing PRT2's, the original installers who would have access to the installation instructions had all connected TL to the Thermostat Live as indeed yours was..... Which made me wonder....can they really all be wired up wrongly??

2.JPG
3.JPG
4.JPG


So, I now suspect that as the PRT2 has two lights on the front, one for 'Below' set temperature, and one for 'Reached' set temperature, that the TL connection maybe more to do with the operation of the indicator lights than the wiring for an 'accelerator'.

Either way, it's a quirk of the PRT2 which is being removed, and the remaining 3 wires have been identified for you.
 
  • Thanks
Reactions: CBW
I believe that the Potterton PRT2 is a bit of an oddity when it comes to thermostats. The symbol I've marked below on most thermostats would correspond to a small accelerator, a device that is energised when the thermostat is calling for heat.
I know you are well aware, but just my thoughts on generic rectangular symbols...

As with a recent post about the Honeywell com901 'stat -
Screenshot_20230104-094725_Chrome.jpg
If a C/H circuit diagram includes a generic rectangular symbol, I will always treat it as "Here be dragons"! ;)

It is still the symbol for a resistor, and as nearly every load will show a resistance, no matter what the contents of the rectangle - technically it's not wrong!
 
Indeed, that crossed my mind too, but I dismissed it because:

1) When the symbol is used to represent the heating load; a single N terminal / connection is shown as being external from the thermostat as per the example you posted.

1.jpg


(An exception may be where there are two Neutral wires shown at the thermostat, one from the supply, and one out to the heating load.)

2) The layout of the PRT2 diagram shows the symbol as being inside the thermostat terminals with the switching contact (i.e. above the terminals)...

2.JPG


....and not an external device connected to the opposite side (i.e. below the terminals) as per the Honeywell.

3) A heating load wouldn't be connected to the thermostat live (TL), if it was the heating would be permanently on.
 

DIYnot Local

Staff member

If you need to find a tradesperson to get your job done, please try our local search below, or if you are doing it yourself you can find suppliers local to you.

Select the supplier or trade you require, enter your location to begin your search.


Are you a trade or supplier? You can create your listing free at DIYnot Local

 
Sponsored Links
Back
Top