radiator swap but unsure of trv and lockshield sizes

Joined
19 Feb 2024
Messages
4
Reaction score
0
Country
United Kingdom
Hi, I'm hoping someone can help point me in the right direction please. Struggling a bit financially at the moment and that's why I'm trying to do this myself, I have no experience of plumbing but mechanically minded, sorry for silly questions. I had it in my mind how to carry this out but I saw a post that I now can not find that was similar but they were told they would have to cut the pipes for some reason - if it involves this I'll just wait to save for a professional plumber! Have a 600x700 single panel compact radiator in bathroom of bungalow property and gravity fed system and looking to replace with similar due to the radiator corroding - appears to have done this due to condensation over the years. It's an old property, 1830's at one section and a newer section presumably done in the last 20 years where this radiator is. The property itself I would say has had a number of non-standard things done when unearthed so this may be one.

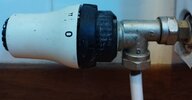
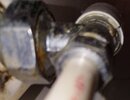
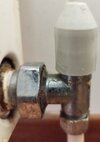
As far as I can see, the pipes routing the CH are 10mm on both the trv side and lockshield side, yet appear to be 15mm elsewhere in house. The TRV is oriented horizontally and is like that throughout the house. I think what is in place is a 15mm TRV and 15mm lockshield but I'm not sure, from underneath the TRV side it looks like a mecahnical reducer inserted but it doesn't look the same to me on the right at the lockshield so wasn't sure if I need a 10mm lockshield valve...wondering if anyone knew? I also am unsure about what's going on with the radiator tail on the trv side - it has a place a spanner could hold as well as the nut of the trv (unsure if this is an extra spacer I need to buy?)... I've included pics. If it helps work out what sizes then the bottom of the trv nuts are either 24mm or 25mm with the radiator tail nut 16mm on the trv side, the lockshield has a 17mm nut underneath and I believe a 30mm nut connecting to radiator.


Presuming if I get the right parts then I just have to bung the expansion, achieve vacuum, undo everything whilst catching spillage, cutting olive, getting new compression fittings with their olives and reducing sections and installing (possibly using jointing compound for olives and ptfe for tails), adding inhibitor and undoing bungs, allow to fill and bleed? I was planning to buy some pushfit stop ends in the event that I encounter some issue and hopefully that will leave the heating system operational. Thanks in advance for any help that can be given!
 

Attachments

  • rad1.jpg
    rad1.jpg
    133.6 KB · Views: 41
  • rad2.jpg
    rad2.jpg
    237.6 KB · Views: 33
  • rad3.jpg
    rad3.jpg
    248.5 KB · Views: 32
  • rad4.jpg
    rad4.jpg
    157.1 KB · Views: 33
Sponsored Links
The photographs are not clear enough to be certain, but if rad3.jpg is the lock-shield valve, that looks like a 15 mm pipe going into it.
However, if you are able to keep the existing valves, you don't need to worry about the sizes. What you could do is:

1. Close the TRV and lock-shield. Count the number of 1/8 turns to close lockshield so that it can be opened to the same point t restore system balance.
2. Plenty of old towels and a shallow tray.
3. Slacken one or both nuts connecting the valve to the radiator. NOT the ones holding the valves to the pipework.
4. Open the radiator bleed point and allow the water to drain out. Re-tighten bleed point.
5. Undo the slackened nuts completely and remove the radiator. It is likely to have dirty water remaining, so invert it as soon as possible.
6. Remove the tails from the old radiator. You will need a special spanner such as Screwfix item 11467 to do this. Make sure they go back into the same ends of the new radiator.
7. Screw the blanking plug and bleed nipple (which should come with the new radiator) into the top of the new radiator. If they have rubber sealing rings you won't need PTFE tape, otherwise you will need it. Close the bleed nipple.
8. Clean the threads on the old tails, wrap in PTFE tape ( start with 15 turns in a direction which doesn't unwind as you screw them in) and screw them into the bottom of the new radiator. The last two or three threads should require a decent amount of force on the spanner. If not, remove, clean off the PTFE, re-wrap with 20 turns and try again.
9. Re-connect the valve to radiator nuts onto the re-fitted tails and tighten.
10. Open the lock-shield and TRV. Provided no leaks, bleed the radiator. If you have a combi or system boiler, you will probably need to top up the system pressure to its normal reading - usually around 1.3 bar. If you have a feed and expansion tank in the loft, the system should refill itself automatically.

The above depends on the new radiator being exactly the same size as the old one (width), and being the same distance off the wall as the old, give or take a few mm. As noted above you will need a radiator spanner and some PTFE tape. You will also need a suitable spanner to work on the valve nuts (adjustable spanner is probably best), and something like a set of grips to hold the body of each valve while undoing the nuts.
 
Edit - comprehensive reply as i type and posted

what the exact size of the radiator now and the exact size of the one replacing

if the new rad is the same size or smaller - then simple to do

I suspect you may have an imperial size radiator - I have changed a few in the house on 8mm microbore piping, and also in 2 cases had to build out the brackets to mount in exactly the same place - 95mm from wall as opposed to about 60ish

and used some extender radiator pipes - from toolstation - screwfix do them as well
Thanks for your help, the existing single panel compact radiator is 600mm wide by 700mm height and I was going to replace it with the same size. Currently the back of the radiator sits 20mm from the wall and the front being approx 80mm from the wall. I'm particularly confused about sizes of TRV and lockshield - I can see the TRV has a reducer and am presuming it's a 15mm with a reducer to 10mm but the lockshield side looks different to me but I have no experience in this field. Thank you
 
Sponsored Links
The photographs are not clear enough to be certain, but if rad3.jpg is the lock-shield valve, that looks like a 15 mm pipe going into it.
However, if you are able to keep the existing valves, you don't need to worry about the sizes. What you could do is:

1. Close the TRV and lock-shield. Count the number of 1/8 turns to close lockshield so that it can be opened to the same point t restore system balance.
2. Plenty of old towels and a shallow tray.
3. Slacken one or both nuts connecting the valve to the radiator. NOT the ones holding the valves to the pipework.
4. Open the radiator bleed point and allow the water to drain out. Re-tighten bleed point.
5. Undo the slackened nuts completely and remove the radiator. It is likely to have dirty water remaining, so invert it as soon as possible.
6. Remove the tails from the old radiator. You will need a special spanner such as Screwfix item 11467 to do this. Make sure they go back into the same ends of the new radiator.
7. Screw the blanking plug and bleed nipple (which should come with the new radiator) into the top of the new radiator. If they have rubber sealing rings you won't need PTFE tape, otherwise you will need it. Close the bleed nipple.
8. Clean the threads on the old tails, wrap in PTFE tape ( start with 15 turns in a direction which doesn't unwind as you screw them in) and screw them into the bottom of the new radiator. The last two or three threads should require a decent amount of force on the spanner. If not, remove, clean off the PTFE, re-wrap with 20 turns and try again.
9. Re-connect the valve to radiator nuts onto the re-fitted tails and tighten.
10. Open the lock-shield and TRV. Provided no leaks, bleed the radiator. If you have a combi or system boiler, you will probably need to top up the system pressure to its normal reading - usually around 1.3 bar. If you have a feed and expansion tank in the loft, the system should refill itself automatically.

The above depends on the new radiator being exactly the same size as the old one (width), and being the same distance off the wall as the old, give or take a few mm. As noted above you will need a radiator spanner and some PTFE tape. You will also need a suitable spanner to work on the valve nuts (adjustable spanner is probably best), and something like a set of grips to hold the body of each valve while undoing the nuts.
Didn't notice this reply first of all sorry, tht's exactly like i was thinking but I'm probably going to replace the TRV and lockshield valves as they are old and just going to fit new. I've measured the pipes again and they actually are 8mm - The coating (plastic?) is what threw me - the TRV side has a gap between the fittings and the pipe itself is definitely 8mm. On the lockshield side there's no way of seeing the pipe but it's got the same coating so I presume it's also 8mm with the plastic coating. Do you know how I can determine the size of the lockshield and trv in order to purchase the same? thank you so much! Rad3 is indeed the lockshield valve from underneath - sorry I couldn't get a great photo as it's beside the toilet and can't get it to focus.
 
1. If you are going to change the valves, you can't go with my suggestion at post #2
2. Unless you really know what you are doing, I'd advise you to drain down the system rather than "bunging" it.
3. If you have a "Feed and Expansion (F&E)" tank in the loft (small, roughly 4 gallon, 20 litre capacity):
3.1 Switch off the boiler
3.2 Shut off the supply to the F&E, either valve if fitted or tie up the float valve.
3.3 Empty the water in the F&E into bucket(s) and pour away down a foul drain.
3.4 Clean the F&E to make sure there is no muck in it, or that muck will get washed into the system.
4. Obtain new valves:
4.1 If TRV feed is 10 mm, also get 15 to 10 adaptor, e.g. Screwfix item 70435.
4.2 Lock-shield looks as if it could be fed with 15 mm plastic pipe. If so, make sure the insert in the pipe is kept in place.
4.3 If lock-shield feed is 10 mm, get another adaptor as above.
5. With the boiler off and any motorised valves in the manually opened position, drain down the system to just below the level of the radiator you are working on.
6. Remove old radiator with its old valves.
7. Measure up and fix brackets for new radiator.
8. Fit new valve tails, blanking plug and bleed point as post#2 points 7 and 8.
9. Hang new radiator and connect new valves to radiator and pipework.
10. Refill system, check for leaks.
11. When happy, shut off supply to F&E again, drain off to leave F&E empty then drain out another 5 litres. Add 1 litre of inhibitor such as Sentinel X100. Refill system again.
spot on, really appreciate the detail - thank you. I don't know what I'm doing really but understand the bunging process but lets face it - whatever I do will not be quick so better safe than sorry and to be fair it'll be good to clean up the f&e. Thanks a lot for all your help, cheers!
 

DIYnot Local

Staff member

If you need to find a tradesperson to get your job done, please try our local search below, or if you are doing it yourself you can find suppliers local to you.

Select the supplier or trade you require, enter your location to begin your search.


Are you a trade or supplier? You can create your listing free at DIYnot Local

 
Back
Top