removing radiator tails

Joined
3 Mar 2012
Messages
5
Reaction score
0
Country
United Kingdom
A newbie question here...

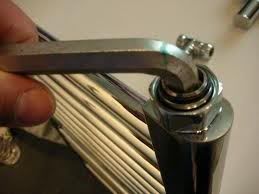
I have some old rads with tails and valves that look extremely similar to what's shown in this photo: http://tinyurl.com/8aa9bvj i.e. there is a standard 15mm compression joint onto the pipe, but the connection to the radiator tail is rather larger, I think 3/4".

I want to replace these with TRVs (Screwfix item 32130, http://tinyurl.com/7se3e7p), that have the same 15mm compression connections onto the tail as they have onto the pipe. So they definitely won't work with the existing tails, but they are supplied with their own tails, and it looks like these new tails will fit the radiator.

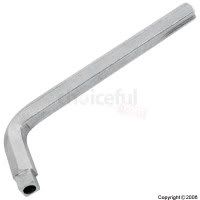
So it looks like all should be fine provided that I can remove the old tails. The question is how. The radiators are old enough that it is likely to need some force. Although the new tails include a square nut section, the existing tails have only a circular outer diameter (again, just like the one shown in the first link).

A suggestion I've seen (if I understand it right) is as follows: tighten the tail's cap nut hard onto the valve, then remove the valve from the pipe, and then continue to turn the cap nut as if to tighten the tail onto the valve (except that the valve is now free to rotate) and this will undo the tail from the radiator.

It seems sensible, but: (a) will it work, and (b) is it non-destructive?

The reason I ask about nondestructive is that if it all goes wrong with the TRV (e.g. the spacings aren't right and there isn't enough give in the pipe) then I'd like to keep the option of putting everything back how it was. If I tighten that joint from the old tail onto the old valve enough to get enough grip on the tail to unscrew it from the rad, am I likely to damage the joint worse than can be fixed by fitting a new 3/4" olive?

Alternatively, is there any other way of getting the old tail off?

Many thanks.
 
Sponsored Links
Get a proper allen key that'll fit the tails and undo them.

61618_m.jpg
 
Get a proper allen key that'll fit the tails and undo them.

Thanks, but I don't see how that can be used. The bleed valve and the blanking plug look like they are designed to be removed with one of those allen keys. But the tail pipes feeding the radiator would appear to have circular internal cross section (at least if the new ones are anything to go by). I haven't yet drained down to look inside the old ones, but I can't imagine them narrowing down inside to fit the allen key, because it would restrict the flow. Am I missing something here?

Thanks.
 
Sponsored Links
Okay, thanks very much for your help.

Only trouble is, it's 3/4".

I've now discovered this other topic: //www.diynot.com/forums/viewtopic.php?t=190656

The original poster in that topic said he broke one of those allen keys trying to remove a 3/4" tail. There seem to be a few different followup suggestions made by different people, so I've sent him a message to ask what he did in the end.
 
If you dont have an allen key or rad spanner that fits.

Drain and undo bottom nut so pipe is no longer in valve . Then using 2 pairs of grips(or stillies) ,one holding the valve the other on the big nut. Tighten the big nut as much as it will go against the valve this will then turn the thread out of the rad
 
Drain and undo bottom nut so pipe is no longer in valve . Then using 2 pairs of grips(or stillies) ,one holding the valve the other on the big nut. Tighten the big nut as much as it will go against the valve this will then turn the thread out of the rad

Thanks - I this sounds like the same as I was trying to describe. Per my original question, do you know from experience whether this is effective, and also whether tightening it that much will damage the joint from the tail onto the valve (which I'd prefer not to for reasons outlined above)?

It's beginning to sound like I should drain down to have a look what's inside, then if the tails have a proper hex inside then get a proper allen key (not expensive) ensuring it fits 3/4", but if it's those nibbed ones as described in the other topic then maybe resort to this method rather than fork out for a step wrench. Does this sound reasonable?
 
no it wont damage anything,
Experience yes have done it countless times .
If you find new ones are a bit tight for space then you can cut the tails slightly (1/4 of an inch) to give you a bit of additional room
 
I got a Monument step wrench, and was going to take the rad off, lie it on the floor, heat up the tail with propane lamp, and use my longest socket handle.

However I found an easier solution was to sell the house.
 
Hello all,

Many thanks to all for your hints and tips. Sorry for delay in responding: I was waiting until I'd done the job. I can now report back, in the hope that it might be useful to someone.

I first tried to remove the tail by the overtighten-onto-the-valve method. Even when I'd done it up quite hard (with stillsons) and then tried turning the nut with the valve free to rotate, the nut still just turned against the tail rather than unscrewing it from the rad. I then tried tightening it even harder, and this succeeded in starting to split the nut, but still didn't get the tail out.

I then tried to use a proper tool. As per the topic linked above, the tail had a couple of ribs running along the inside rather than a hex. The step wrench from Screwfix mentioned in that topic was no good as the grooves in it were the wrong shape - a bit too V-shaped, they would have needed to be more U-shaped for a good fit - so it just started shearing metal off the inside. (Fortunately it didn't damage the tool itself, so I got that refunded.) Another shop sold a radiator Allen key with grooves up the sides, but it didn't fit the hole.

At this stage, I removed some crud from around the join - that I should obviously have done before, though who's to say whether the other methods would have worked if I'd done it earlier. I then sawed the nut off and tried to unscrew the tail with a stillson. The outside of the tail was circular so there was nothing for the stillson to grip against, so even when done up quite tight it just slipped round. Finally I drilled laterally through the old tail, so as to insert a large screw or nail (the piece of metal I actually used was a bit nondescript) so that the stillson would have something to grip against, and this time managed to unscrew the tail surprisingly easily.

All of this was on a radiator that really needed the valve changing because the old valve was knackered. I was also intending to put TRVs on all the other radiators, but decided it was becoming too much like hard work, and also risky because it involves destroying the old tail, and if it went wrong and I ended up having to replace a radiator then it would be a lot more hassle as the existing rads didn't seem to be standard sizes. So it seemed better just to leave the non-thermostatic valves that worked.
 
I think a blowtorch on the old tail would have made it easier to unscrew.
 
The heat would have to be put on the rad as oppossed to the tail and that would leave the rad looking lovely :rolleyes: .
 

DIYnot Local

Staff member

If you need to find a tradesperson to get your job done, please try our local search below, or if you are doing it yourself you can find suppliers local to you.

Select the supplier or trade you require, enter your location to begin your search.


Are you a trade or supplier? You can create your listing free at DIYnot Local

 
Sponsored Links
Back
Top