Rendering below DPC line

Joined
25 Mar 2022
Messages
6
Reaction score
0
Country
Ireland
I have a question that might or might not be relevant

An existing garage/shed had a small extension added to the back

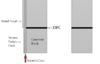
The original shed is rendered with a break at the DPC line where a 'step inwards' or 'recess' is formed. I would not call it a bell cast as it is more of a squared off finish rather than a curve.

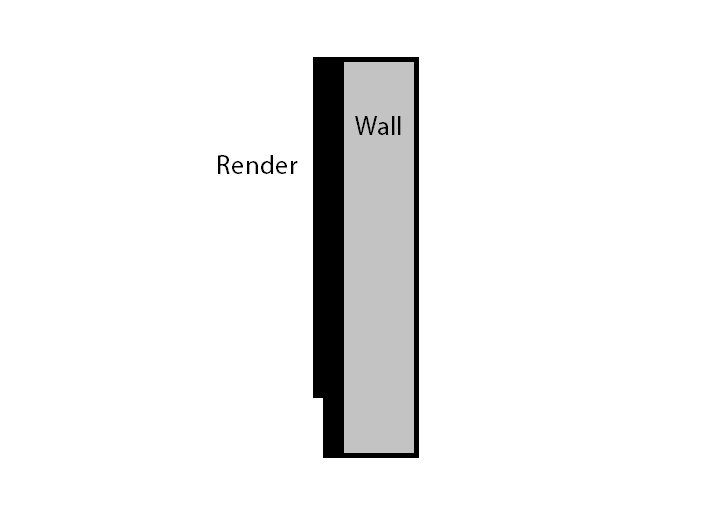
The plan is to match the new render into the old render along each side and then render across the back of the new part of the building

1648062353790-png.68837

sketch above.

I am assuming that I would do the following

1.20mm corner beads on the back corners and around openings
2.10mm thick Scratch coat the full distance down to ground level.
3.10mm Stop bead at DPC level placed in front of scratch coat
4.10mm Finish coat down to stop bead
5.Should the finish coat below the DPC line then be only 5mm thereby creating the step?

Does it need a scud before any of this is done? Not sure if I have the room for another coat

In any event, how deep should a recess be under the DPC line
 
Sponsored Links
you could either rake out the dpc line of your scratch coat while its still wet or place two render stop beads back to back at the dpc.
is this a cavity wall?
 
Sponsored Links
you could either rake out the dpc line of your scratch coat while its still wet or place two render stop beads back to back at the dpc.
is this a cavity wall?

Is the following an appropriate solution. You may see the fine white lines that indicate the stop beads back to back

Also the back wall is the wall that faces the vast majority of heavy rainfall. Would it be beneficial to have two scratch coats before the finish coat, or would loading with waterproofer be the best solution?

upload_2022-4-2_10-3-40.png
 

Attachments

  • upload_2022-4-2_10-2-54.png
    upload_2022-4-2_10-2-54.png
    10.5 KB · Views: 144
Another method is to Sit a a bell cast bead along the dpc so the water drips away, when you render underneath you can cut a line just under the bell cast bead to stop the water rising or you could sit a stop bead just under the bellcast , i have before just cut a line with an Ashlar tool to stop the render from bridging
 
Another method is to Sit a a bell cast bead along the dpc so the water drips away, when you render underneath you can cut a line just under the bell cast bead to stop the water rising or you could sit a stop bead just under the bellcast , i have before just cut a line with an Ashlar tool to stop the render from bridging

That's the way we always did it Steve, and still do. A bellcast bead fitted along the dpc, then the plinth was either cement rendered, or left as a facing brick plinth.
Fitting the bellcast bead along the dpc line, leaves a good sloping inch or more " below" the dpc, plus it's a really neat, waterproof finish.
I would not call it a bell cast as it is more of a squared off finish rather than a curve.

The plan is to match the new render into the old render
 
That's the way we always did it Steve, and still do. A bellcast bead fitted along the dpc, then the plinth was either cement rendered, or left as a facing brick plinth.
Fitting the bellcast bead along the dpc line, leaves a good sloping inch or more " below" the dpc, plus it's a really neat, waterproof finish.

Thanks for the information.

1.Would you be recommending scratch coat down to ground level behind a single coat the bellcast bead?

or

Would you recommend a two coat bellcast bead fixed directly to the substrate?

2.The finish I am aiming to match alongside is a a straight vertical render. Will the bellcast bead facilitate a straight finish? Does that depend on the depth to which I fix it?


Another method is to Sit a a bell cast bead along the dpc so the water drips away, when you render underneath you can cut a line just under the bell cast bead to stop the water rising or you could sit a stop bead just under the bellcast , i have before just cut a line with an Ashlar tool to stop the render from bridging

Is it necessary to cut a line in the scratch coat also, or just on the finish coat?
 
Both methods are ok as Steve says, but the bellcast, due to its shape, will not give you a "straight" downward finish at the bottom.
 
What is the best thickness ratio between scratch and finish coat?

10mm scratch approx and 10mm finish coat approx?

Also, if I get into difficulty with rain, is it OK to stop the scratch coat half way through the job, or am I best to continue. Is joining scratch coat good practice, or will the lines show through the finish coat? I presume if I was to stop the scratch mid-wall, that I would taper back the end where I stop and scratch over that the next day, rather than having a square butt end to end joint.

For the finish coat, I presume I will need to complete the job for each wall in one pass, to avoid joint lines in the finish coat. I will be painting over the finished render, but perhaps not until 2023.

I am concerned about fatigue also and might not have the stamina to complete a wall at once
 

DIYnot Local

Staff member

If you need to find a tradesperson to get your job done, please try our local search below, or if you are doing it yourself you can find suppliers local to you.

Select the supplier or trade you require, enter your location to begin your search.


Are you a trade or supplier? You can create your listing free at DIYnot Local

 
Sponsored Links
Back
Top